Getting started with managed.hopsworks.ai (Azure)#
This guide goes into detail for each of the steps of the cluster creation in managed.hopsworks.ai
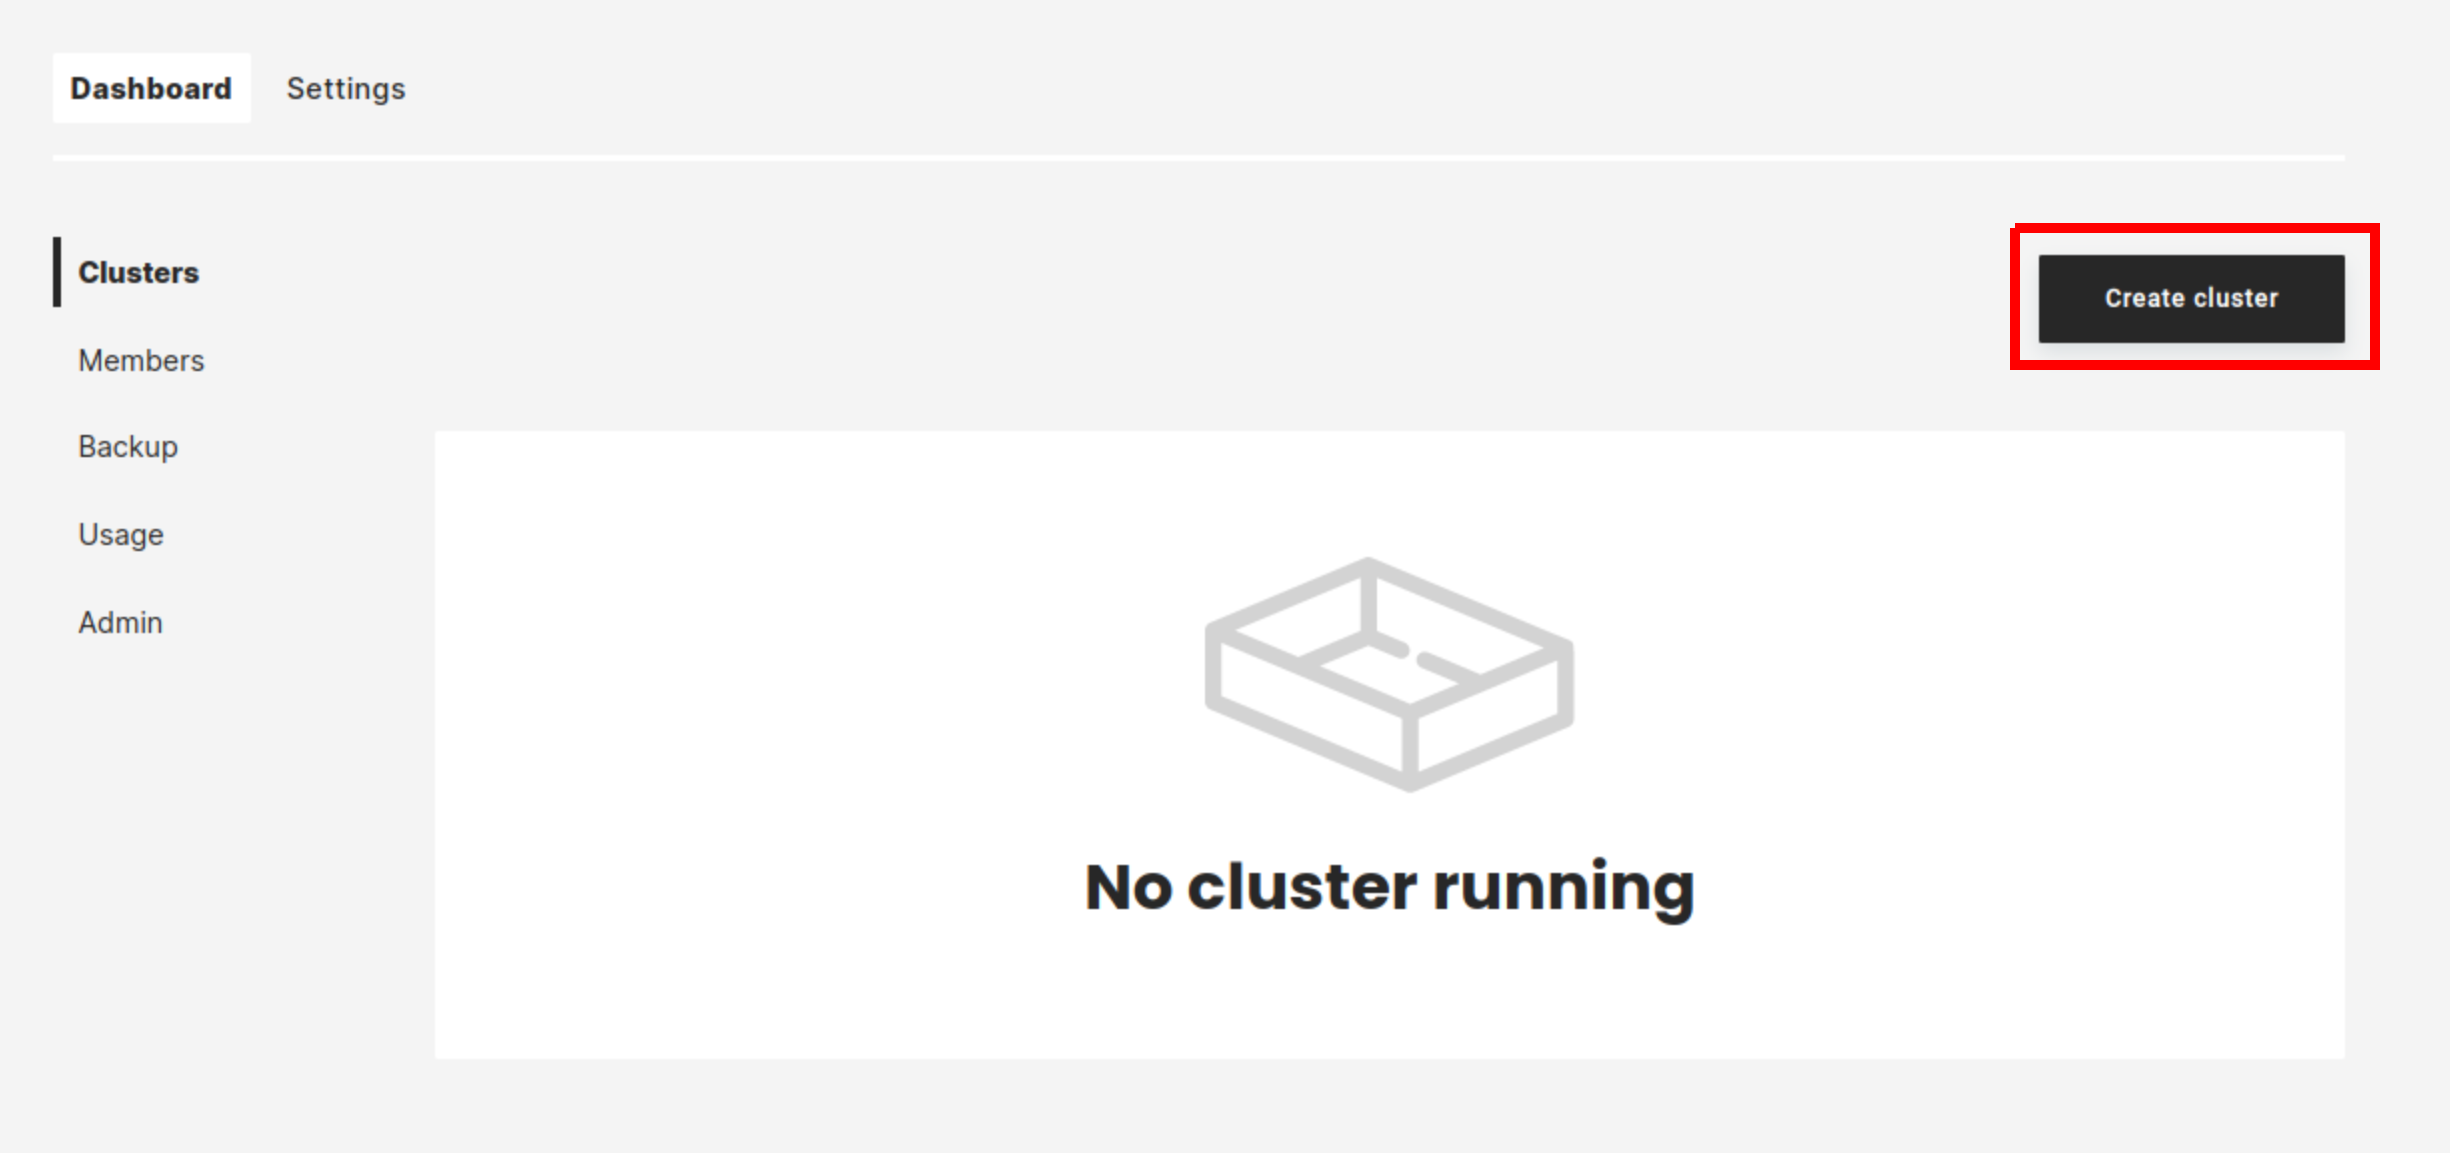
Step 1 starting to create a cluster#
In managed.hopsworks.ai, select Create cluster:
Step 2 setting the General information#
Select the Resource Group (1) you want to use.
Note
If the Resource Group does not appear in the drop-down, make sure that you properly created and set the custom role for this resource group.
Name your cluster (2). Your cluster will be deployed in the Location of your Resource Group (3).
Select the Instance type (4) and Local storage (5) size for the cluster Head node.
Optional (6): Enable customer-managed encryption keys and specify a disk encryption set to be used for encryption of local storage. The disk encryption set has to be specified using the format: /subscriptions/[SUBSCRIPTION_ID]/resourceGroups/[RESOURCE_GROUP]/providers/Microsoft.Compute/diskEncryptionSets/[DISK_ENCRYPTION_SET]. Note that you have to grant the service principal of managed.hopsworks.ai Reader access to the disk encryption set and Key Vault Reader and Key Vault Secrets User on the key vault used with the disk encryption set. Refer to the Azure documentation for more details: Server-side encryption of Azure Disk Storage.
To provide the capacity of adding and removing workers on demand, the Hopsworks clusters deployed by managed.hopsworks.ai store their data in an Azure storage container. In this step, you select which storage account and container to use for this purpose. Select the storage account (7) you want to use in Azure Storage account name. The name of the container in which the data will be stored is displayed in Azure Container name (8). You can change this name. For more details on how to create and configure a storage in Azure refer to Creating and configuring a storage
Note
You can choose to use a container already existing in your storage account by using the name of this container, but you need to first make sure that this container is empty.
Enter the Azure container registry name (9) to be used as the managed docker registry for the cluster.
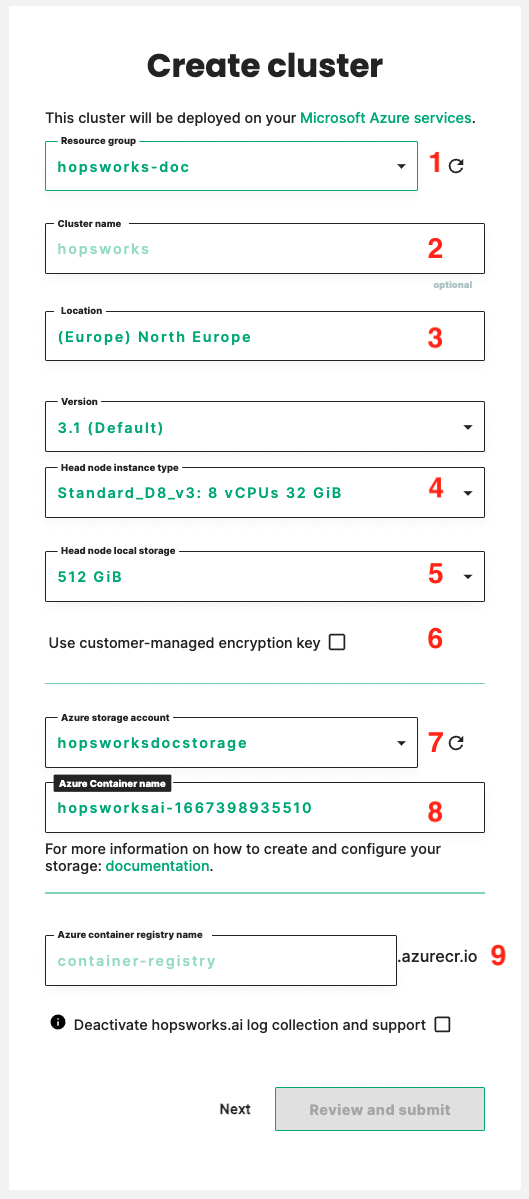
On this page, you can also choose to opt out of managed.hopsworks.ai log collection. Managed.hopsworks.ai collects logs about the services running in your cluster to help us improve our system and to provide support. If you choose to opt-out from the log collection and need support you will have to provide us the log by yourself, which will slow down the support process.
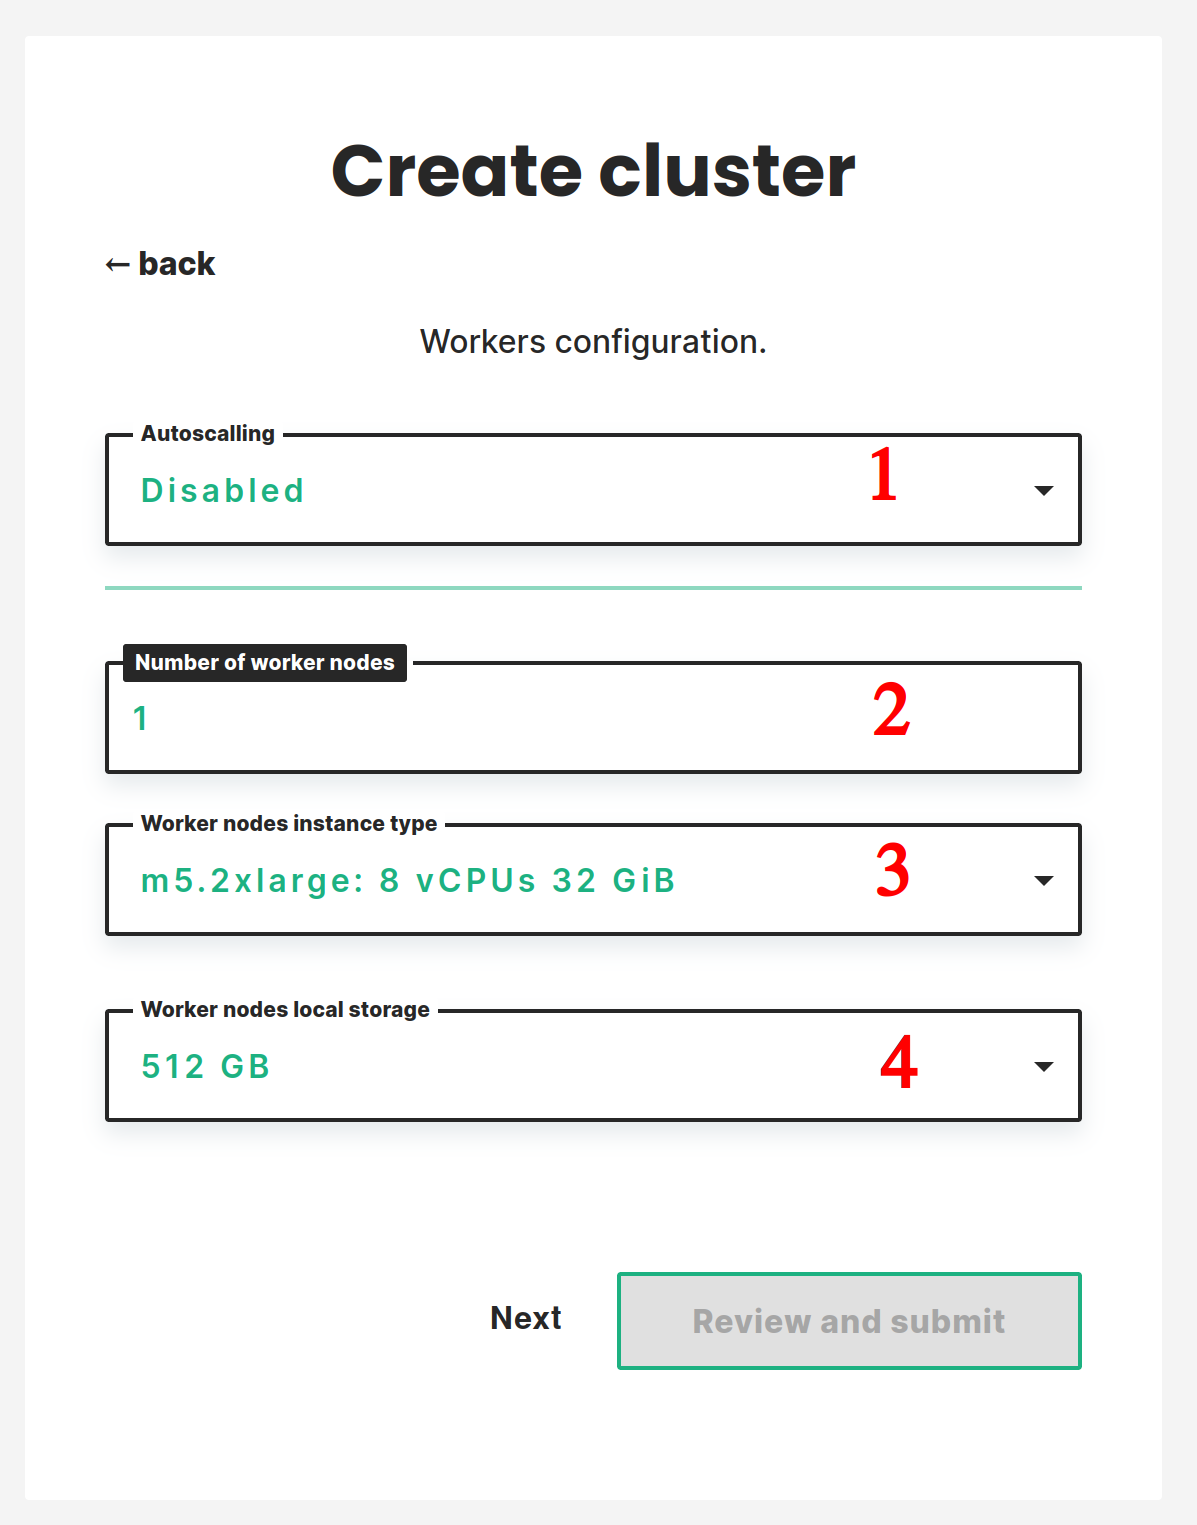
Step 3 workers configuration#
In this step, you configure the workers. There are two possible setups static or autoscaling. In the static setup, the cluster has a fixed number of workers that you decide. You can then add and remove workers manually, for more details: the documentation. In the autoscaling setup, you configure conditions to add and remove workers and the cluster will automatically add and remove workers depending on the demand.
Static workers configuration#
You can set the static configuration by selecting Disabled in the first drop-down (1). Then you select the number of workers you want to start the cluster with (2). And, select the Instance type (3) and Local storage size (4) for the worker nodes.
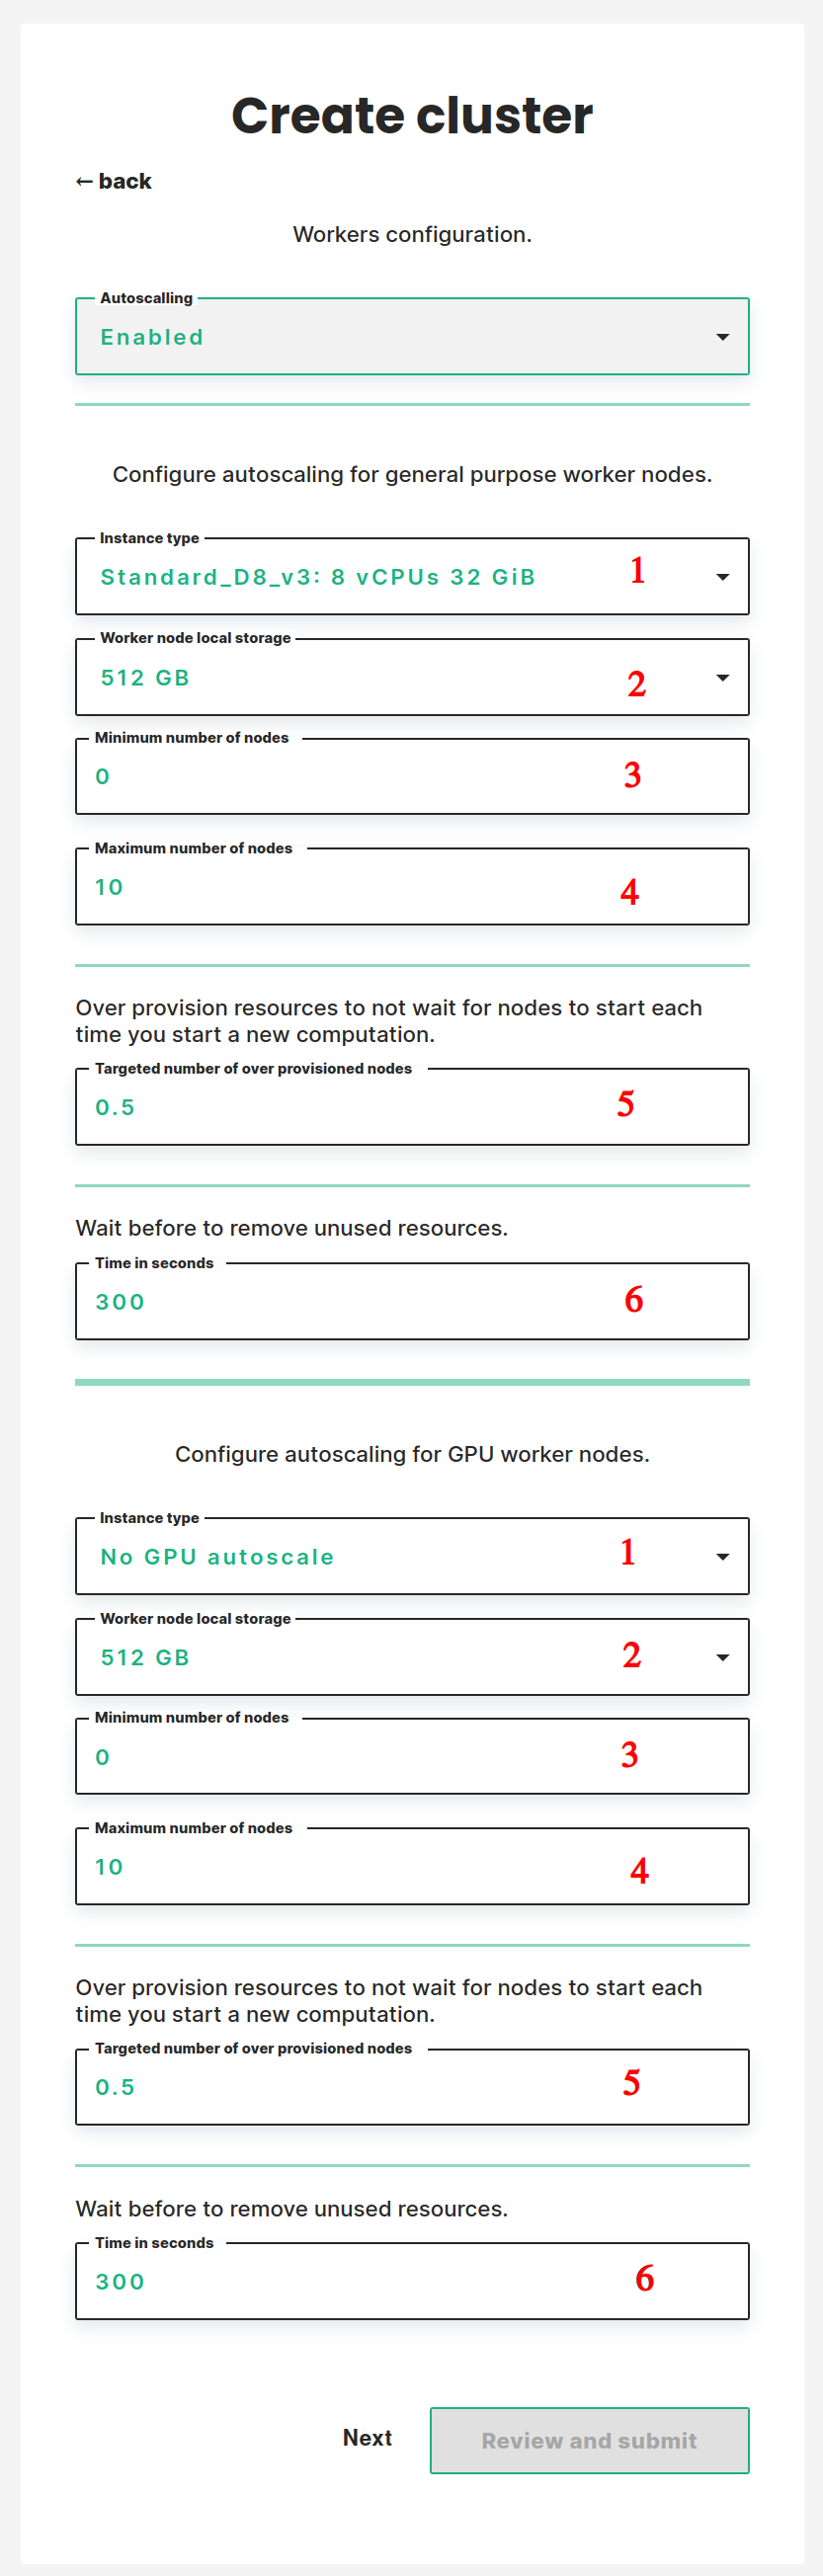
Autoscaling workers configuration#
You can set the autoscaling configuration by selecting enabled in the first drop-down (1). You then have access to a two parts form allowing you to configure the autoscaling. In the first part, you configure the autoscaling for general-purpose compute nodes. In the second part, you configure the autoscaling for nodes equipped with GPUs. In both parts you will have to set up the following:
- The instance type you want to use. You can decide to not enable the autoscaling for GPU nodes by selecting No GPU autoscale.
- The size of the instances' disk.
- The minimum number of workers.
- The maximum number of workers.
- The targeted number of standby workers. Setting some resources in standby ensures that there are always some free resources in your cluster. This ensures that requests for new resources are fulfilled promptly. You configure the standby by setting the amount of workers you want to be in standby. For example, if you set a value of 0.5 the system will start a new worker every time the aggregated free cluster resources drop below 50% of a worker's resources. If you set this value to 0 new workers will only be started when a job or notebook request the resources.
- The time to wait before removing unused resources. One often starts a new computation shortly after finishing the previous one. To avoid having to wait for workers to stop and start between each computation it is recommended to wait before shutting down workers. Here you set the amount of time in seconds resources need to be unused before they get removed from the system.
Note
The standby will not be taken into account if you set the minimum number of workers to 0 and no resources are used in the cluster. This ensures that the number of nodes can fall to 0 when no resources are used. The standby will start to take effect as soon as you start using resources.
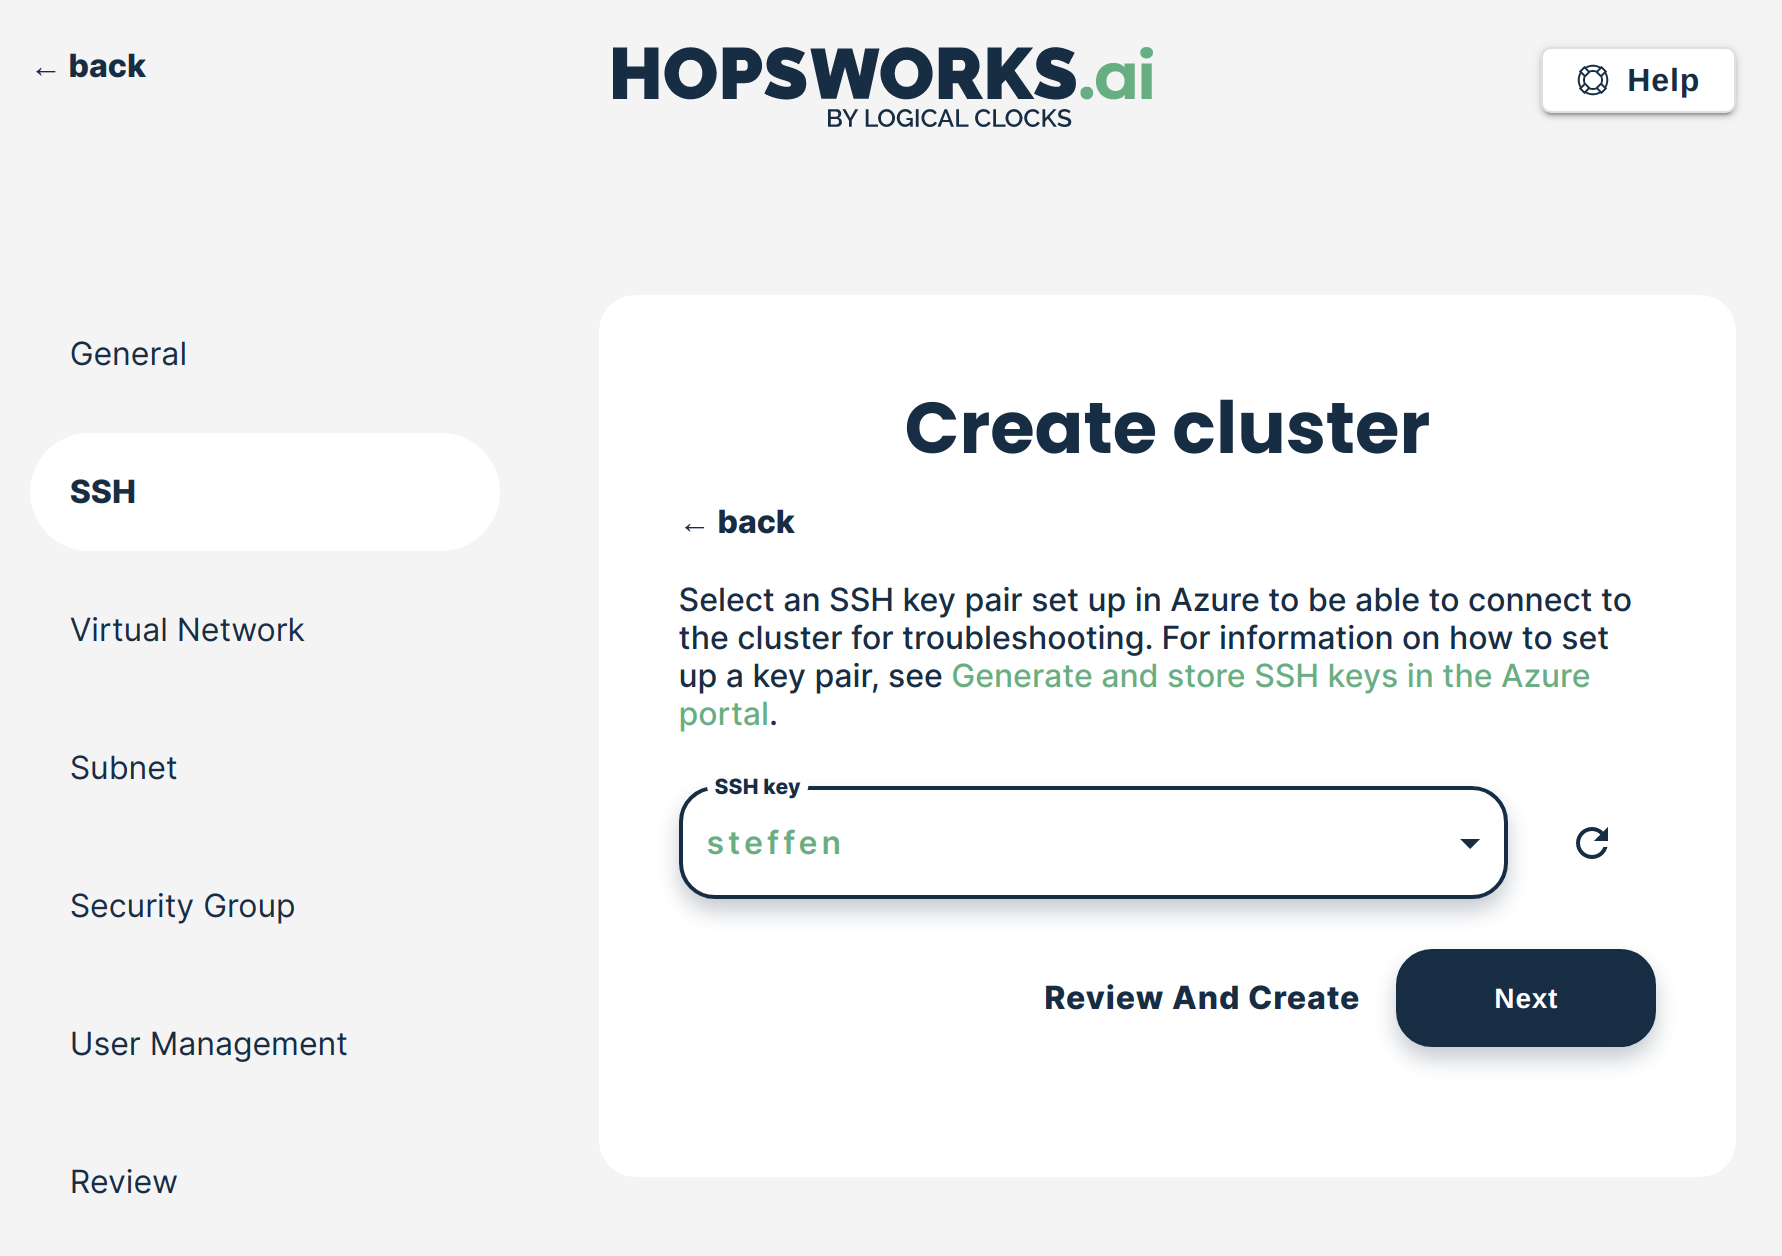
Step 4 select a SSH key#
When deploying clusters, managed.hopsworks.ai installs a ssh key on the cluster's instances so that you can access them if necessary. Select the SSH key that you want to use to access cluster instances. For more detail on how to add a shh key in Azure refer to Adding a ssh key to your resource group
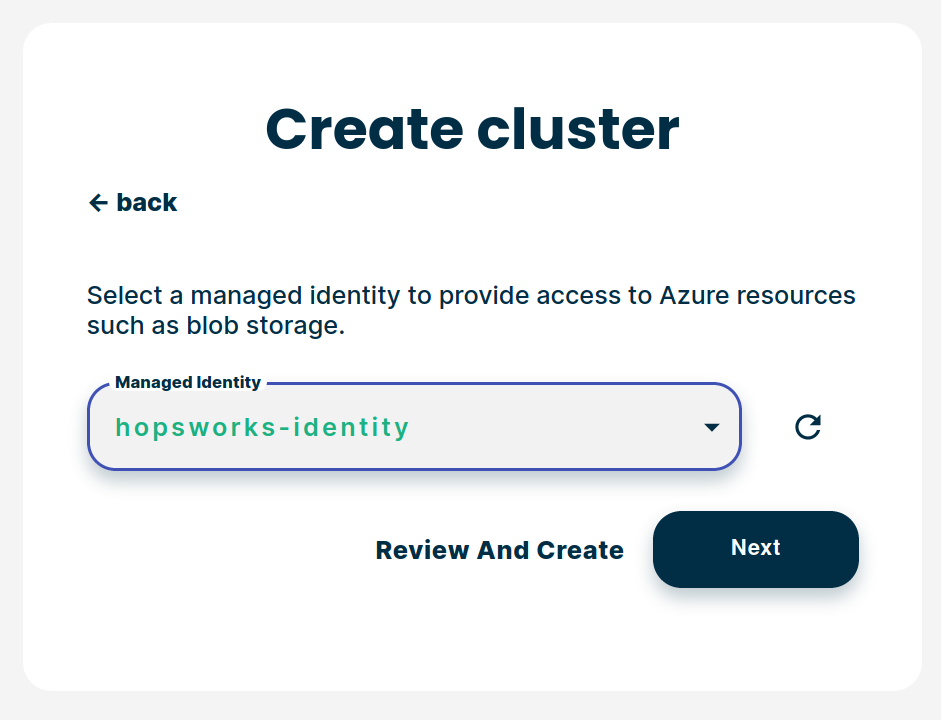
Step 5 select the User assigned managed identity:#
In order to let the cluster instances access to the Azure storage we need to attach a User assigned managed identity to the virtual machines. In this step you choose which identity to use. This identity need to have access right to the storage account you selected in Step 2. For more information about how to create this identity and give it access to the storage account refer to Creating and configuring a storage:
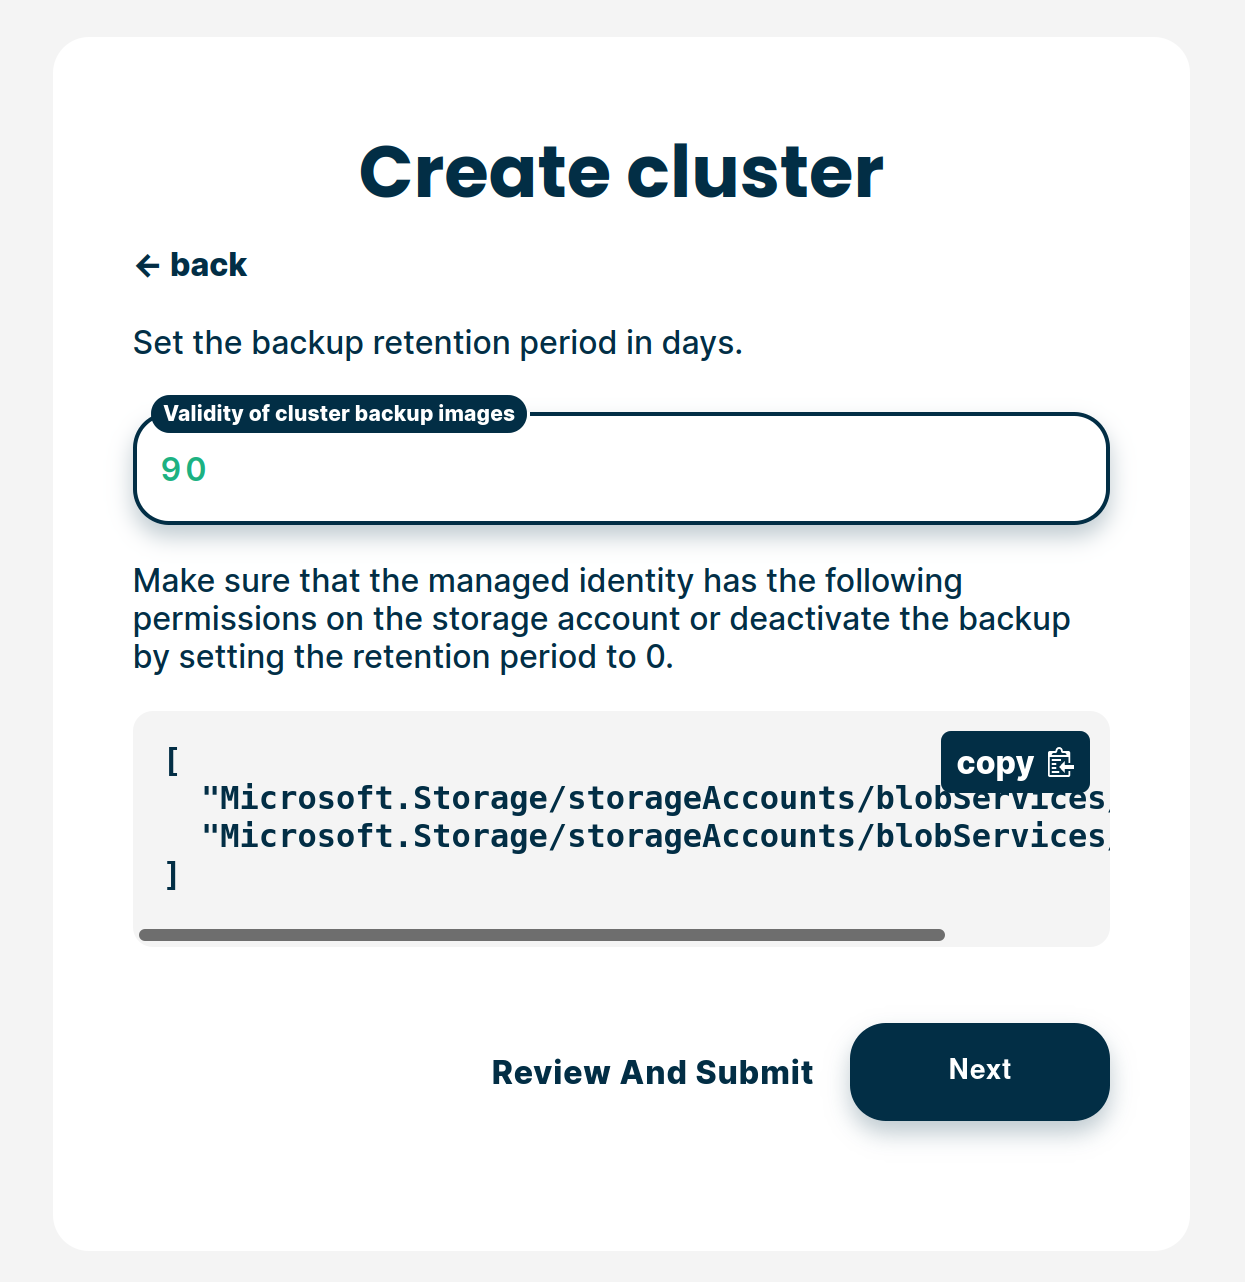
Step 6 set the backup retention policy:#
To backup the Azure blob storage data when taking a cluster backups we need to set a retention policy for the blob storage. In this step, you choose the retention period in days. You can deactivate the retention policy by setting this value to 0 but this will block you from taking any backup of your cluster.
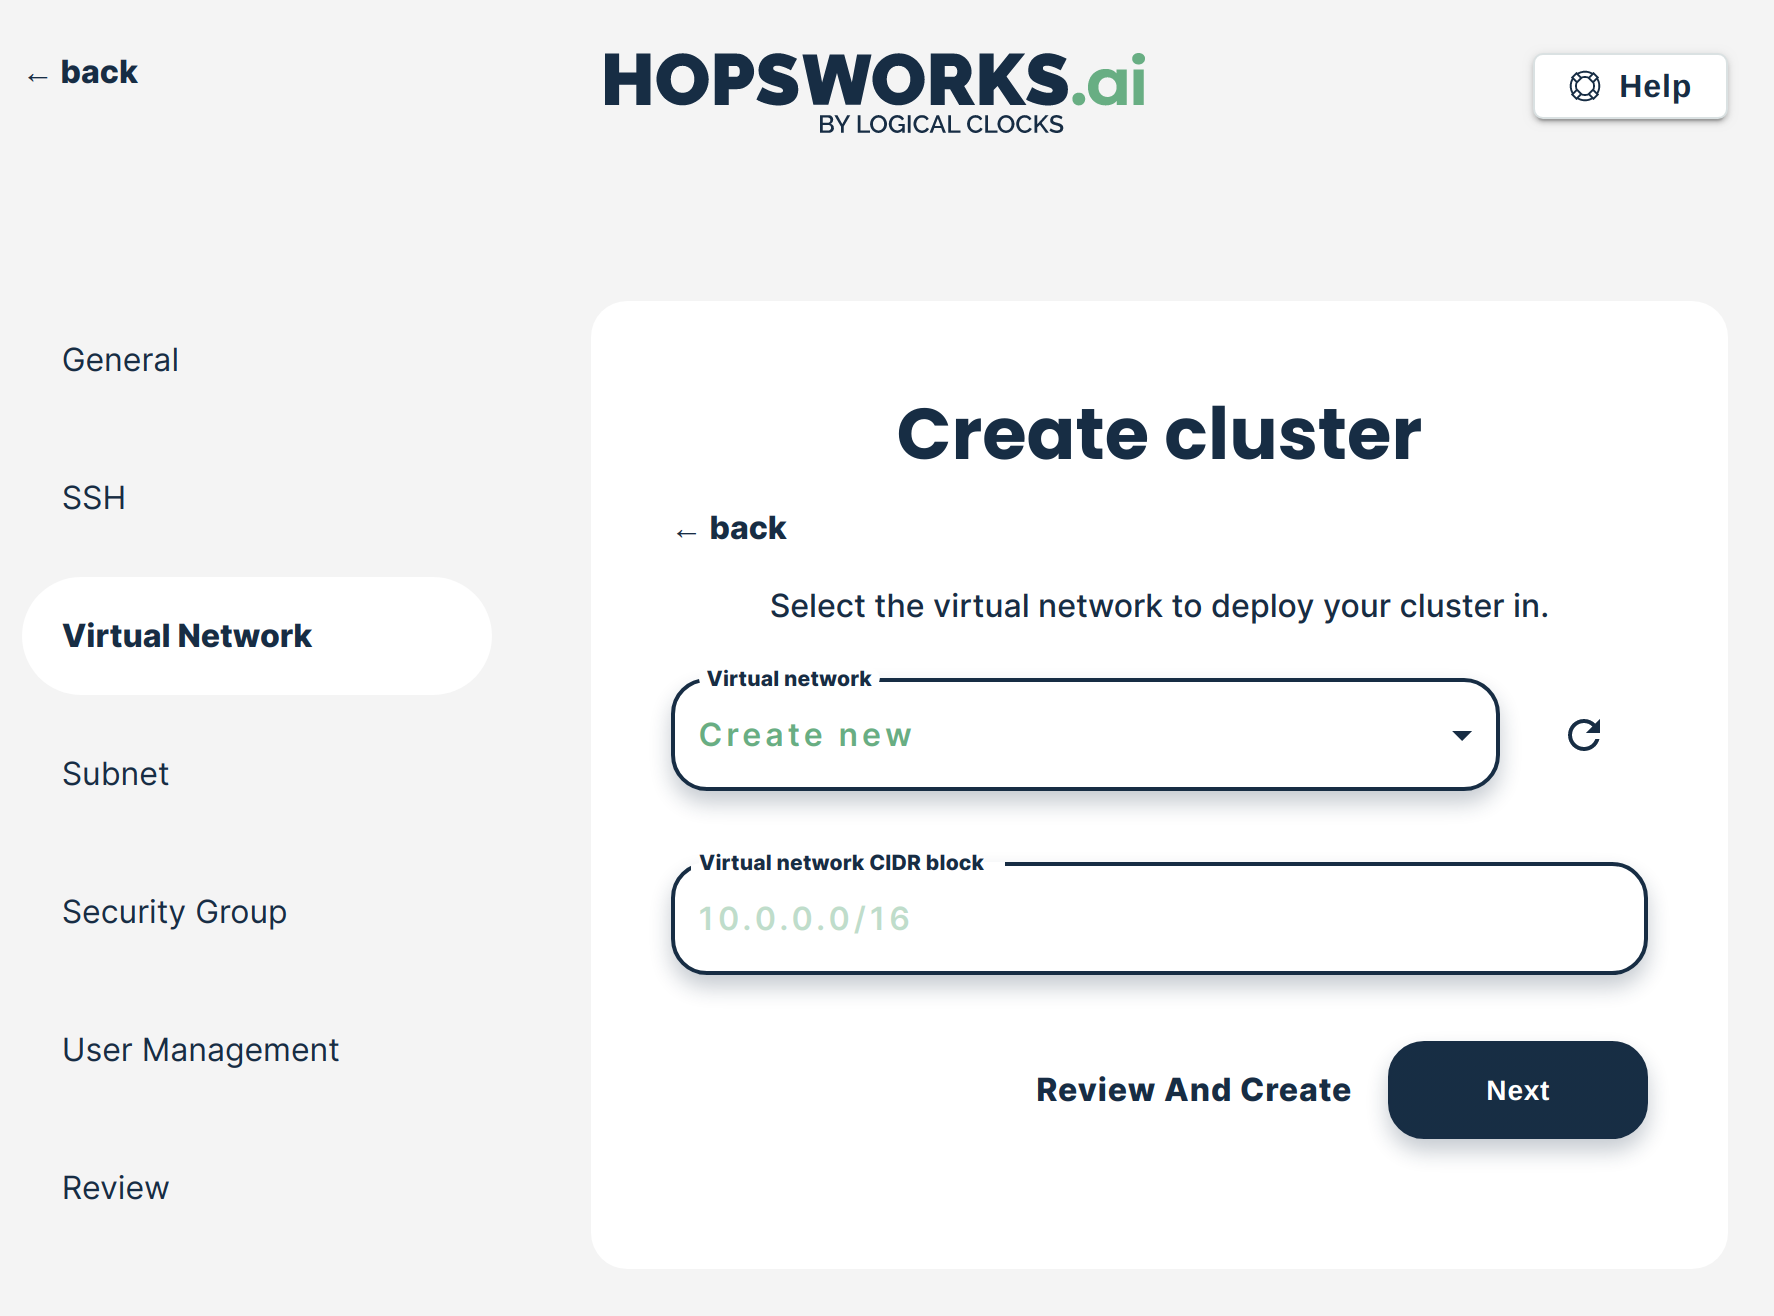
Step 7 Virtual network selection#
In this step, you can select the virtual network which will be used by the Hopsworks cluster. You can either select an existing virtual network or let managed.hopsworks.ai create one for you. If you decide to let managed.hopsworks.ai create the virtual network for you, you can choose the CIDR block for this virtual network. Refer to Create a virtual network and subnet for more details on how to create your own virtual network in Azure.
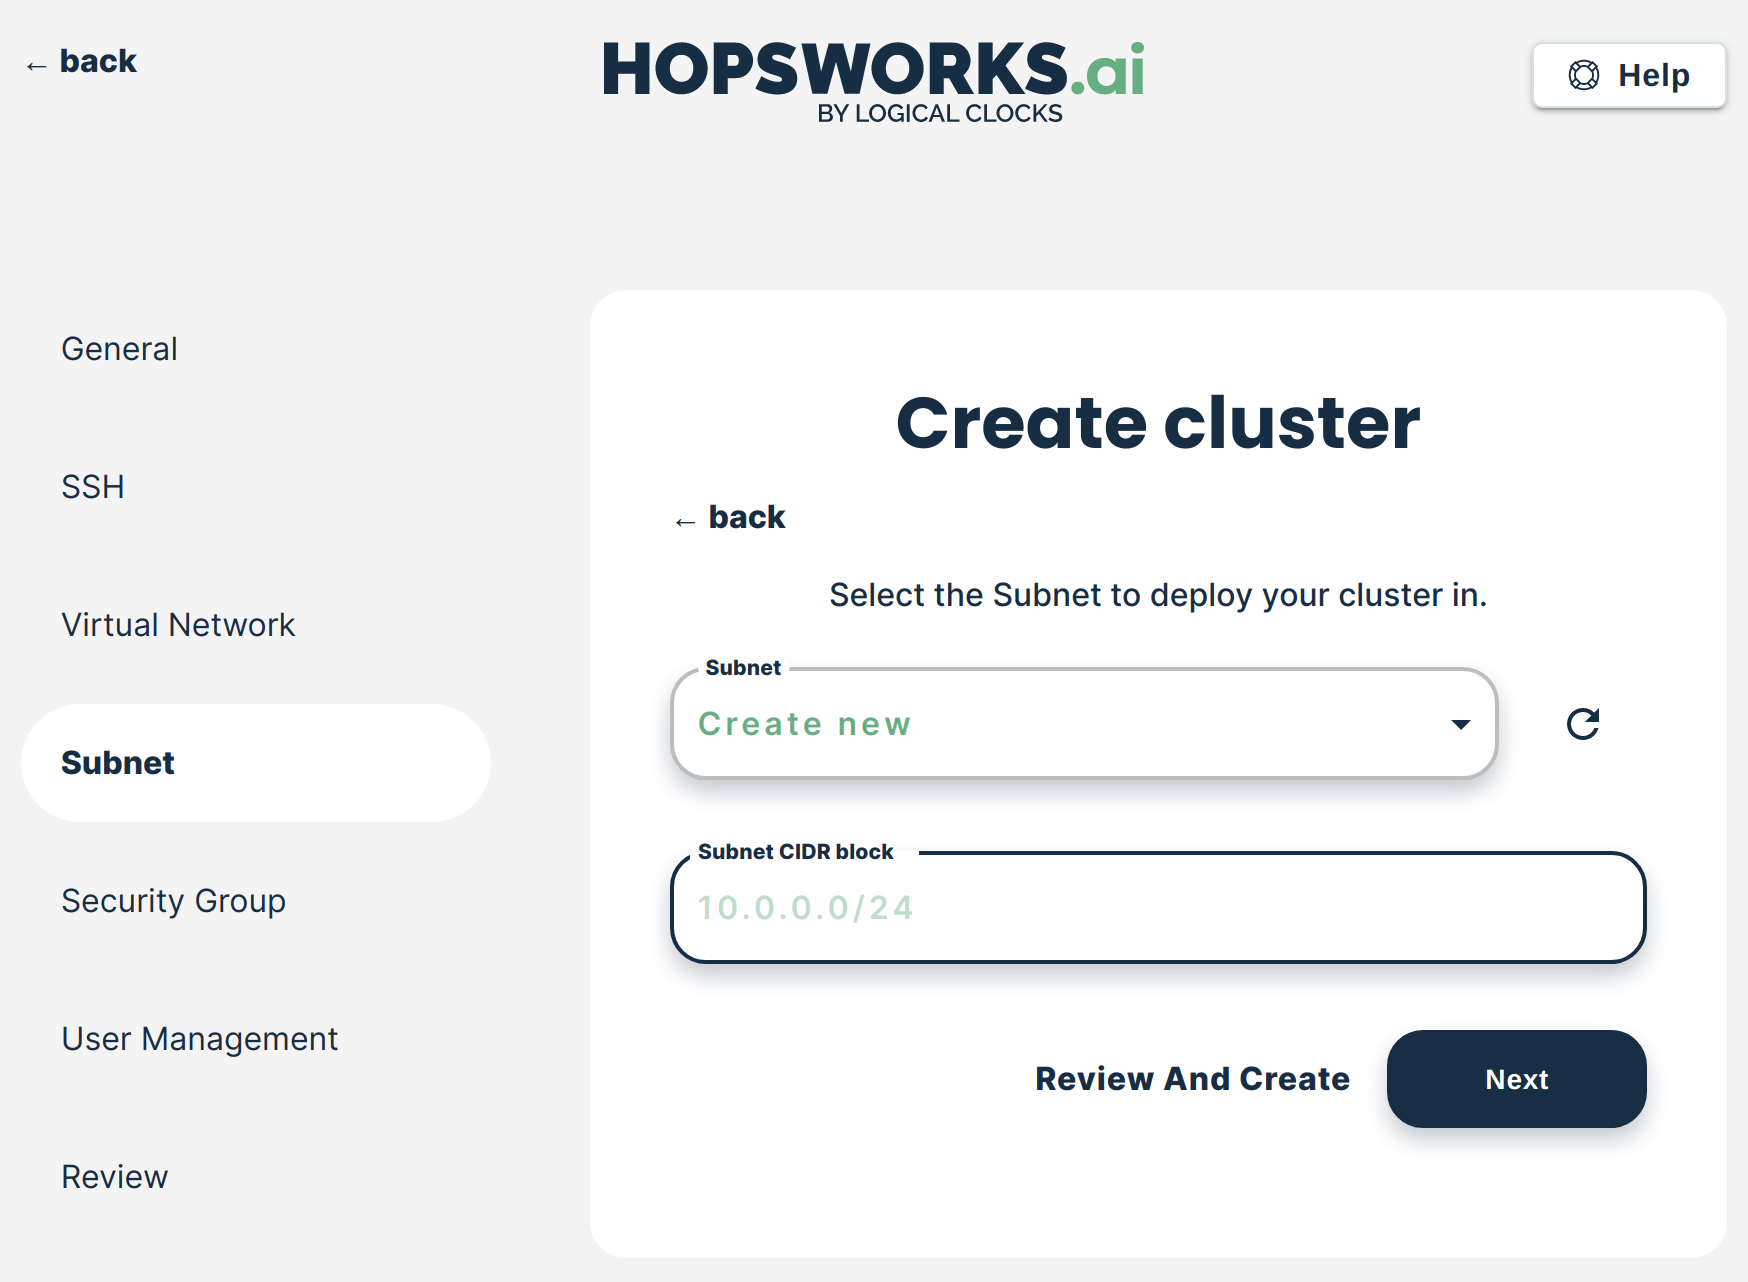
Step 8 Subnet selection#
If you selected an existing virtual network in the previous step, this step lets you select which subnet of this virtual network to use. For more information about creating your own subnet refer to Create a virtual network and subnet.
If you did not select an existing virtual network in the previous step managed.hopsworks.ai will create the subnet for you. You can choose the CIDR block this subnet will use.
Step 9 Network Security group selection#
In this step, you can select the network security group you want to use to manage the inbound and outbound network rules. You can either let managed.hopsworks.ai create a network security group for you or select an existing security group. For more information about how to create your own network security group in Azure refer to Create a network security group.
Note
Managed.hopsworks.ai require some rules for inbound and outbound traffic in your security group, for more details refer to inbound traffic rules and outbound traffic rules.
Note
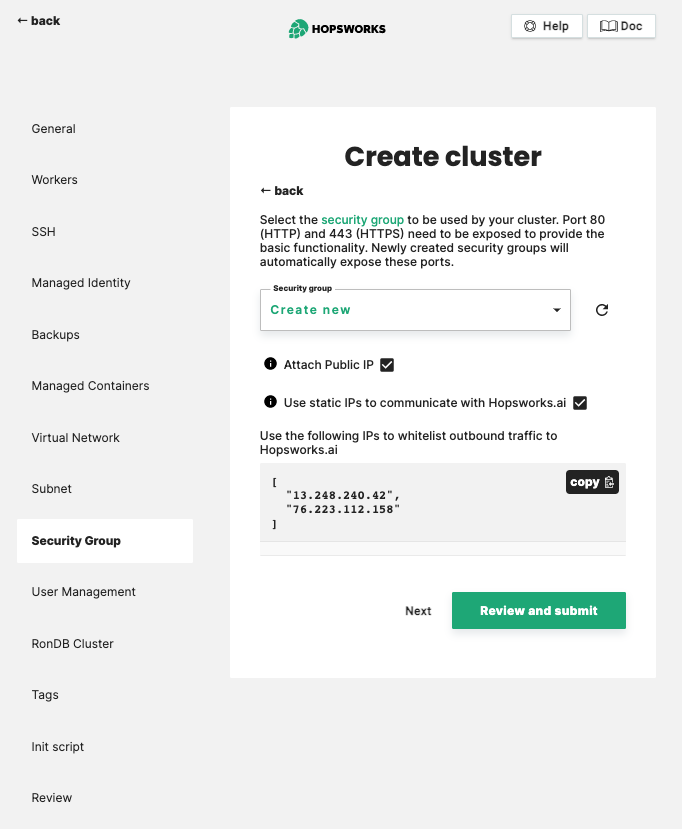
Managed.hopsworks.ai attaches a public ip to your cluster by default. However, you can disable this behavior by unchecking the Attach Public IP checkbox.
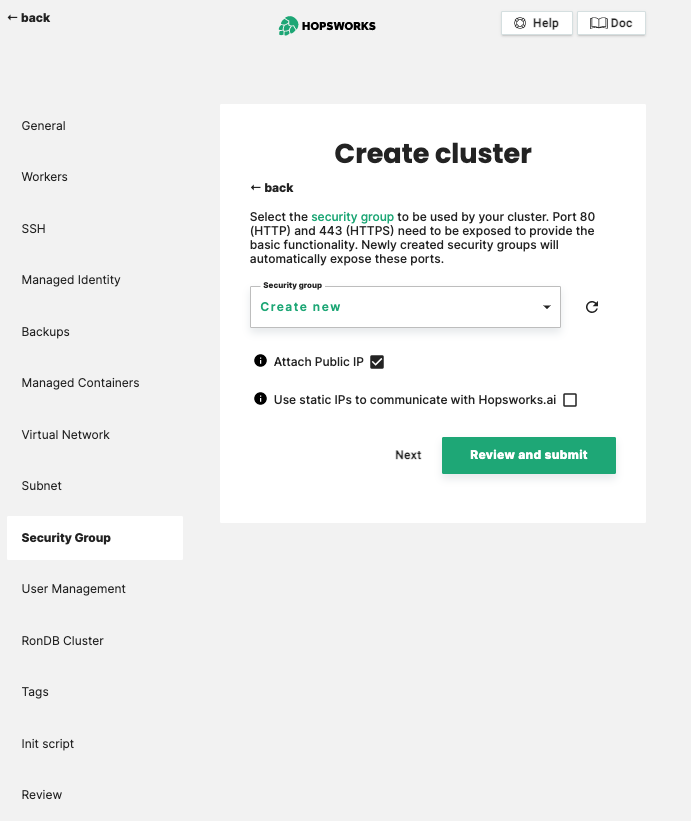
Limiting outbound traffic to managed.hopsworks.ai#
Clusters created on managed.hopsworks.ai need to be able to send http requests to api.hopsworks.ai. If you have strict regulation regarding outbound traffic, you can enable the Use static IPs to communicate with managed.hopsworks.ai checkbox to get the list of IPs to be allowed as shown below:
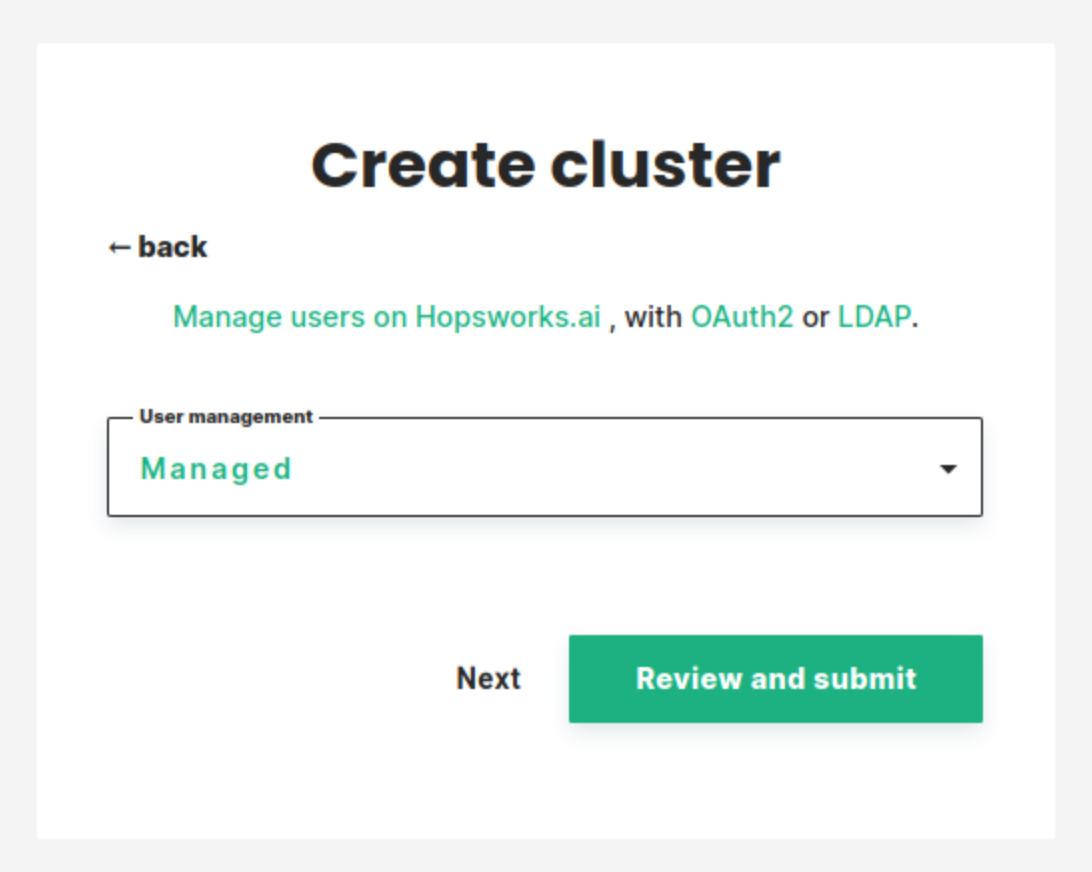
Step 10 User management selection#
In this step, you can choose which user management system to use. You have four choices:
- Managed: managed.hopsworks.ai automatically adds and removes users from the Hopsworks cluster when you add and remove users from your organization (more details here).
- OAuth2: integrate the cluster with your organization's OAuth2 identity provider. See Use OAuth2 for user management for more detail.
- LDAP: integrate the cluster with your organization's LDAP/ActiveDirectory server. See Use LDAP for user management for more detail.
- Disabled: let you manage users manually from within Hopsworks.
Step 12 Managed RonDB#
Hopsworks uses RonDB as a database engine for its online Feature Store. By default database will run on its own VM. Premium users can scale-out database services to multiple VMs to handle increased workload.
For details on how to configure RonDB check our guide here.
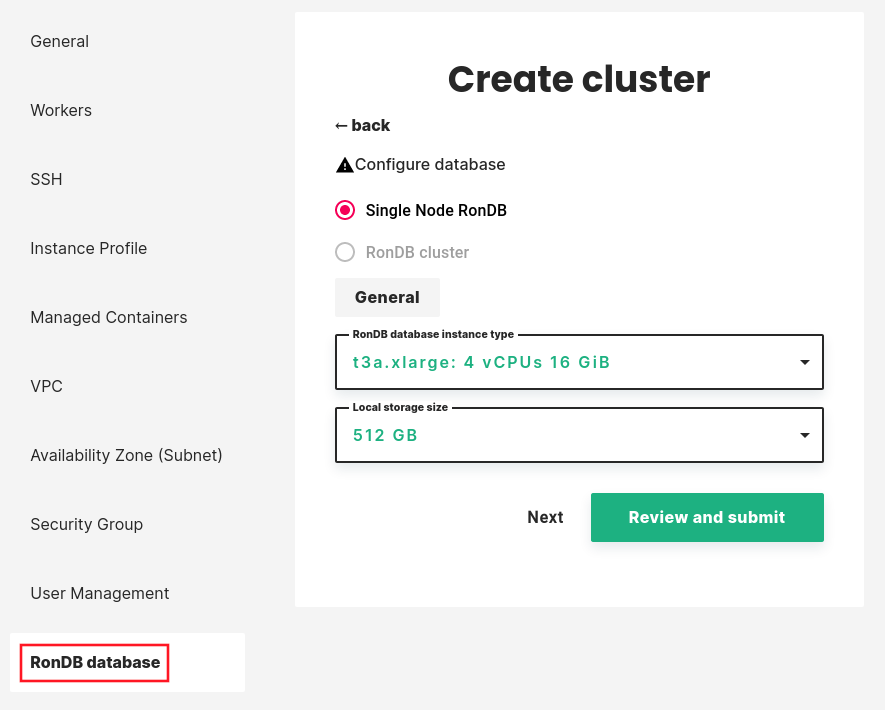
If you need to deploy a RonDB cluster instead of a single node please contact us.
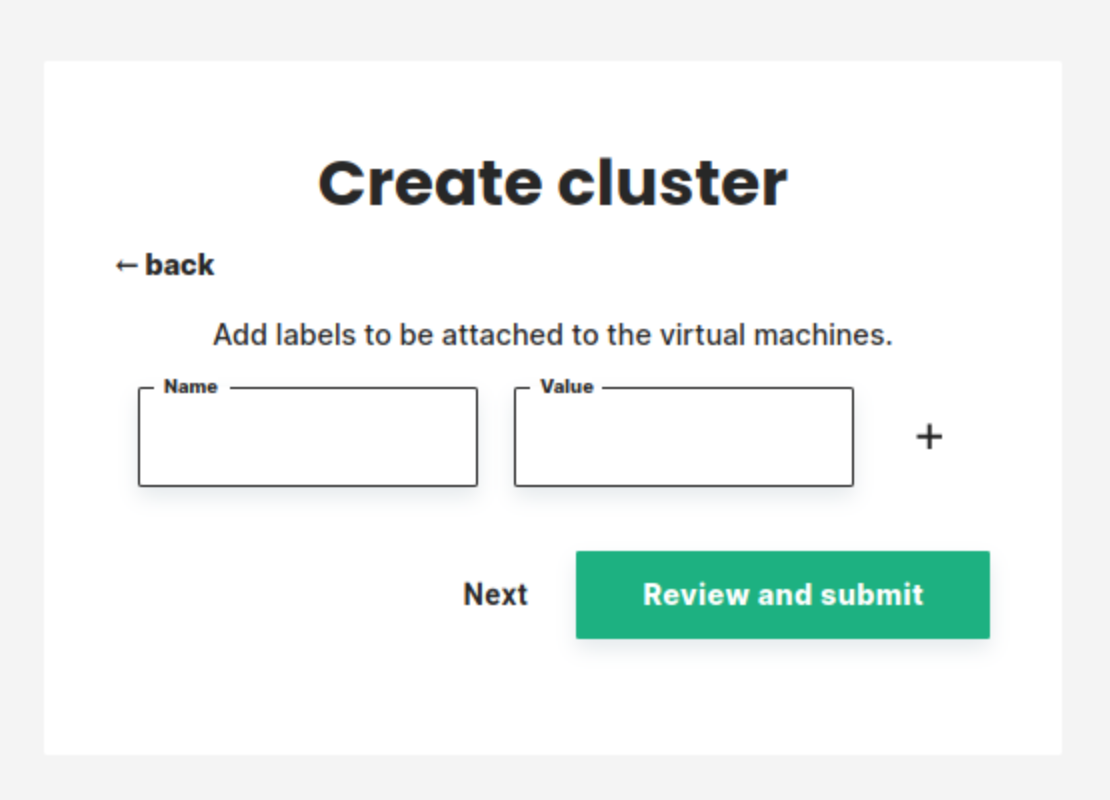
Step 13 add tags to your instances.#
In this step, you can define tags that will be added to the cluster virtual machines.
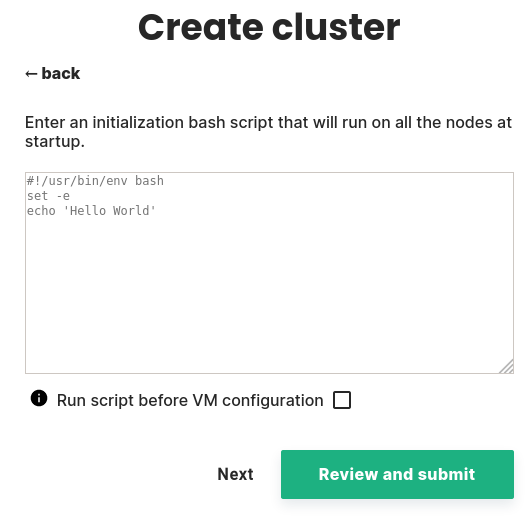
Step 14 add an init script to your instances.#
In this step, you can enter an initialization script that will be run at startup on every instance.
Note
this init script must be a bash script starting with #!/usr/bin/env bash
Step 15 Review and create#
Review all information and select Create:

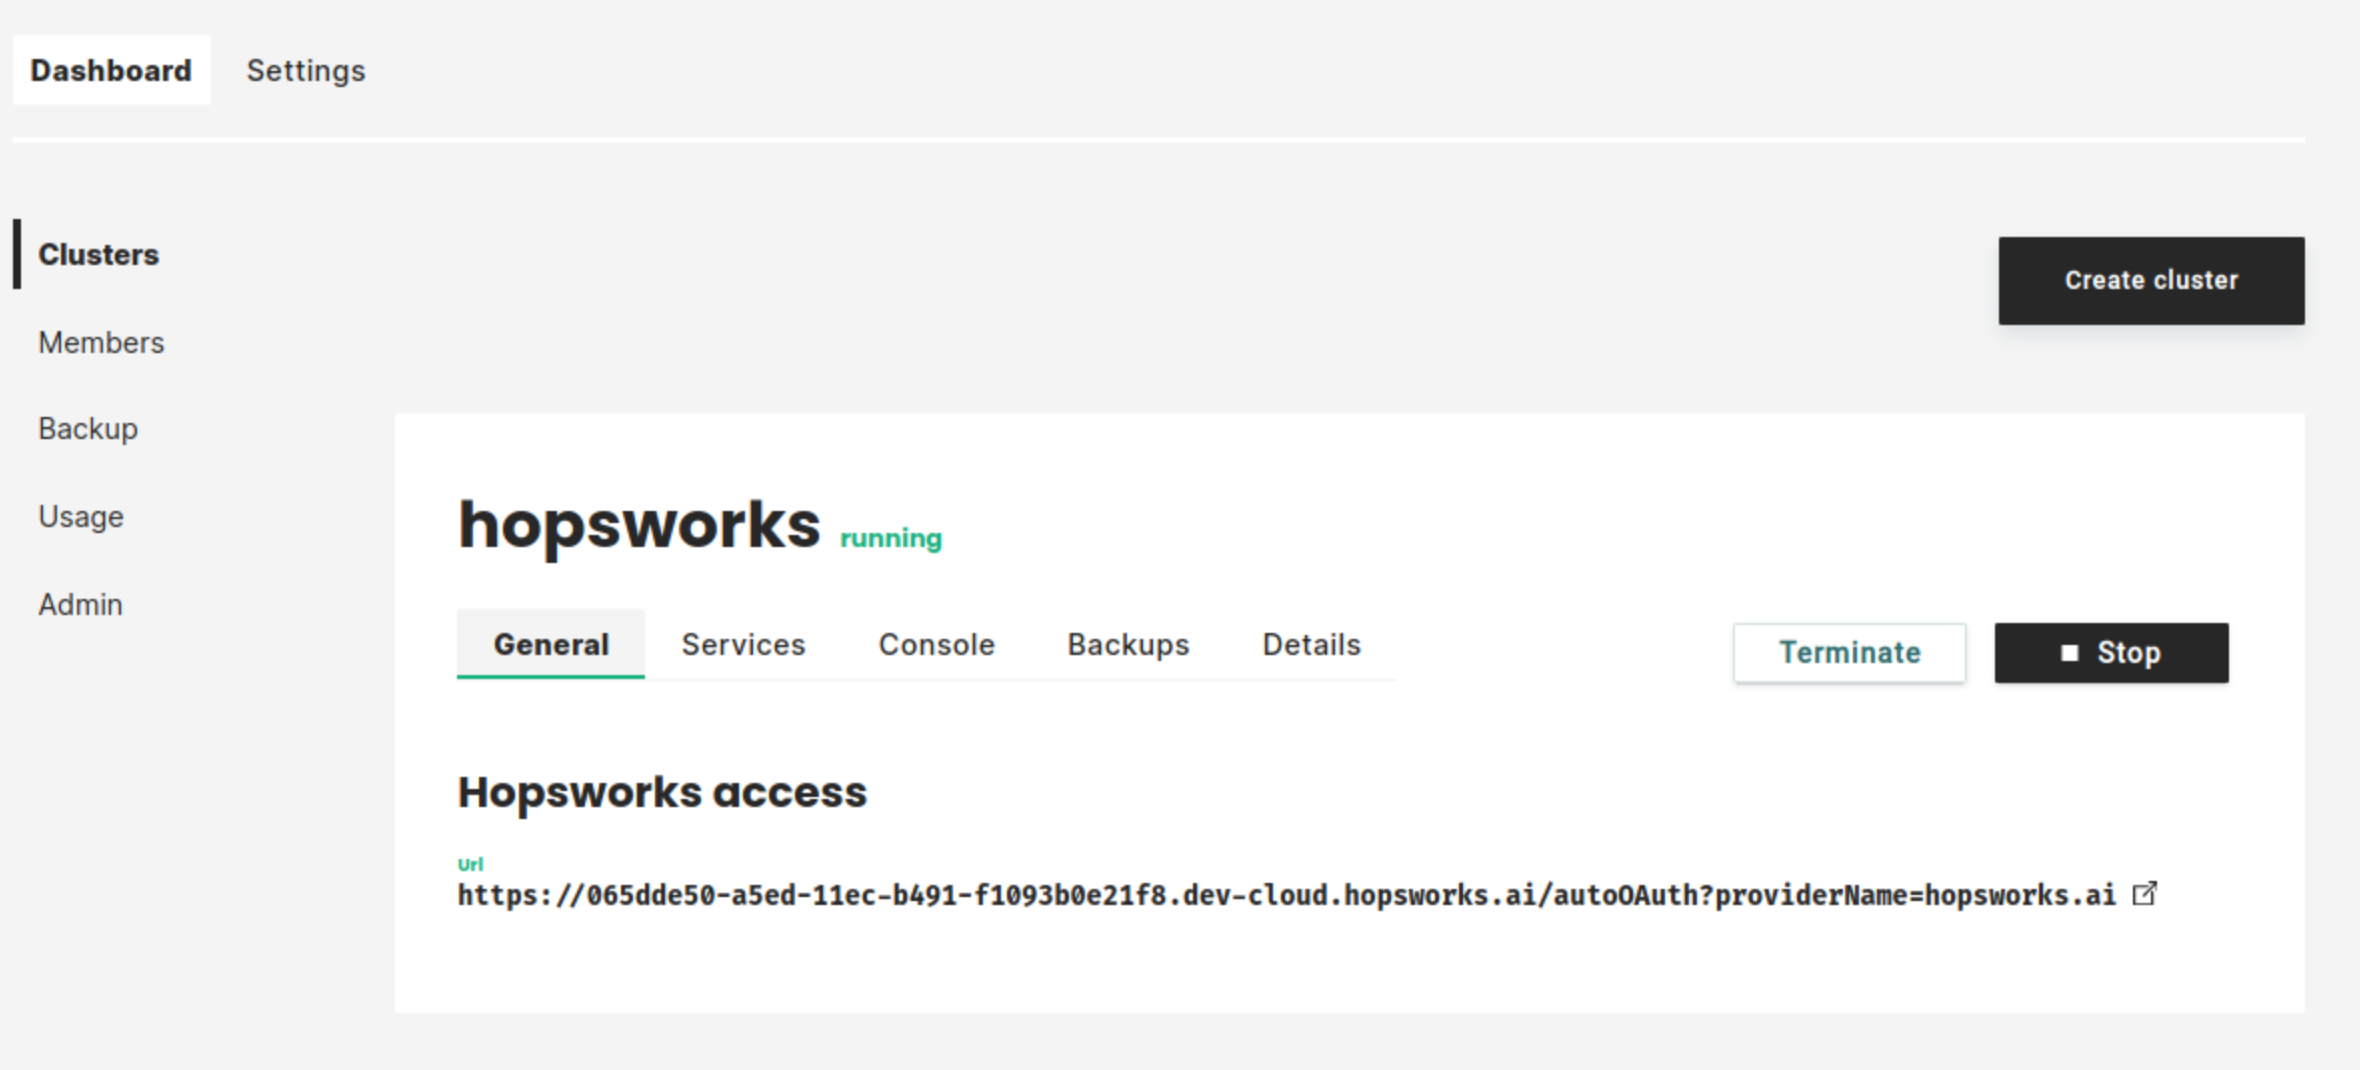
The cluster will start. This will take a few minutes:
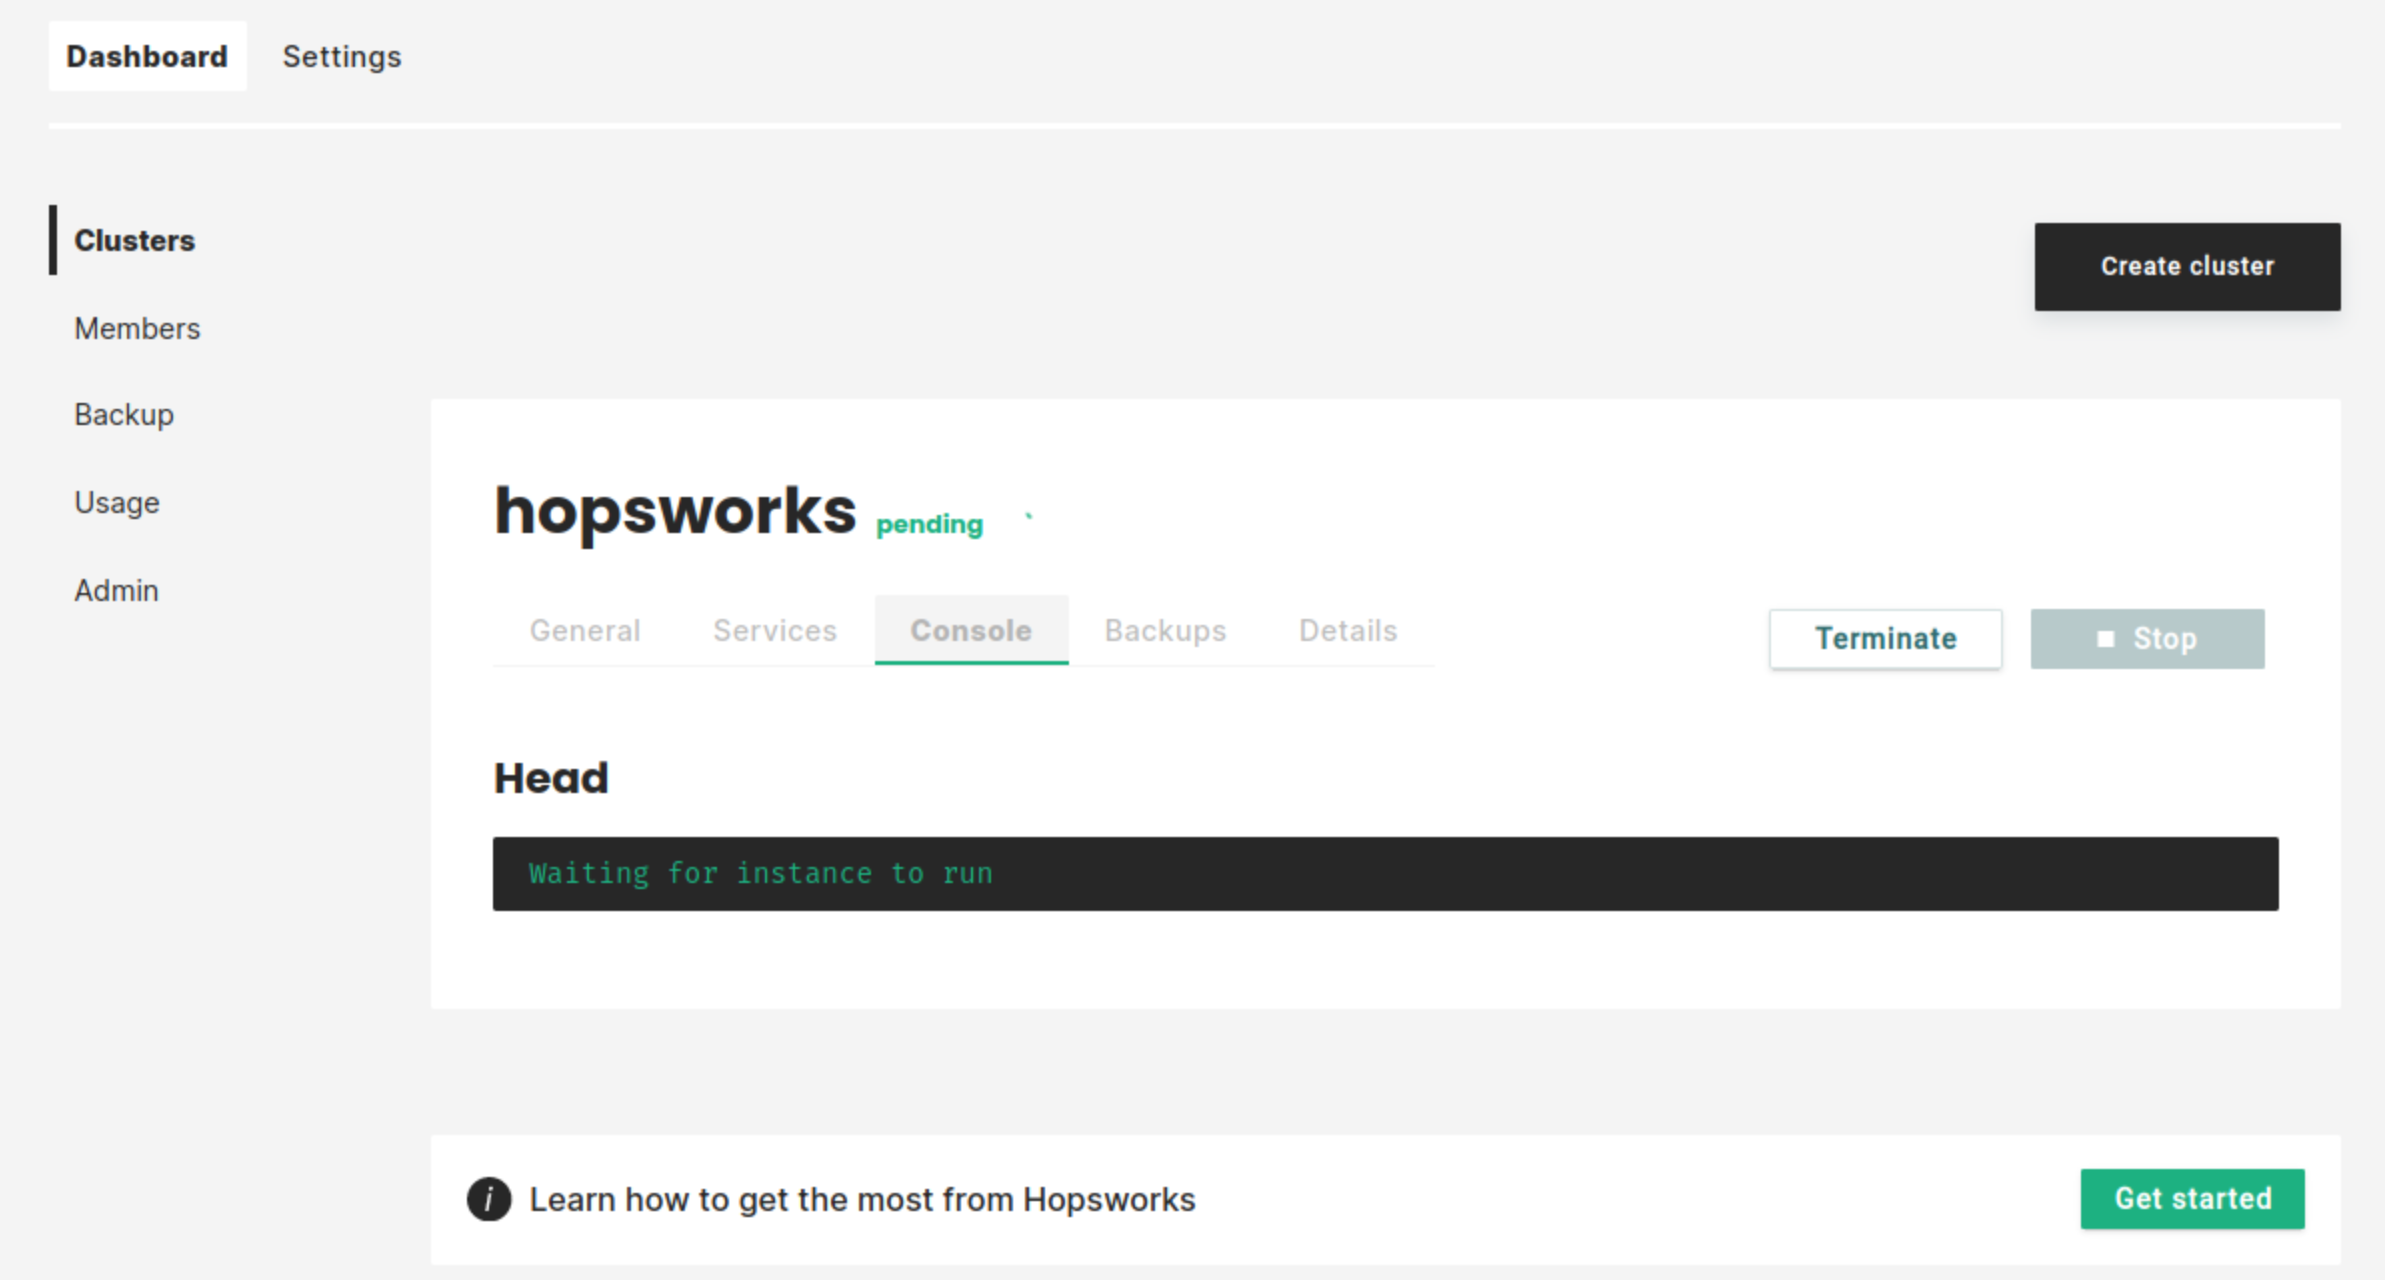
As soon as the cluster has started, you will be able to log in to your new Hopsworks cluster. You will also be able to stop, restart, or terminate the cluster.