How-To set up an SQL Data Source#
Introduction#
The SQL Data Source connects Hopsworks to a Relational Database Service. Supported database types are MySQL, PostgreSQL, and Oracle. Using this connector, you can query and update data in your relational database from Hopsworks.
In this guide, you will configure a Data Source in Hopsworks to securely store the authentication information needed to set up a connection to your database instance. When you're finished, you'll be able to query your SQL database using Hopsworks APIs.
Note
Currently, it is only possible to create data sources in the Hopsworks UI. You cannot create a data source programmatically.
Prerequisites#
Before you begin, ensure you have the following information from your database instance:
-
Host: The endpoint for your database instance.
Example from AWS: 1. Go to the AWS Console →
Aurora and RDS2. Click on your DB instance. 3. UnderConnectivity & security, you'll find the endpoint, e.g.:mydb.abcdefg1234.us-west-2.rds.amazonaws.com -
Database: The name of the database to connect to. For Oracle, this is the service name (e.g.
ORCLor a TNS alias). -
Port: The port to connect to (e.g.
3306for MySQL,5432for PostgreSQL,1521for Oracle). -
Username and Password: A username and password with the necessary permissions to access the required tables.
Optional: Oracle Wallet for mTLS Authentication#
If your Oracle database requires mutual TLS (mTLS) authentication — common with Oracle Autonomous Database and Oracle Cloud — you will also need:
- Wallet file: A
.zipfile containing the wallet credentials (e.g.cwallet.sso,tnsnames.ora,sqlnet.ora). - Wallet password: The password for the wallet, if using a PKCS12 wallet (
ewallet.p12). Auto-login wallets (cwallet.sso) do not require a password.
Tip
You can download the wallet zip from the Oracle Cloud Console under your Autonomous Database's DB Connection page. Upload the zip file to your Hopsworks project (e.g. to Resources/) before creating the data source.
Creation in the UI#
Step 1: Set up a new Data Source#
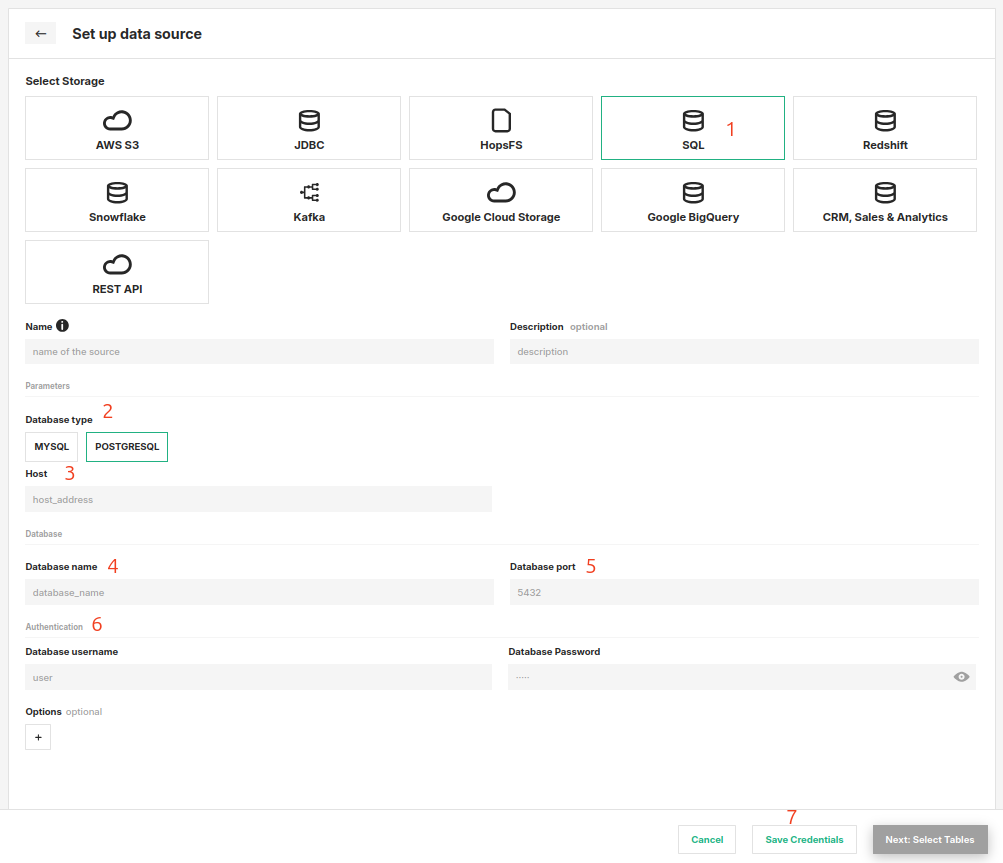
Head to the Data Source View on Hopsworks (1) and set up a new data source (2).

Step 2: Enter SQL Settings#
Enter the details for your database. Start by giving the connector a name and an optional description.
- Select "SQL" as the storage.
- Select the database type (MySQL, PostgreSQL, or Oracle).
- Enter the host endpoint.
- Enter the database name (service name for Oracle).
- Specify the port.
- Provide the username and password.
- For Oracle with mTLS, upload the wallet zip file and provide the wallet password (if required).
- Click on "Save Credentials".
Oracle-Specific Notes#
The generic read, external feature group, and training data workflows are covered in the usage guide for data sources. The following notes apply only to Oracle.
JDBC driver on the Spark classpath#
The Oracle JDBC driver JAR (e.g. ojdbc11.jar) must be available on the Spark classpath. Upload it via the Jupyter configuration or Job configuration in Additional Jars. The MySQL and PostgreSQL drivers are included in Hopsworks by default.
Spark JDBC limitations#
Oracle Spark JDBC limitations
- Single-partition reads only. All data is fetched through a single JDBC connection from the Spark driver. Spark's parallel JDBC read (via
numPartitions/partitionColumn) is not supported. For very large tables, filter with aWHEREclause in your query. - Wallet available on the driver only. When using wallet-based authentication, the wallet zip is downloaded from HopsFS and extracted on the Spark driver node. This is sufficient because reads are single-partition (driver-only).
- Timestamp precision. Spark JDBC supports timestamp precision up to seconds only. Sub-second precision from Oracle
TIMESTAMPcolumns may be truncated.
Python engine#
The Python engine reads Oracle via the Hopsworks Arrow Flight service, which handles the database connection server-side. No JDBC driver or wallet files are needed on the client, and the Spark JDBC limitations above do not apply.
Next Steps#
Move on to the usage guide for data sources to see how you can use your newly created SQL connector.