How To Configure A Predictor#
Introduction#
In this guide, you will learn how to configure a predictor for a trained model.
Warning
This guide assumes that a model has already been trained and saved into the Model Registry. To learn how to create a model in the Model Registry, see Model Registry Guide
Predictors are the main component of deployments. They are responsible for running a model server that loads a trained model, handles inference requests and returns predictions. They can be configured to use different model servers, different resources or scale differently. In each predictor, you can decide the following configuration:
Web UI#
Step 1: Create new deployment#
If you have at least one model already trained and saved in the Model Registry, navigate to the deployments page by clicking on the Deployments tab on the navigation menu on the left.
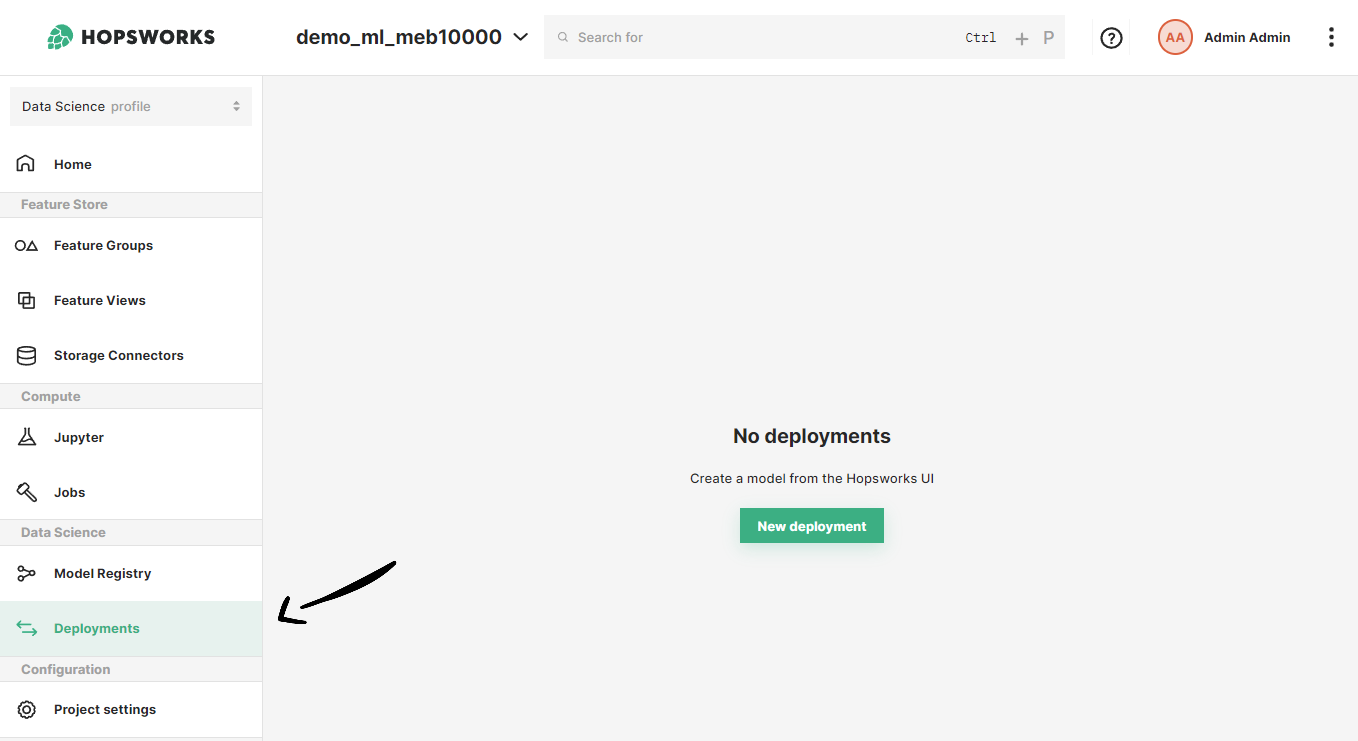
Once in the deployments page, you can create a new deployment by either clicking on New deployment (if there are no existing deployments) or on Create new deployment it the top-right corner. Both options will open the deployment creation form.
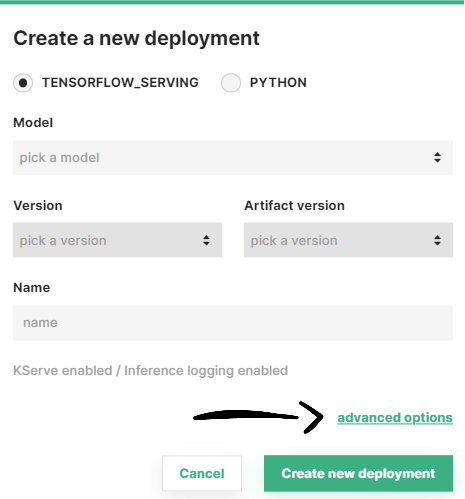
Step 2: Choose a backend#
A simplified creation form will appear, including the most common deployment fields from all available configurations. The first step is to choose a backend for your model deployment. The backend will filter the models shown below according to the framework that the model was registered with in the model registry.
For example if you registered the model as a TensorFlow model using ModelRegistry.tensorflow.create_model(...) you select TensorFlow Serving in the dropdown.
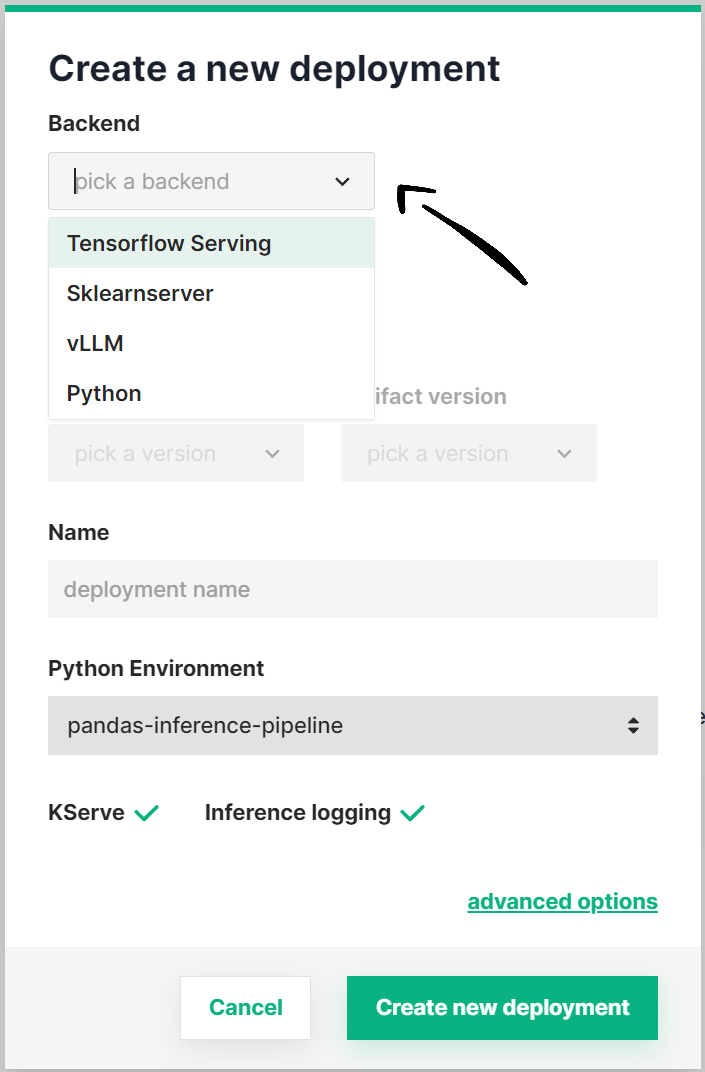
All models compatible with the selected backend will be listed in the model dropdown.
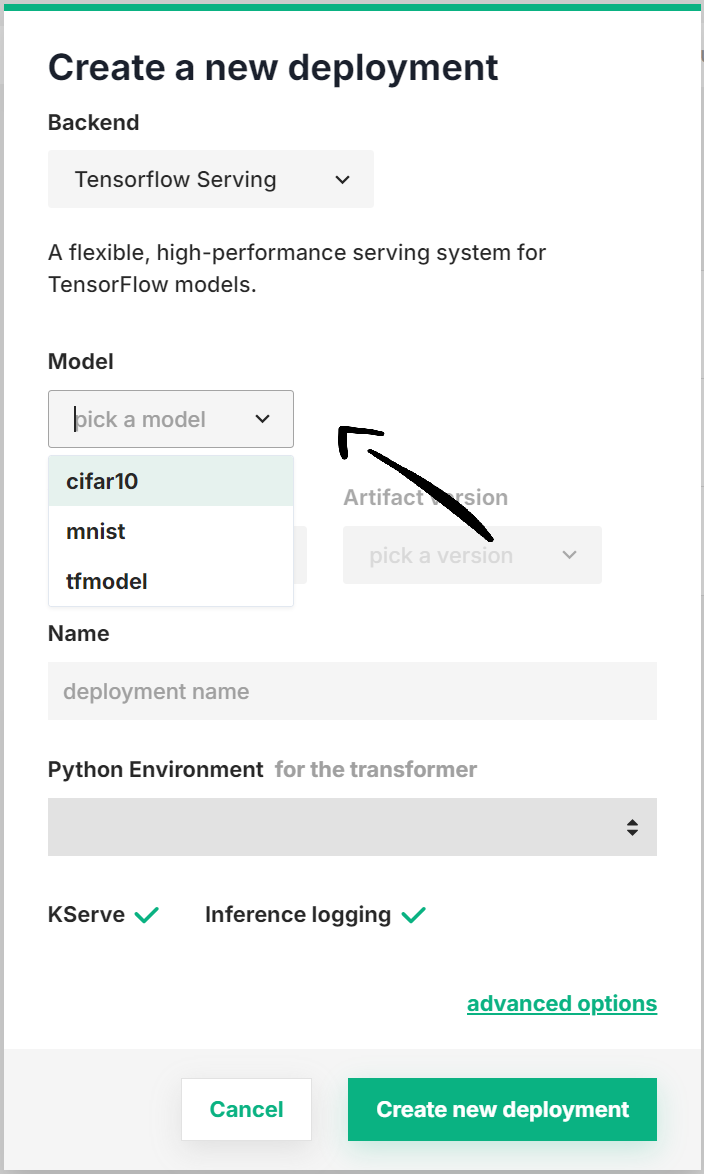
After selecting a model from the dropdown, you can optionally choose a predictor script, modify the predictor environment, add a configuration file, or adjust other advanced settings as described in the optional steps below.
Otherwise, click on Create new deployment to create the deployment for your model with default values.
Step 3 (Optional): Select a predictor script#
For python models, to select a predictor script click on From project and navigate through the file system to find it, or click on Upload new file to upload a predictor script now.

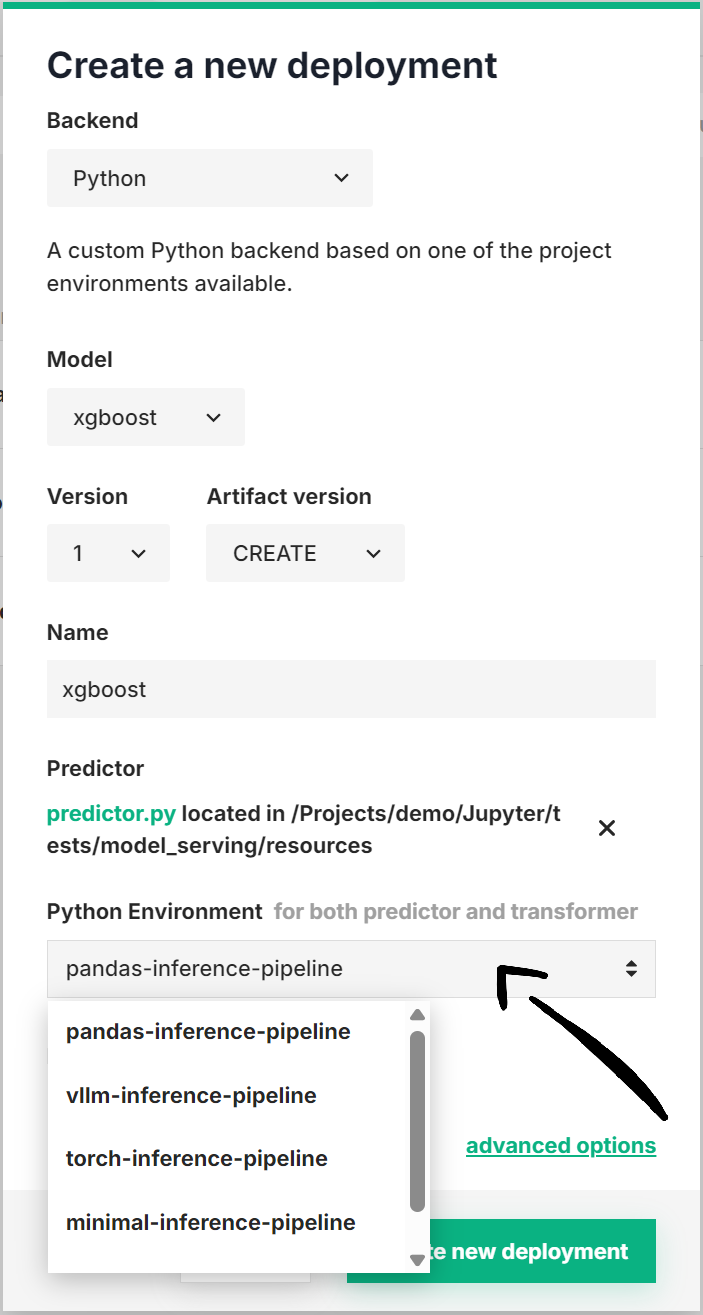
Step 4 (Optional): Change predictor environment#
If you are using a predictor script, it is required to select an inference environment for the predictor. This environment needs to have all the necessary dependencies installed to run your predictor script.
Hopsworks provide a collection of built-in environments like minimal-inference-pipeline, pandas-inference-pipeline or torch-inference-pipeline with different sets of libraries pre-installed. By default, the pandas-inference-pipeline Python environment is used.
To create your own it is recommended to clone the pandas-inference-pipeline and install additional dependencies for your use-case.
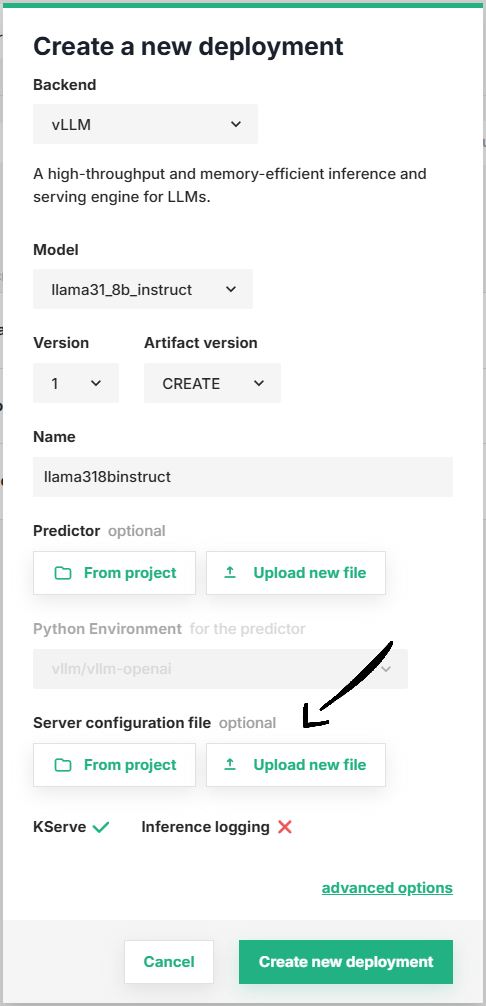
Step 5 (Optional): Select a configuration file#
You can select a configuration file to be added to the artifact files. In Python model deployments, this configuration file will be available inside the model deployment at the local path stored in the CONFIG_FILE_PATH environment variable. In vLLM deployments, this configuration file will be directly passed to the vLLM server. You can find all configuration parameters supported by the vLLM server in the vLLM documentation.
Info
Configuration files are required for vLLM deployments as they are used to define the configuration for the vLLM server.
Step 6 (Optional): Other advanced options#
To access the advanced deployment configuration, click on Advanced options.
Here, you can further change the default values of the predictor:
Predictor configuration
Once you are done with the changes, click on Create new deployment at the bottom of the page to create the deployment for your model.
Code#
Step 1: Connect to Hopsworks#
import hopsworks


project = hopsworks.login()

# get Hopsworks Model Registry handle
mr = project.get_model_registry()

# get Hopsworks Model Serving handle
ms = project.get_model_serving()
Step 2.1 (Optional): Implement a predictor script#
For Python model deployments, you need implement a predictor script that loads and serve your model.
class Predictor:
  def __init__(self):
      """Initialization code goes here"""
      # Optional __init__ params: project, deployment, model, async_logger
      # Model files can be found at os.environ["MODEL_FILES_PATH"]
      # self.model = ... # load your model

  def predict(self, inputs):
      """Serve predictions using the trained model"""
      # Use the model to make predictions
      # return self.model.predict(inputs)
class Predictor:
  def __init__(self, async_logger, model, project):
      """Initializes the serving state, reads a trained model"""
      # Get feature view attached to model
      ## self.model = model
      ## self.feature_view = model.get_feature_view()

      # Initialize feature view with async feature logger
      ## self.feature_view.init_feature_logger(feature_logger=async_logger)

  def predict(self, inputs):
      """Serves a prediction request usign a trained model"""
      # Extract serving keys and request parameters from inputs
      ## serving_keys = ...
      ## request_parameters = ...

      # Fetch feature vector with logging metadata
      ## vector = self.feature_view.get_feature_vector(serving_keys,
      ##                                               request_parameters=request_parameters,
      ##                                               logging_data=True)

      # Make predictions
      ## predictions = model.predict(vector)

      # Log Predictions
      ## self.feature_view.log(vector,
      ##                       predictions=predictions,
      ##                       model = self.model)

      # Predictions
      ## return predictions
class Predictor:
  def __init__(self):
      """Initialization code goes here"""
      # Optional __init__ params: project, deployment, model, async_logger
      # Model files can be found at os.environ["MODEL_FILES_PATH"]
      # self.model = ... # load your model

  async def predict(self, inputs):
      """Asynchronously serve predictions using the trained model"""
      # Perform async operations that required
      # result = await some_async_preprocessing(inputs)

      # Use the model to make predictions
      # return self.model.predict(result)
Optional __init__ parameters
The __init__ method supports optional parameters that are automatically injected at runtime:
| Parameter | Class | Description |
|---|---|---|
project | Project | Hopsworks project handle |
deployment | Deployment | Current model deployment handle |
model | Model | Model handle |
async_logger | AsyncFeatureLogger | Async feature logger for logging features to Hopsworks |
You can add any combination of these parameters to your __init__ method:
class Predictor:
    def __init__(self, project, model):
        # Access the project and model directly
        self.project = project
        self.model = model
Feature logging
The async_logger parameter enables asynchronous logging of features and predictions from your predictor script via the Feature View API. This is useful for debugging, monitoring, and auditing the data your models use in production. Logged features are periodically materialized to the offline feature store, and can be retrieved, filtered, and managed through the feature view.
See the Feature and Prediction Logging guide for details on enabling logging, retrieving logs, and managing the log lifecycle.
Jupyter magic
In a jupyter notebook, you can add %%writefile my_predictor.py at the top of the cell to save it as a local file.
Step 2.2 (Optional): Upload the script to your project#
You can also use the UI to upload your predictor script. See above
uploaded_file_path = dataset_api.upload(
    "my_predictor.py", "Resources", overwrite=True
)
predictor_script_path = os.path.join(
    "/Projects", project.name, uploaded_file_path
)
Step 3: Pass predictor configuration to model deployment#
You can customize the default predictor settings when creating a model deployment.
my_model = mr.get_model("my_model", version=1)

my_deployment = my_model.deploy(
    # predictor configuration
    model_server="PYTHON",
    script_file=predictor_script_path,
)
API Reference#
Model Server#
Hopsworks Model Serving supports deploying models with a Python model server for python-based models (scikit-learn, XGBoost , pytorch...), TensorFlow Serving for TensorFlow / Keras models and vLLM for Large Language Models (LLMs).
Supported model servers
| Model Server | Backend | ML Models and Frameworks |
|---|---|---|
| Python | Any *-inference-pipeline Python environment | Python-based (scikit-learn, XGBoost , pytorch...) |
| KServe sklearnserver | Sklearn built-in KServe runtime | Scikit-learn, XGBoost |
| TensorFlow Serving | TensorFlow Serving runtime | Keras, TensorFlow |
| vLLM | vLLM openai-compatible server | vLLM-supported models (see list) |
vLLM variants
The vLLM model server is available in two variants — standard vLLM and vLLM-Omni — and the image version can be pinned per deployment. See vLLM variant and image version.
Each model server has specific requirements and supports different types of model artifacts, file formats, and configuration options. When deploying a model, ensure that your model files and configuration align with the expectations of the selected server.
Model artifact requirements
| Model server | Model files |
|---|---|
| Python | Any model file format |
| KServe sklearnserver | Files with extensions .joblib, .pkl, .pickle |
| TensorFlow Serving | Model artifact needs variables/ and .pb file |
| vLLM | Model files supported by vLLM engine (e.g., .safetensors) |
All deployments use KServe as the serving platform, providing autoscaling (including scale-to-zero), fine-grained resource allocation, inference logging, inference batching, and transformers.
Predictor script#
For Python model deployments only, you can provide a custom Python script—called a predictor script—to load your model and serve predictions. This script is included in the artifact files of the deployment. The script must follow a specific template, as shown in Step 2.
Server configuration file#
For Python model deployments, you can provide a server configuration file to separate deployment-specific settings from the logic in your predictor or transformer scripts. This approach allows you to update configuration parameters without modifying the code. Within the deployment, the configuration file is accessible at the path specified by the CONFIG_FILE_PATH environment variable (see environment variables).
For vLLM deployments, the server configuration file is required and is used to configure the vLLM server. For example, you can use this configuration file to specify the chat template or LoRA modules to be loaded by the vLLM server. See all available parameters in the official documentation.
Configuration file format
The configuration file can be of any format, except in vLLM deployments for which a YAML file (.yml/.yaml) is required. When a predictor script is provided, any format is allowed as users can load it as necessary.
vLLM variant and image version#
For vLLM deployments, you can choose which variant of vLLM to run and, optionally, which image version to use. Both settings are stored on the deployment and can be edited later — they are first-class fields on the predictor configuration.
Variant#
| Variant | Runtime | When to use |
|---|---|---|
VLLM (default) | Standard vllm-openai server (docker hub) | OpenAI-compatible inference with the upstream vLLM engine. |
VLLM_OMNI | Standard vllm-omni server (docker hub) | OpenAI-compatible multi-modal inference with the upstream vLLM engine. |
Both the VLLM and VLLM_OMNI variants run the official upstream vLLM images published on Docker Hub: vllm/vllm-openai and vllm/vllm-omni respectively.
Python SDK
From the Python SDK, the variant is selected with the vllm_variant keyword argument. See Model.deploy() in the API reference.
Image version#
The image version is the runtime image tag (for example v0.14.0) used for the vLLM container. If not set, Hopsworks picks the highest image version advertised for the chosen variant at creation time. Set it explicitly to pin a deployment to a specific image — useful when you need a stable, reproducible runtime.
The list of available versions per variant is advertised by the cluster administrator through the kube_serving_vllm_versions and kube_serving_vllm_omni_versions Hopsworks variables.
Hopsworks ships exactly one default image version for each of the vLLM and vLLM-Omni variants. Any additional versions exposed in the Version dropdown are managed by the cluster administrator. If a version you need is not listed, contact your administrator.
Cluster registry access
For any additional image version advertised in the Version dropdown to actually start, the official docker.io registry and the vllm/vllm-openai / vllm/vllm-omni repositories must be pullable from inside the cluster. If the cluster has no egress to Docker Hub, ask your administrator to either grant access or mirror the upstream tags into the cluster's internal registry under the same repository path — otherwise the deployment will fail to pull the image.
Upstream tags
Hopsworks does not repackage these images — the tag you select in the Version dropdown is the upstream Docker Hub tag.
Python SDK
From the Python SDK, the image version is selected with the vllm_image_tag keyword argument. See Model.deploy() in the API reference.
Environment variables#
Two kinds of environment variables are available in the predictor: user-defined variables that you set per deployment or at the account level, and built-in variables that Hopsworks sets automatically at runtime.
User-defined environment variables#
In the advanced deployment form, the Predictor environment variables section is pre-filled with your account-level Environment variables. Values you change in the form become per-deployment overrides for that deployment only. Account-level values for names you don't include in the form continue to apply at runtime.
Account-level variables also apply
Variables defined under Account settings → Environment variables are injected into every model deployment you start. A value set on the deployment overrides the account-level value with the same name for that deployment only.
Built-in environment variables#
A number of different environment variables are available in the predictor to ease its implementation.
Warning
Built-in environment variables cannot be overwritten as they are meant for internal use.
Available environment variables
These variables are available in all deployments.
| Name | Description |
|---|---|
DEPLOYMENT_NAME | Name of the current deployment |
DEPLOYMENT_VERSION | Version of the deployment |
ARTIFACT_FILES_PATH | Local path to the artifact files |
These variables are set for predictor components.
| Name | Description |
|---|---|
SCRIPT_PATH | Full path to the predictor script |
SCRIPT_NAME | Prefixed filename of the predictor script |
CONFIG_FILE_PATH | Local path to the configuration file (if provided) |
IS_PREDICTOR | Set to true for predictor components |
| Name | Description |
|---|---|
MODEL_FILES_PATH | Local path to the model files (/var/lib/hopsworks/model_files) |
MODEL_NAME | Name of the model being served by the current deployment |
MODEL_VERSION | Version of the model being served by the current deployment |
These variables are available in all deployments.
| Name | Description |
|---|---|
REST_ENDPOINT | Hopsworks REST API endpoint |
HOPSWORKS_PROJECT_ID | ID of the project |
HOPSWORKS_PROJECT_NAME | Name of the project |
HOPSWORKS_PUBLIC_HOST | Hopsworks public hostname |
API_KEY | API key for authenticating with Hopsworks services |
PROJECT_ID | Project ID (for Feature Store access) |
PROJECT_NAME | Project name (for Feature Store access) |
SECRETS_DIR | Path to secrets directory (/keys) |
MATERIAL_DIRECTORY | Path to TLS certificates (/certs) |
REQUESTS_VERIFY | SSL verification setting |
Python environments#
Based on the model server used in the model deployment, you can select the Python environment where the predictor and transformer scripts will run. To create a new Python environment see Python Environments.
Supported Python environments
| Model server | Predictor | Transformer |
|---|---|---|
| Python | any *-inference-pipeline image | any *-inference-pipeline image |
| KServe sklearnserver | sklearnserver | any *-inference-pipeline image |
| TensorFlow Serving | tensorflow/serving | any *-inference-pipeline image |
| vLLM | vllm-openai | Not supported |
Note
For Python model deployments, the same Python environment is used for both predictor and transformer.
Transformer script#
Transformer scripts are Python scripts used to apply transformations on the model inputs before sending them to the predictor for making predictions using the model. To learn more about transformers, see the Transformer (KServe) Guide.
Note
Transformer scripts are not supported in vLLM deployments
Inference logger#
Inference loggers are deployment components that log inference requests into a Kafka topic for later analysis.
To learn about the different logging modes, see the Inference Logger Guide
Inference batcher#
Inference batcher are deployment component that apply batching to the incoming inference requests for a better throughput-latency trade-off.
To learn about the different configuration available for the inference batcher, see the Inference Batcher Guide.
Resources#
Resources include the number of replicas for the deployment as well as the resources (i.e., memory, CPU, GPU) to be allocated per replica.
To learn about the different combinations available, see the Resources Guide.
Autoscaling#
Deployments use Knative Pod Autoscaler (KPA) to automatically scale the number of replicas based on traffic, including scale-to-zero.
To learn about the different autoscaling parameters, see the Autoscaling Guide.
Scheduling#
Kueue is required
This feature requires Kueue to be enabled in your cluster. If Kueue is not available, queue and topology options will not be accessible.
If the cluster has Kueue enabled, you can select a queue for your deployment from the advanced configuration. Queues control resource allocation and scheduling priority across the cluster.
For full details on scheduling configuration, see the Scheduling Guide.
API protocol#
Depending on the model server, Hopsworks supports both REST and gRPC as the API protocols to send inference requests to model deployments. In general, you use gRPC when you need lower latency inference requests.
To learn more about the REST and gRPC API protocols for model deployments, see the API Protocol Guide.