Jobs#
All members of a project in Hopsworks can launch the following types of applications through a project's Jobs service:
- Python (Hopsworks Enterprise only)
- Apache Spark
- Apache Flink
- Docker (Hopsworks Enterprise only)
Launching a job of any type is very similar process, what mostly differs between job types is the various configuration parameters each job type comes with.
Manage jobs#
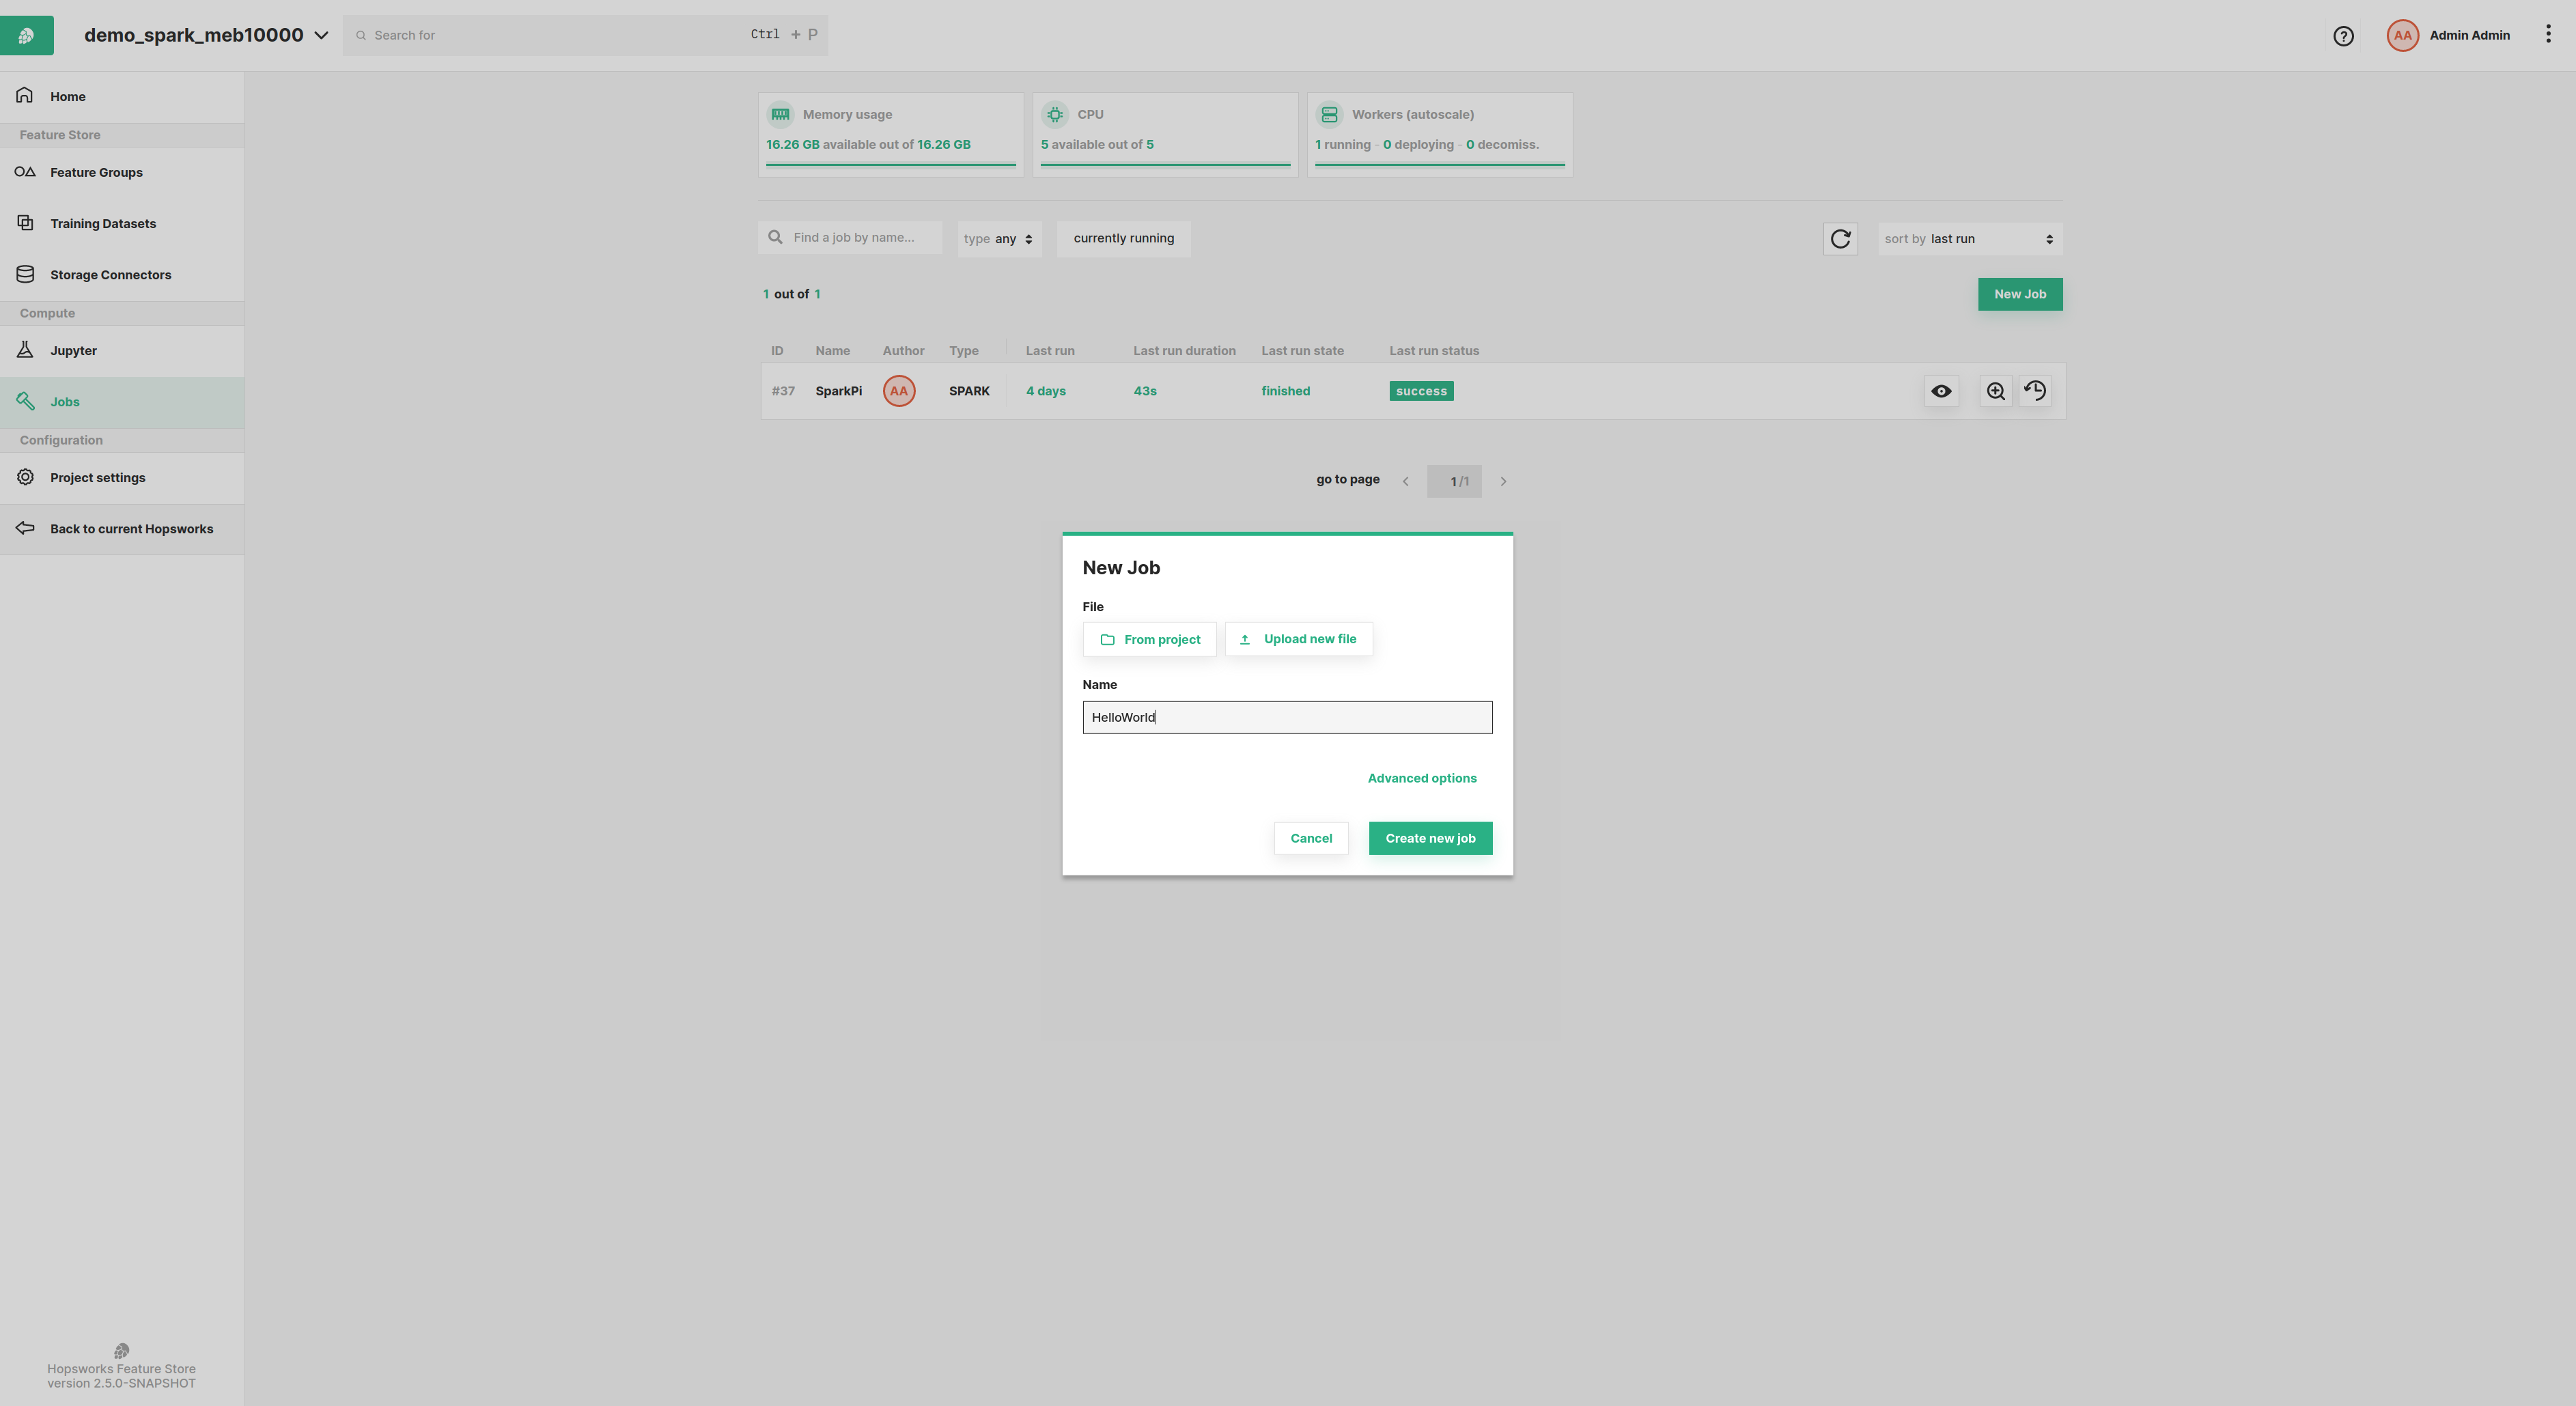
You can quickly create a new job by following these steps:
- From the project menu click
Jobsand then theNew jobbutton - Select a file to be used as the program the job will execute. The file can be selected either from within the project,
that means you need to select a file stored in one of the project's datasets, or select a file from your local
workstation which will be uploaded to the
Resourcesdataset by default. You can also select Jupyter notebooks as files to be executed. When running a job, Hopsworks will automatically convert the PySpark/Python notebook to a.pyfile and run it. The notebook is converted every time the job runs, which means changes in the notebook will be picked up by the job without having to update it. - Fill in a name for the job. The name can be made of alphanumeric characters, dash or underscore. A job's name is unique across the project, that is no two jobs can have the same name.
If you would like to explore more advanced options such as importing a job or setting alerts, then you need to click
the Advanced options button shown in the image below and from that page you can configure the options shown in the
sections below.
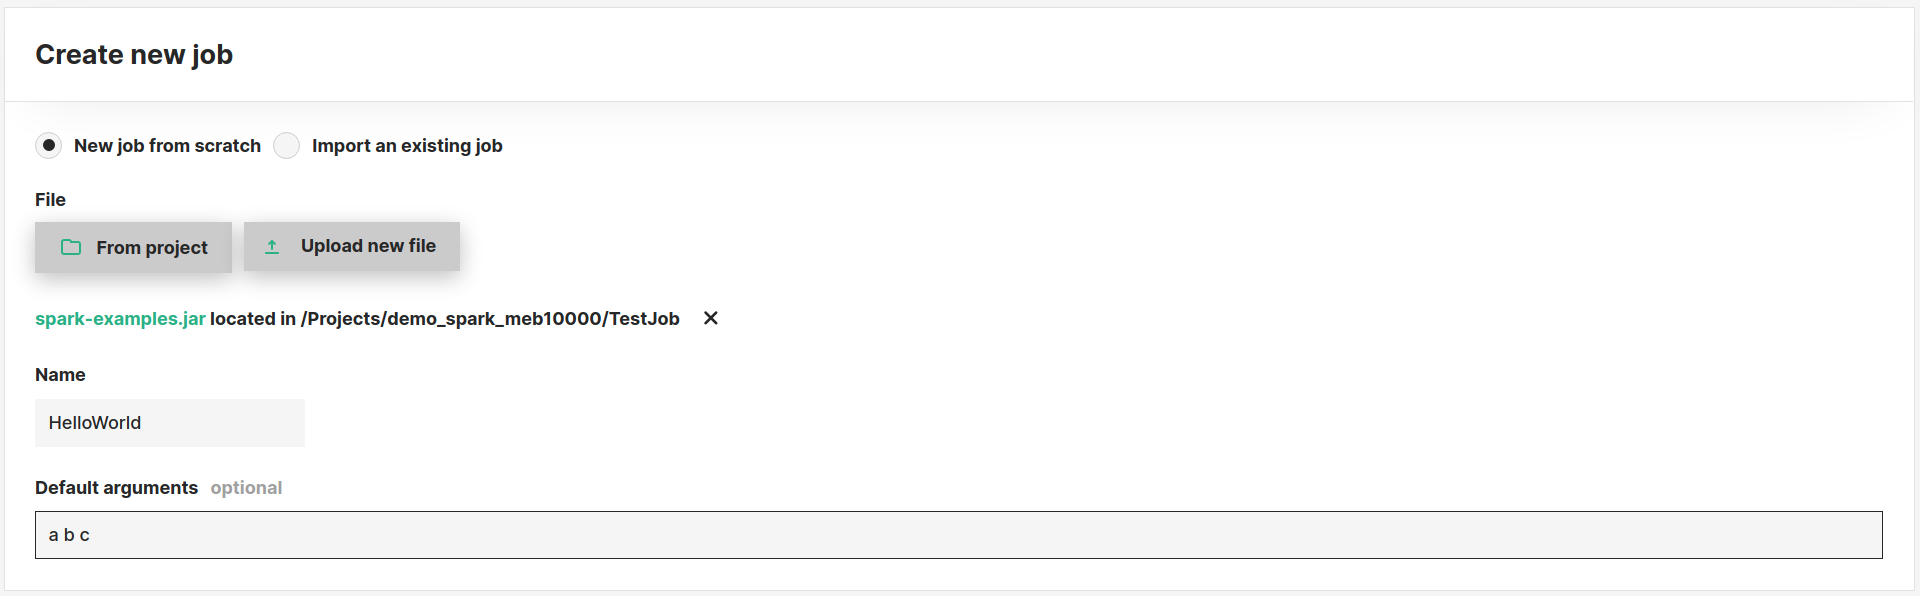
New job from scratch#
In addition to the options available with the new job quickstart, from this menu you can set default arguments to be given as input to the job when executed. You can overwrite these arguments when running a job by providing input arguments for that particular execution of the job.
For example, in the image below the default arguments "a b c" will be passed as space-separated arguments to the job.
Import an existing job#
Instead of creating a new job from scratch, you can create one based on another jobs' configuration. The latter can be exported
by using the Export button from the job's Overview page as shown below. This action will download a .json file containing
the job's specification which you can then import from the advanced options page.

Compute Configuration#
You can set a default configuration for each job type (currently only supported for Spark and Python) at a project scope, from the Project settings - Compute configuration menu option.
That enables you to have the job configuration parameters already filled in when creating a job and optionally override them for this particular job instance.
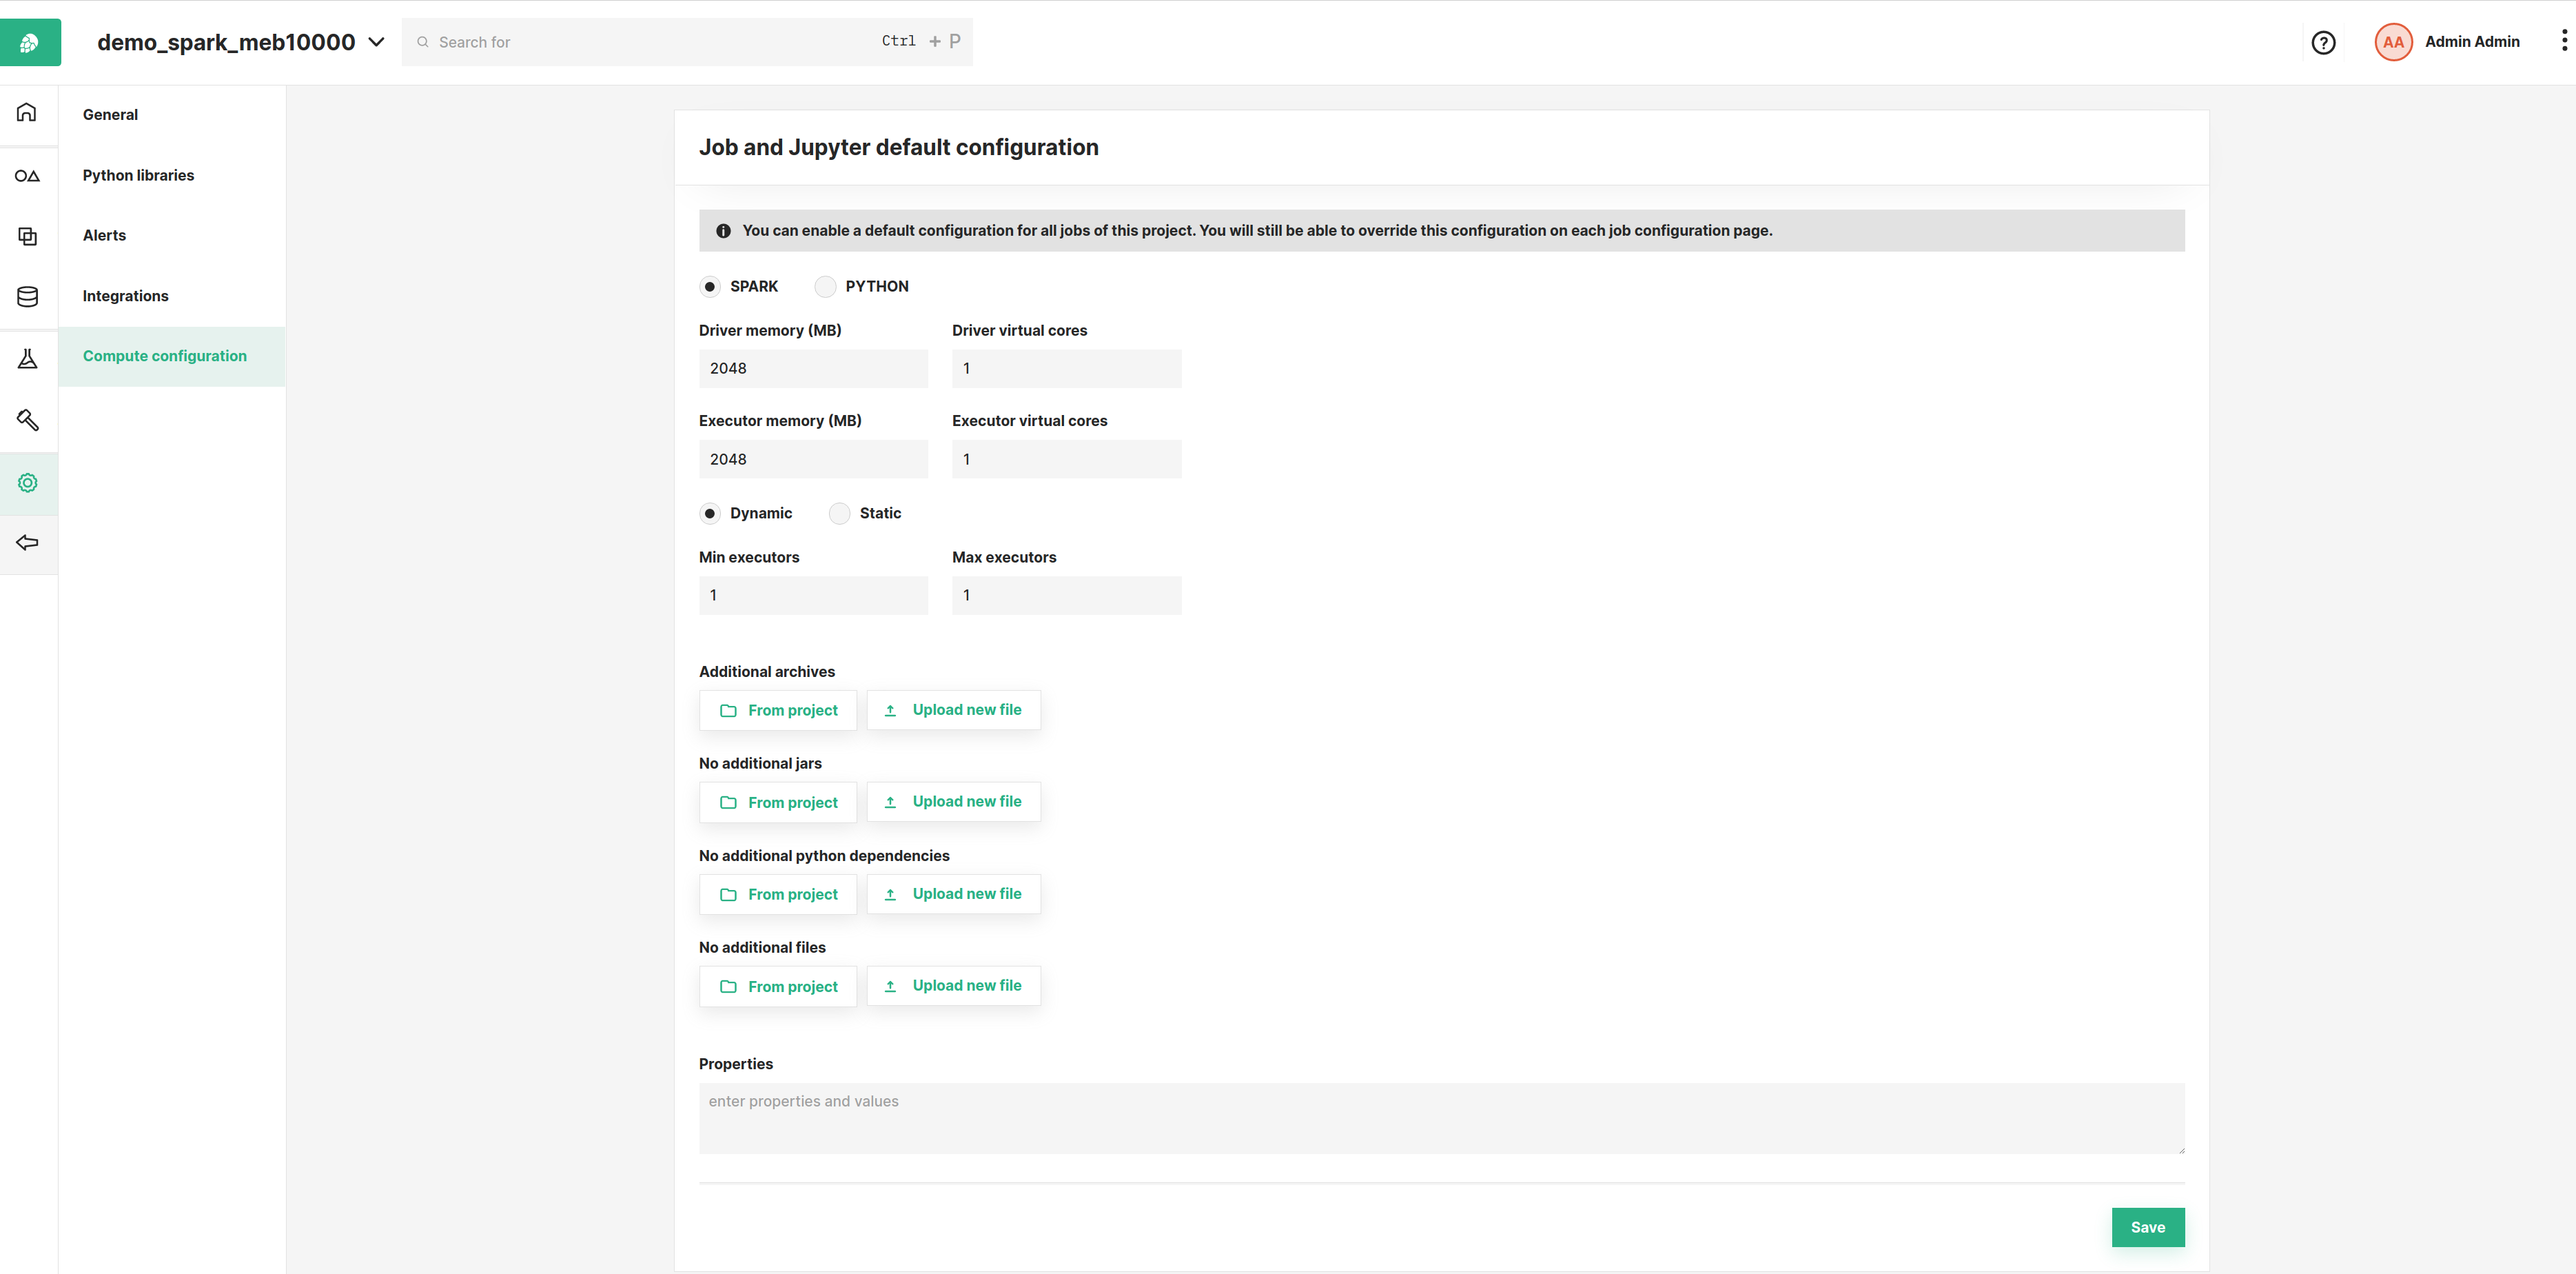
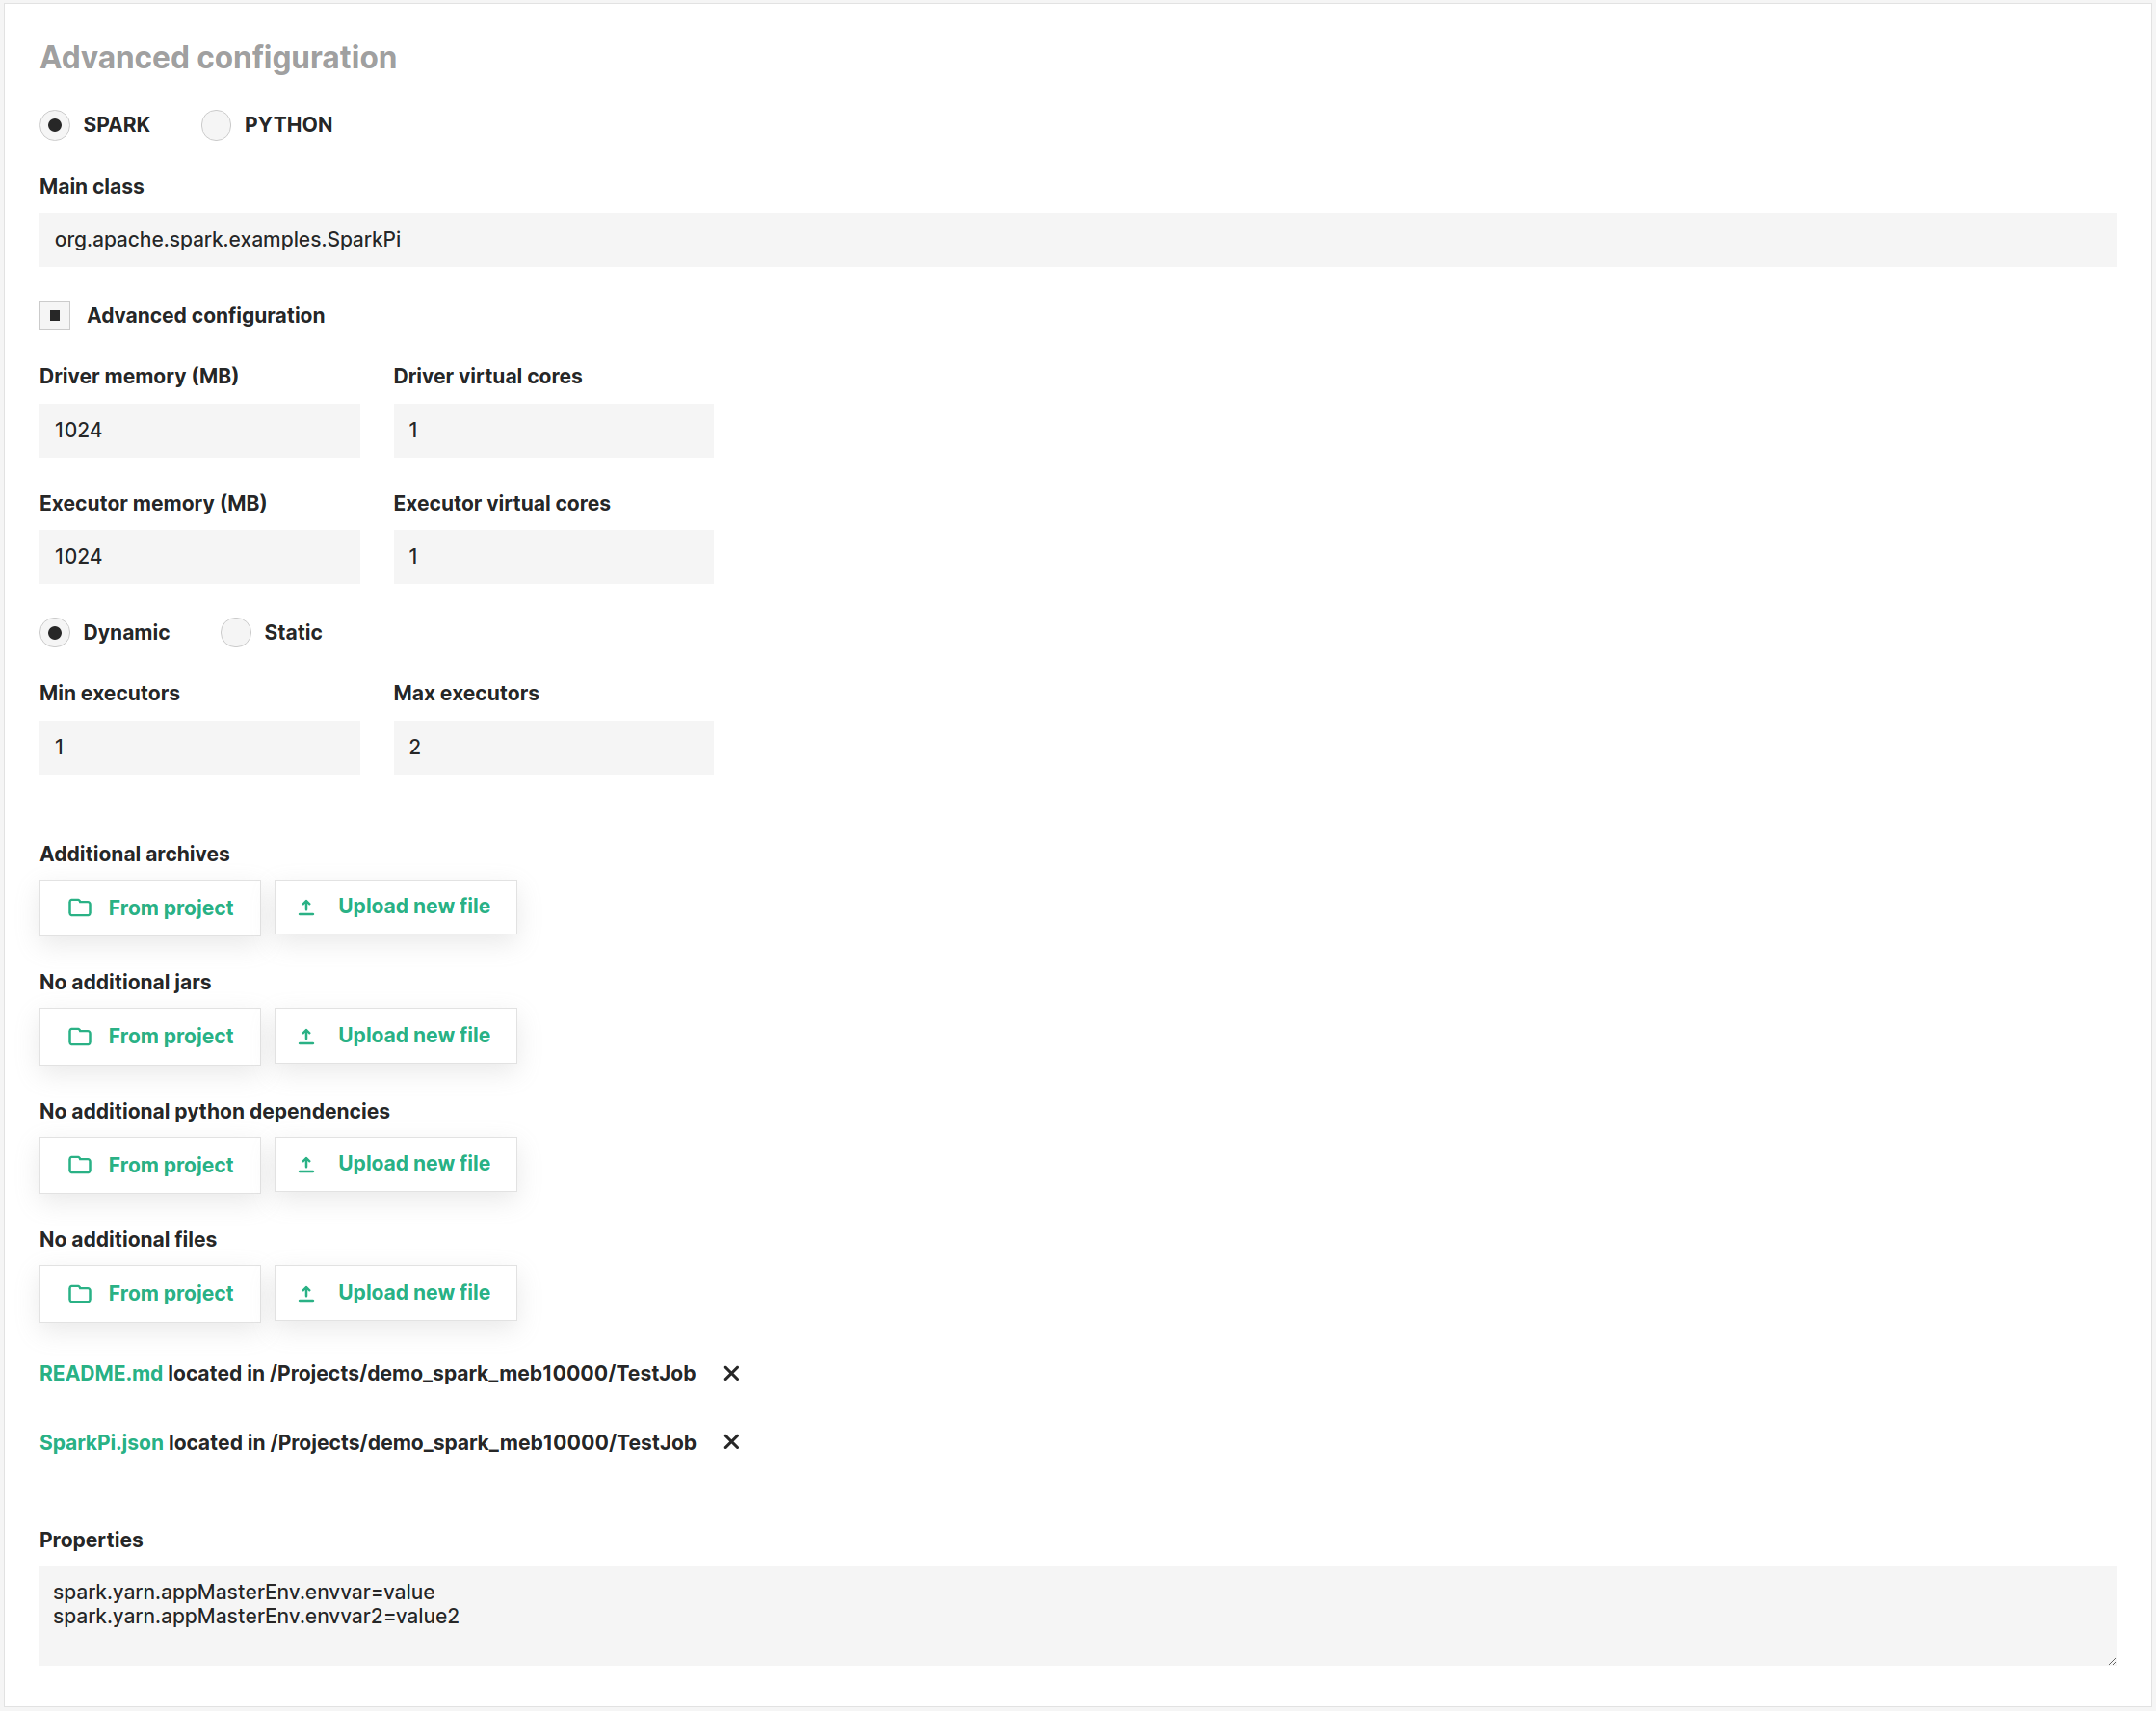
Spark#
The image below shows an example of a Spark job advanced configuration page. If set, these configuration properties will override the default project-scoped job configuration properties described in the section above.
You can set the following properties for Spark/PySpark jobs:
- Main class: For Spark jobs, the main class of the application
- Driver memory
- Driver virtual cores
- Executor memory
- Executor virtual cores
- Dynamic - Static: Run the Spark job in static or dynamic allocation mode (see official docs for details).
- Additional archives: List of zip or .tgz files that will be locally accessible by the application
- Additional jars: List of .jar files to add to the CLASSPATH of the application
- Additional Python dependencies: List of .py, .zip or .egg files that will be locally accessible by the application
- Additional files: List of files that will be locally accessible by the application
- Properties: Optional line-separates properties to be set for the Spark application. For example, to set environment variables for the driver you can set the properties as shown below
spark.yarn.appMasterEnv.envvar=value
spark.yarn.appMasterEnv.envvar2=value2
If you are creating the job programmatically, the following JSON is an example job configuration for a PYSPARK job:
{
    "type": "sparkJobConfiguration",
    "amQueue": "default", // Should be set to "default", represents name of YARN queue
    "amMemory": 2048, // Memory in megabytes to configure for Spark driver
    "amVCores": 1, // Virtual cores to configure for Spark driver
    "jobType": "PYSPARK", // Should be SPARK if application is a .jar file, otherwise PYSPARK if .py or .ipynb is configured
    "appPath": "hdfs:///Projects/{PROJECT_NAME}/{DATASET_NAME}/{APP_FILE}", // Path to application file to execute, supported files are .jar, .py or .ipynb
    "mainClass": "org.apache.spark.deploy.PythonRunner", // Must be set to "org.apache.spark.deploy.PythonRunner" for PYSPARK jobs, otherwise Main class of configured jar to run.
    "spark.executor.instances": 1,
    "spark.executor.cores": 1,
    "spark.executor.memory": 2048,
    "spark.executor.gpus": 0,
    "spark.tensorflow.num.ps": 1,
    "spark.dynamicAllocation.enabled": true,
    "spark.dynamicAllocation.minExecutors": 0,
    "spark.dynamicAllocation.maxExecutors": 1,
    "spark.dynamicAllocation.initialExecutors": 0,
    "spark.blacklist.enabled": false,
    "properties": "", // New-line separated entry such as "spark.yarn.appMasterEnv.envvar=value\nspark.yarn.appMasterEnv.envvar1=value2"
    "spark.yarn.dist.pyFiles": "", // Comma-separated string of paths to .py files
    "spark.yarn.dist.files": "", // Comma-separated string of paths to additional application files
    "spark.yarn.dist.jars": "", // Comma-separated string of paths to additional jars that should be added to the classpath
    "spark.yarn.dist.archives": "", // Comma-separated string of paths to archives that should be added and extracted
    "appName":"{JOB_NAME}", // Name of the job
    "defaultArgs": "", // A string containing the arguments for the app
}
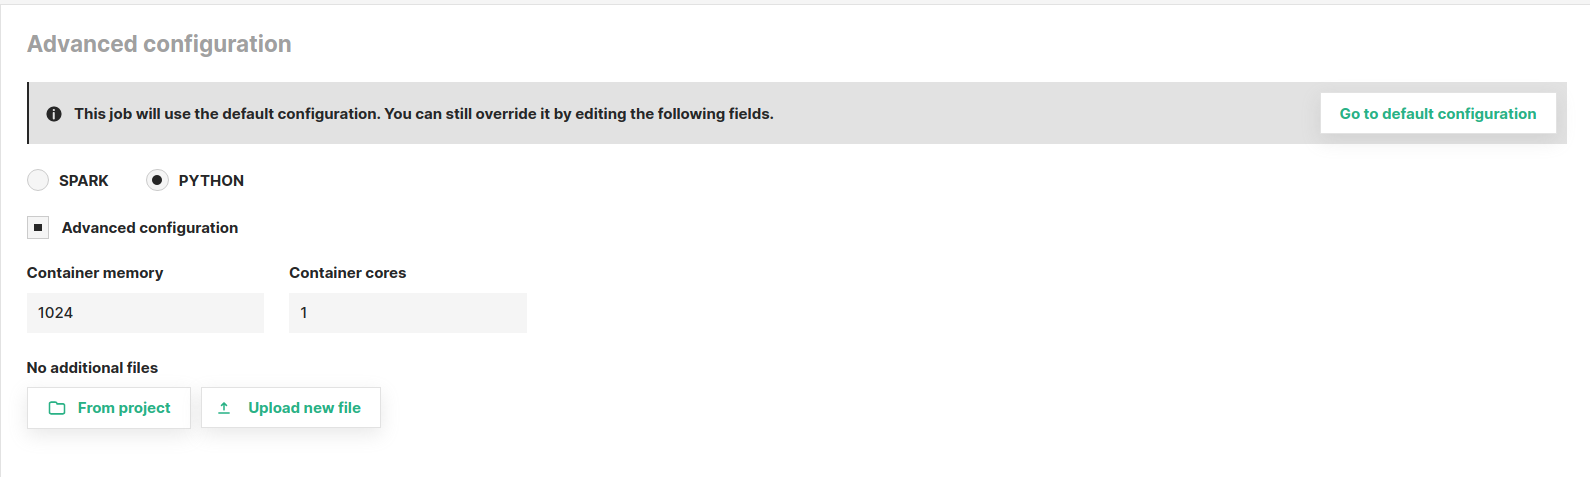
Python#
The image below shows an example of a Python job advanced configuration page. If set, these configuration properties will override the default project-scoped job configuration properties described in the section above.
You can set the following properties for Python jobs:
- Container memory: The amount of memory in MB to be allocated to the container running the Python program
- Container cores: The number of cores to be allocated to the container running the Python program
- Additional files: List of files that will be locally accessible by the application
If you are creating the job programmatically, the following JSON is an example job configuration for a PYTHON job.
{
    "type": "pythonJobConfiguration",
    "appPath": "hdfs:///Projects/{PROJECT_NAME}/{DATASET_NAME}/{APP_FILE}",
    "files": "", // Comma-separated string of paths to additional application files
    "resourceConfig": {
        "type": "dockerResourcesConfiguration",
        "cores": 1,
        "memory": 1024, // Memory in megabytes to allocate for the application
        "gpus": 0 // GPUs to allocate for the application
    },
    "logRedirection": true,
    "appName": "{JOB_NAME}", // Name of the job
    "defaultArgs": "", // A string containing the arguments for the app
}
You do not have to upload the Python program via the Hopsworks UI to run it. It can be done programmatically from a Python program by using the
upload function of the dataset module of the hops Python library
To do that, first generate an API key for your project,
and then use the project.connect() function of the same library to connect to a project of your Hopsworks cluster and then dataset.upload().
Docker#
Docker jobs can currently only be managed from the legacy Hopsworks user interface, see documentation at Docker jobs for details.
Apache Flink#
Flink jobs can currently only be managed from the legacy Hopsworks user interface, see documentation at Flink jobs for details.
Alerts#
You can attach Hopsworks alerts on a per-job basis if you want to receive notifications for job-specific events.
Firstly, a Hopsworks administrator needs to setup alert channels from the Cluster settings page. Currently supported channels are
- email
- slack
- pagerduty
Once you have configured the alert channels, you can proceed by specifying alert receivers from the project's settings page.
Receivers are the destinations to which your alerts will be sent to. You can specify global alerts, which means these alerts will be triggered on job events regardless
of which specific job generated the alert event. Alternatively, you can override the job alerts by adding alerts to a specific job from the job's configuration page as shown below.
The job events alerts are triggered upon are:
- on job success
- on job fail
- on job killed
The potential severities these alerts should report are:
- WARNING
- INFO
- CRITICAL

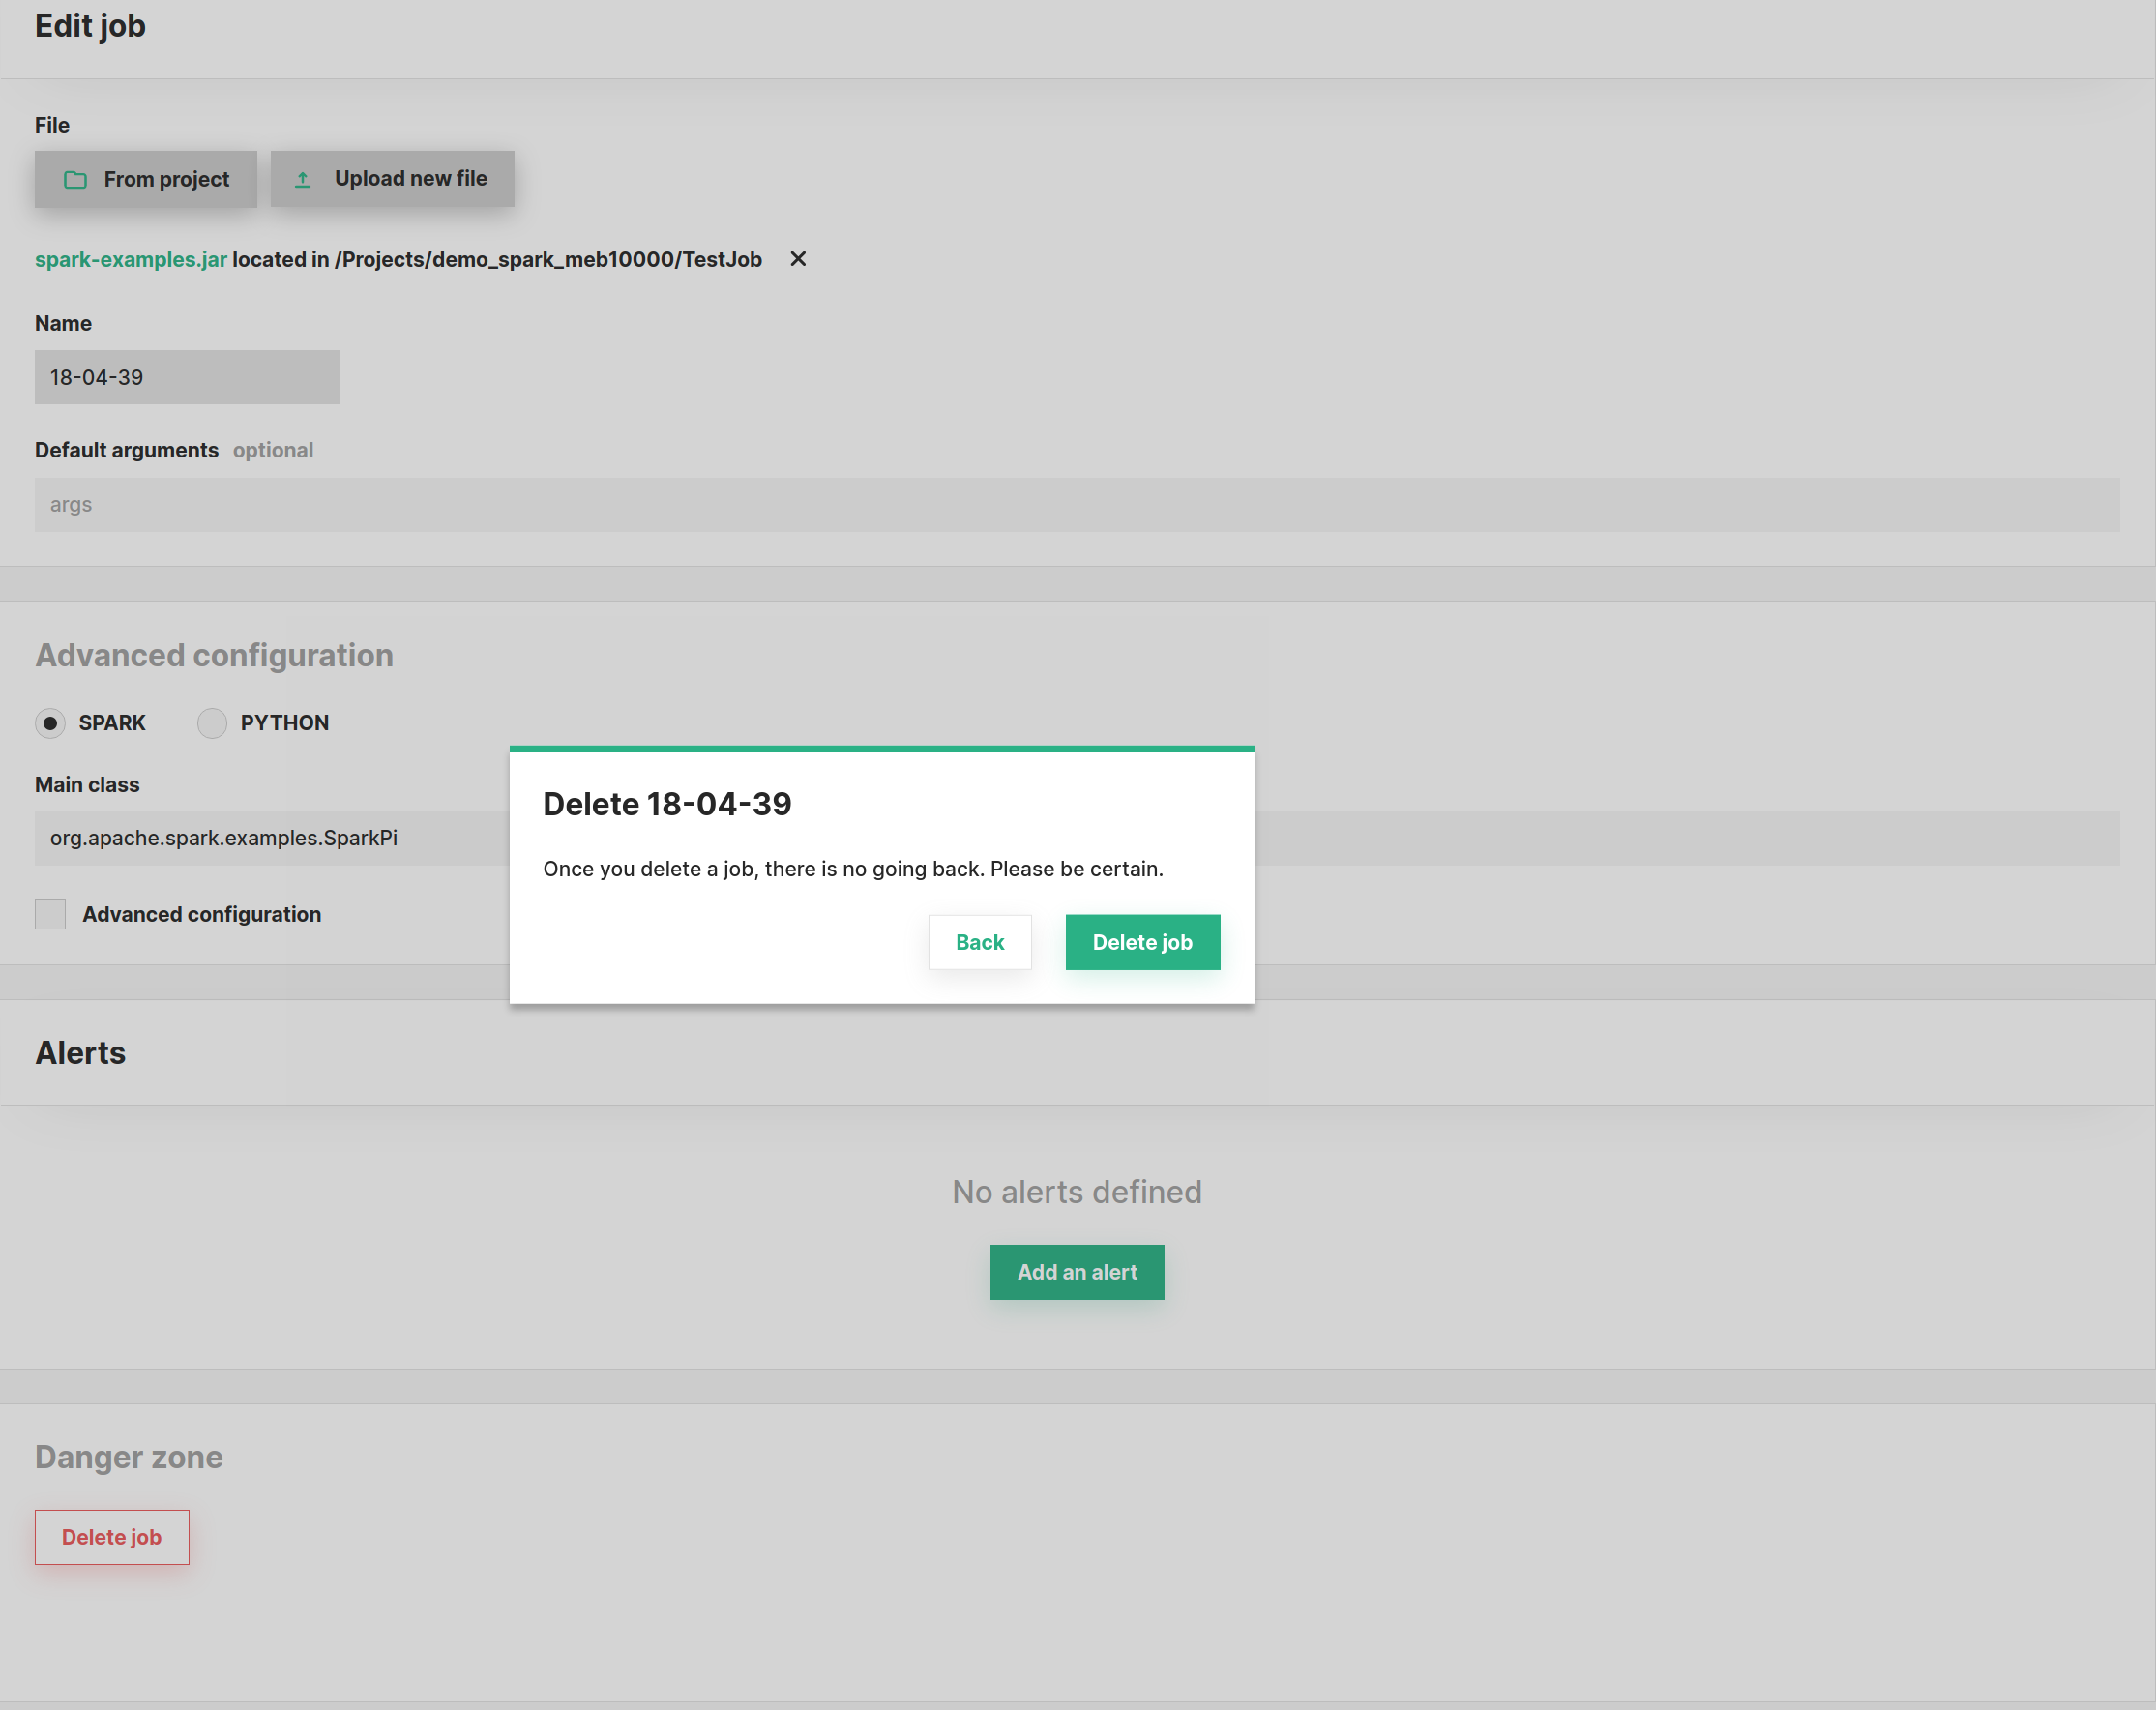
Edit & Delete#
You can edit a job from the Job's overview page. If you would like to quickly create a job based on the configuration of another job,
you can use the Make a copy button that will prompt you for a name for the new job and then immediately after create the new job.
From the same page, you can also delete a job as shown in the image below. Please note that when deleting a job, Hopsworks
will first attempt to gracefully terminate any pending executions of this job. All job logs will remain in the Logs dataset
and it is up to the user to clean them up if needed.
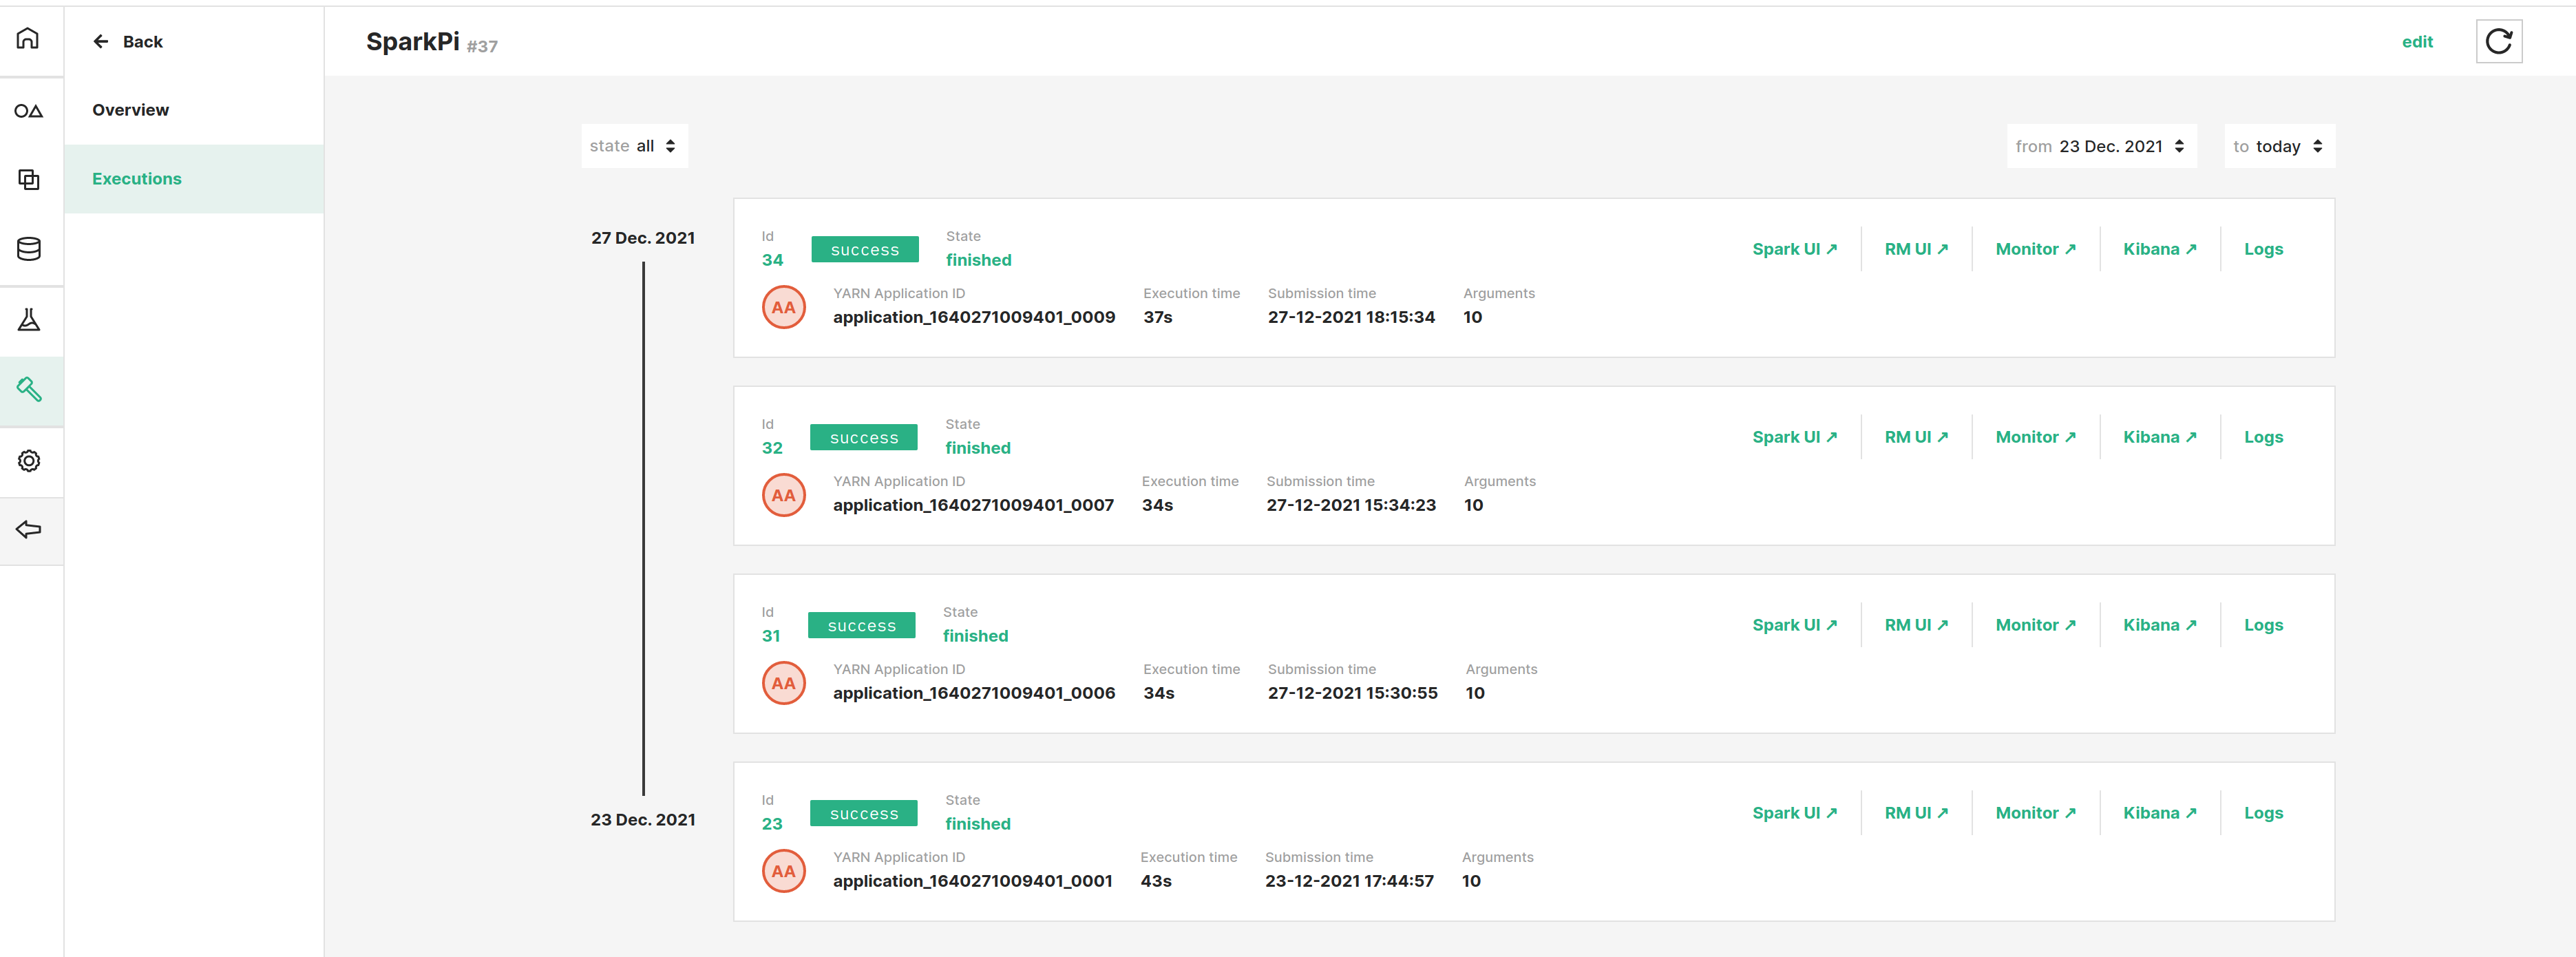
Executions#
You can execute a job multiple times concurrently with different input arguments. Each execution has an individual execution id
that identifies it. Execution logs are stored under the Logs dataset and are categorized per job type, name, execution(Python)/application(Spark) id.
Execute a job#
You can execute a job either using the Quick run option from the job's preview page, as shown in the image below, or from the job's overview page.
The difference between the two is that the latter will prompt you for input arguments whereas the former will use the default arguments, if any are provided.
This page also shows a list of the most recent executions. For a detailed list of executions for the job, you need navigate to the
executions page by clicking the view all executions link.
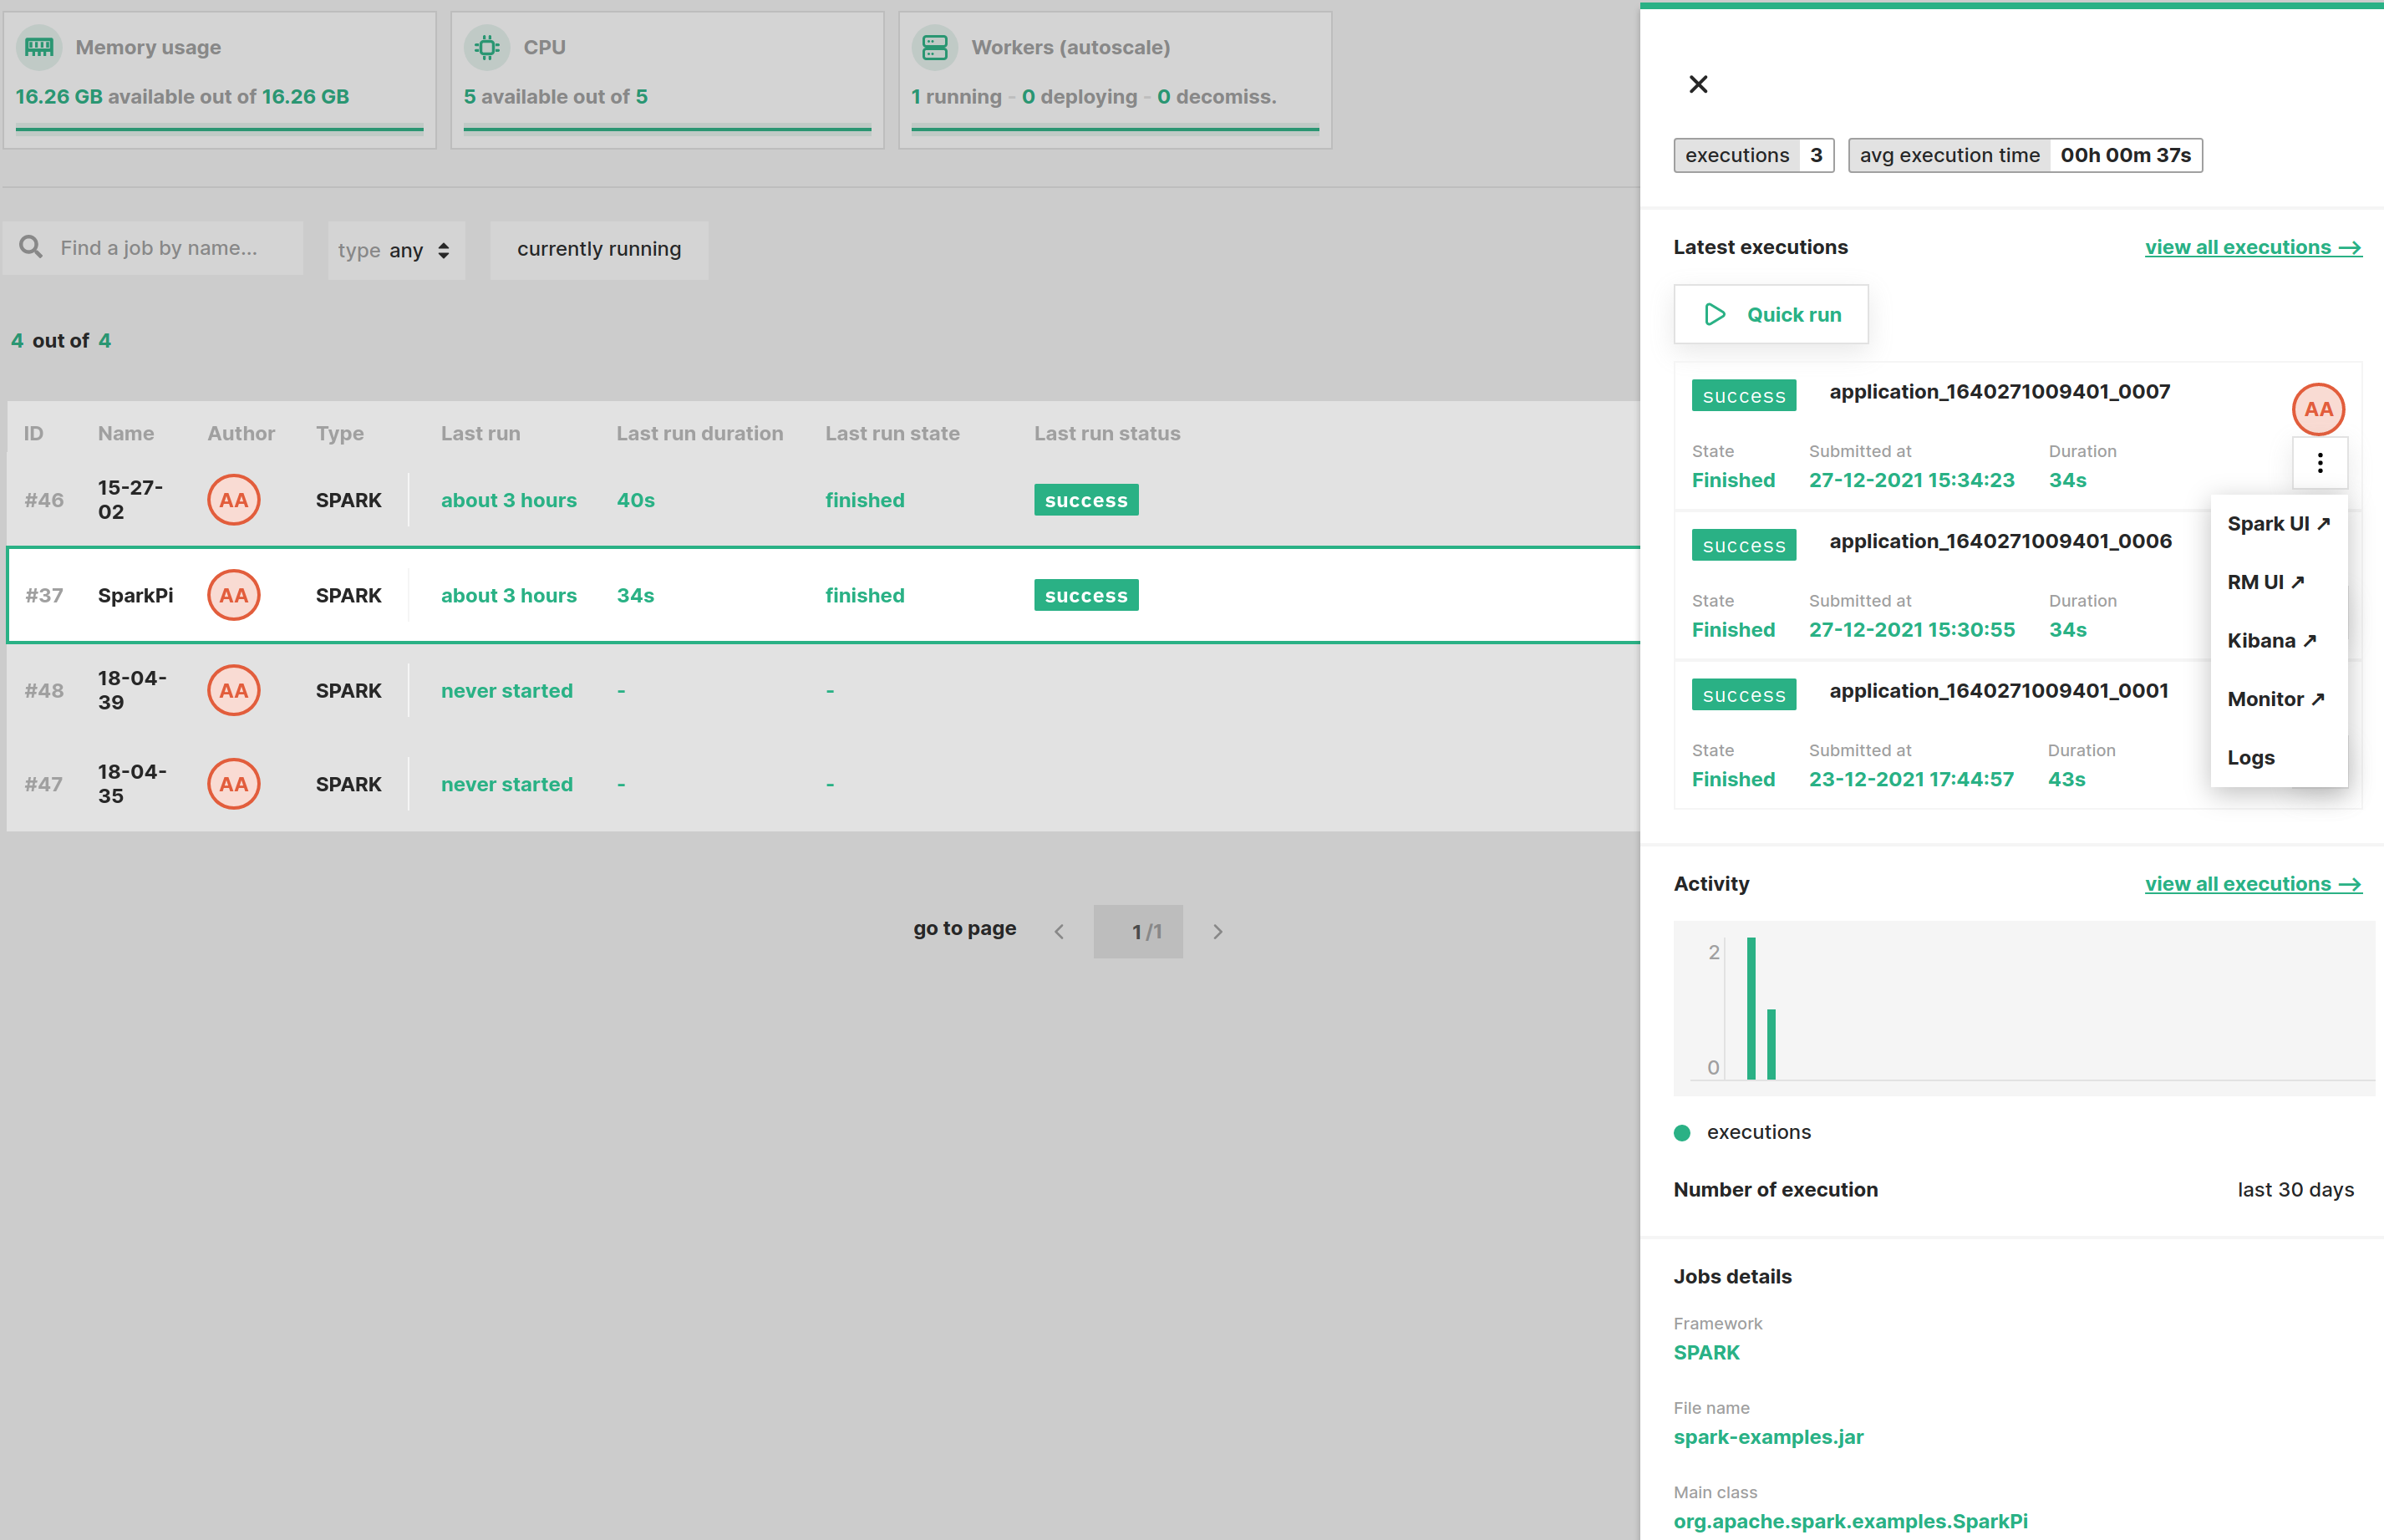
By default, a job can have a maximum of 10000 executions. This limit can be increased/lowered by a Hopsworks administrator.
Monitoring and Logging#
The executions page enables you to filter executions for the job based on the execution's date and state. You can view detailed information about each execution by following the various monitoring and logging links provided with each execution. In particular, you get access to the following dashboards/views for every execution:
- Spark UI: Applies to Spark/PySpark jobs only, a new tab will open showing the Spark application Web UI (see docs).
- RM UI: Applies to Spark/PySpark/Flink jobs only, a new tab will open showing the Apache Hadoop YARN page of the execution
- Kibana: Applies to Spark/PySpark/Flink jobs only, a new tab will open showing the execution logs in real-time as they are collected from all the containers the execution is distributed at.
- Logs: Shows the aggregated stdout/stderr logs of the execution. These logs are stored under the
Logsdataset.
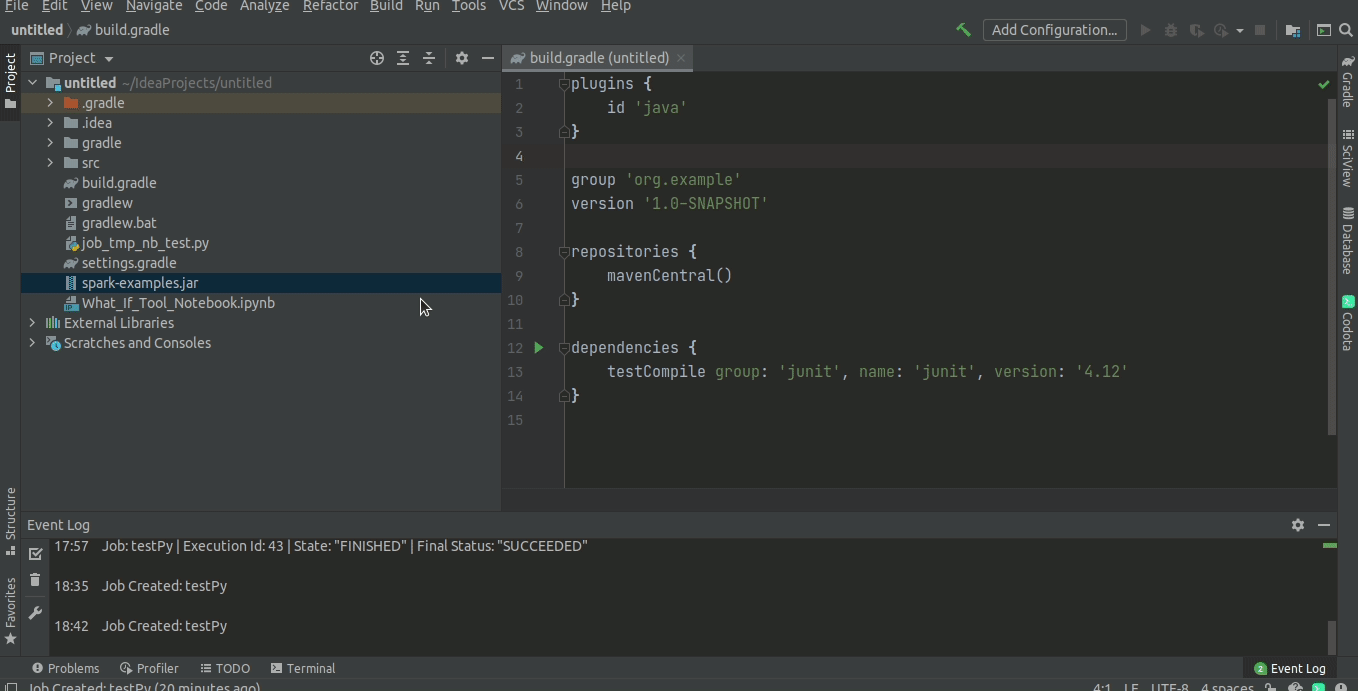
Hopsworks IDE Plugin#
It is also possible to work on jobs while developing in your IntelliJ/PyCharm IDE by installing the Hopsworks Plugin from the marketplace.
Usage
- Open the Hopsworks Job Preferences UI for specifying user preferences under Settings -> Tools -> Hopsworks Job Preferences.
- Input the Hopsworks project preferences and job details you wish to work on.
- Open a Project and within the Project Explorer, right click on the program ( .jar, .py, .ipynb) you wish to execute as a job on Hopsworks. Different job actions possible are available in the context menu ( Create, Run, Stop, etc.)
Actions
- Create: Create or update job as specified in Hopsworks Job Preferences
- Run: Uploads the program first to the HDFS path as specified and runs job
- Stop: Stops a job
- Delete: Deletes a job
- Job Execution Status / Job Execution Logs: Get the job status or logs respectively. You have the option of retrieving a particular job execution by specifying the execution id in the 'Hopsworks Job Preferences' UI, otherwise default is the last execution for the job name specified.