Hopsworks.ai Terraform Provider#
Managed.hopsworks.ai allows users to create and manage their clusters using the Hopsworks.ai terraform provider. In this guide, we first provide brief description on how to get started on AWS and AZURE, then we show how to import an existing cluster to be managed by terraform.
Getting Started with AWS#
Complete the following steps to start using Hopsworks.ai Terraform Provider on AWS.
- Create a managed.hopsworks.ai API KEY as described in details here, and export the API KEY as follows
export HOPSWORKSAI_API_KEY=<YOUR_API_KEY> - Download the proper Terraform CLI for your os from here.
- Install the AWS CLI and run
aws configurreto configure your AWS credentials.
Example#
In this section, we provide a simple example to create a Hopsworks cluster on AWS along with all its required resources (ssh key, S3 bucket, and instance profile with the required permissions).
- In your terminal, run the following to create a demo directory and cd to it
mkdir demo cd demo - In this empty directory, create an empty file
main.tf. Open the file and paste the following configurations to it then save it.terraform { required_providers { aws = { source = "hashicorp/aws" version = "4.16.0" } hopsworksai = { source = "logicalclocks/hopsworksai" } } } variable "region" { type = string default = "us-east-2" } provider "aws" { region = var.region } provider "hopsworksai" { } # Create the required aws resources, an ssh key, an s3 bucket, and an instance profile with the required Hopsworks permissions module "aws" { source = "logicalclocks/helpers/hopsworksai//modules/aws" region = var.region version = "2.2.0" } # Create a cluster with no workers resource "hopsworksai_cluster" "cluster" { name = "tf-hopsworks-cluster" ssh_key = module.aws.ssh_key_pair_name head { instance_type = "m5.2xlarge" } aws_attributes { region = var.region instance_profile_arn = module.aws.instance_profile_arn bucket { name = module.aws.bucket_name } } rondb { management_nodes { instance_type = "t3a.medium" } data_nodes { instance_type = "r5.large" } mysql_nodes { instance_type = "c5.large" } } open_ports { ssh = true } } output "hopsworks_cluster_url" { value = hopsworksai_cluster.cluster.url } - Initialize the terraform directory by running the following command
terraform init - Now you can apply the changes to create all required resources
terraform apply -
Once terraform finishes creating the resources, it will output the url to the newly created cluster. Notice that for now, you have to navigate to your managed.hopsworks.ai dashboard to get your login credentials.
-
After you finish working with the cluster, you can terminate it along with the other AWS resources using the following command
terraform destroy
Getting Started with AZURE#
Complete the following steps to start using Hopsworks.ai Terraform Provider on AZURE.
- Create a managed.hopsworks.ai API KEY as described in details here, and export the API KEY as follows
export HOPSWORKSAI_API_KEY=<YOUR_API_KEY> - Download the proper Terraform CLI for your os from here.
- Install the AZURE CLI and run
az loginto configure your AZURE credentials.
Example#
In this section, we provide a simple example to create a Hopsworks cluster on AZURE along with all its required resources (ssh key, storage account, acr registry, and user assigned managed identity with the required permissions).
- In your terminal, run the following to create a demo directory and cd to it
mkdir demo cd demo - In this empty directory, create an empty file
main.tf. Open the file and paste the following configurations to it then save it.terraform { required_providers { azurerm = { source = "hashicorp/azurerm" version = "3.8.0" } hopsworksai = { source = "logicalclocks/hopsworksai" } } } variable "resource_group" { type = string } provider "azurerm" { features {} skip_provider_registration = true } provider "hopsworksai" { } data "azurerm_resource_group" "rg" { name = var.resource_group } # Create the required azure resources, an ssh key, a storage account, and an user assigned managed identity with the required Hopsworks permissions module "azure" { source = "logicalclocks/helpers/hopsworksai//modules/azure" resource_group = var.resource_group version = "2.2.0" } # Create an ACR registry resource "azurerm_container_registry" "acr" { name = replace(module.azure.storage_account_name, "storageaccount", "acr") resource_group_name = module.azure.resource_group location = module.azure.location sku = "Premium" admin_enabled = false retention_policy { enabled = true days = 7 } } # Create a cluster with no workers resource "hopsworksai_cluster" "cluster" { name = "tf-hopsworks-cluster" ssh_key = module.azure.ssh_key_pair_name head { instance_type = "Standard_D8_v3" } azure_attributes { location = module.azure.location resource_group = module.azure.resource_group user_assigned_managed_identity = module.azure.user_assigned_identity_name container { storage_account = module.azure.storage_account_name } acr_registry_name = azurerm_container_registry.acr.name } rondb { management_nodes { instance_type = "Standard_D2s_v4" } data_nodes { instance_type = "Standard_D4s_v4" } mysql_nodes { instance_type = "Standard_D2s_v4" } } open_ports { ssh = true } } output "hopsworks_cluster_url" { value = hopsworksai_cluster.cluster.url } - Initialize the terraform directory by running the following command
terraform init - Now you can apply the changes to create all required resources. Replace the placeholders with your Azure resource group
terraform apply -var="resource_group=<YOUR_RESOURCE_GROUP>" -
Once terraform finishes creating the resources, it will output the url to the newly created cluster. Notice that for now, you have to navigate to your managed.hopsworks.ai dashboard to get your login credentials.
-
After you finish working with the cluster, you can terminate it along with the other AZURE resources using the following command
terraform destroy -var="resource_group=<YOUR_RESOURCE_GROUP>"
Importing an existing cluster to terraform#
In this section, we show how to use terraform import to manage your existing Hopsworks cluster.
- Step 1: In your managed.hopsworks.ai dashboard, choose the cluster you want to import to terraform, then go to the Details tab and copy the Id as shown in the figure below
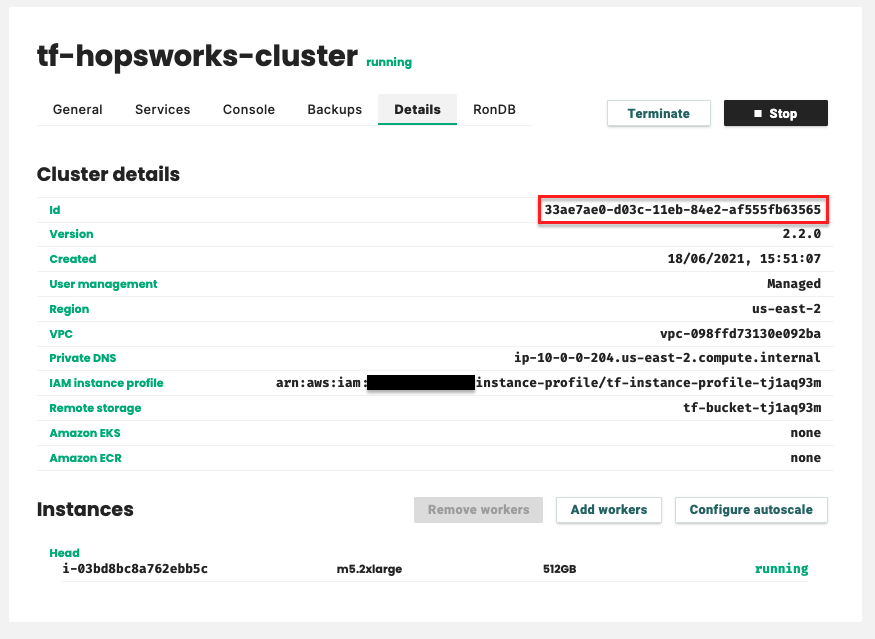
-
Step 2: In your terminal, create an empty directory and cd to it.
mkdir import-demo cd import-demo -
Step 3: In this empty directory, create an empty file
versions.tf. Open the file and paste the following configurations.
Note
Notice that you need to change these configurations depending on your cluster, in this example, the Hopsworks cluster reside in region us-east-2 on AWS.
terraform {
  required_providers {
    aws = {
      source  = "hashicorp/aws"
      version = "4.16.0"
    }
    hopsworksai = {
      source = "logicalclocks/hopsworksai"
    }
  }
}

provider "aws" {
  region = us-east-2
}

provider "hopsworksai" {
}
-
Step 4: Initialize the terraform directory by running the following command
terraform init -
Step 5: Create another file
main.tf. Open the file and paste the following configuration.resource "hopsworksai_cluster" "cluster" { } -
Step 6: Import the cluster state using
terraform import, in this step you need the cluster id from Step 1 (33ae7ae0-d03c-11eb-84e2-af555fb63565).terraform import hopsworksai_cluster.cluster 33ae7ae0-d03c-11eb-84e2-af555fb63565
The output should be similar to the following snippet
hopsworksai_cluster.cluster: Importing from ID "33ae7ae0-d03c-11eb-84e2-af555fb63565"...
hopsworksai_cluster.cluster: Import prepared!
  Prepared hopsworksai_cluster for import
hopsworksai_cluster.cluster: Refreshing state... [id=33ae7ae0-d03c-11eb-84e2-af555fb63565]

Import successful!

The resources that were imported are shown above. These resources are now in
your Terraform state and will henceforth be managed by Terraform.
-
Step 7: At that moment the local terraform state is updated, however, if we try to run
terraform planorterraform applyit will complain about missing configurations. The reason is that our local resource configuration inmain.tfis empty, we should populate it using the terraform state commands as shown below:terraform show -no-color > main.tf -
Step 8: If you try to run
terraform planagain, the command will complain that the read-only attributes are set (Computed attributes) as shown below. The solution is to remove these attributes from themain.tfand retry again until you have no errors.Error: Computed attributes cannot be set on main.tf line 3, in resource "hopsworksai_cluster" "cluster": 3: activation_state = "stoppable" Computed attributes cannot be set, but a value was set for "activation_state". Error: Computed attributes cannot be set on main.tf line 6, in resource "hopsworksai_cluster" "cluster": 6: cluster_id = "33ae7ae0-d03c-11eb-84e2-af555fb63565" Computed attributes cannot be set, but a value was set for "cluster_id". Error: Computed attributes cannot be set on main.tf line 7, in resource "hopsworksai_cluster" "cluster": 7: creation_date = "2021-06-18T15:51:07+02:00" Computed attributes cannot be set, but a value was set for "creation_date". Error: Invalid or unknown key on main.tf line 8, in resource "hopsworksai_cluster" "cluster": 8: id = "33ae7ae0-d03c-11eb-84e2-af555fb63565" Error: Computed attributes cannot be set on main.tf line 13, in resource "hopsworksai_cluster" "cluster": 13: start_date = "2021-06-18T15:51:07+02:00" Computed attributes cannot be set, but a value was set for "start_date". Error: Computed attributes cannot be set on main.tf line 14, in resource "hopsworksai_cluster" "cluster": 14: state = "running" Computed attributes cannot be set, but a value was set for "state". Error: Computed attributes cannot be set on main.tf line 17, in resource "hopsworksai_cluster" "cluster": 17: url = "https://33ae7ae0-d03c-11eb-84e2-af555fb63565.dev-cloud.hopsworks.ai/hopsworks/#!/" Computed attributes cannot be set, but a value was set for "url". -
Step 9: Once you have fixed all the errors, you should get the following output when running
terraform plan. With that, you can proceed as normal to manage this cluster locally using terraform.hopsworksai_cluster.cluster: Refreshing state... [id=33ae7ae0-d03c-11eb-84e2-af555fb63565] No changes. Infrastructure is up-to-date. This means that Terraform did not detect any differences between your configuration and real physical resources that exist. As a result, no actions need to be performed.
Next Steps#
- Check the Hopsworks.ai terraform provider documentation for more details about the different resources and data sources supported by the provider and a description of their attributes.
- Check the Hopsworks.ai terraform AWS examples, each example contains a README file describing how to run it and more details about configuring it.
- Check the Hopsworks.ai terraform AZURE examples, each example contains a README file describing how to run it and more details about configuring it.