How-To set up a S3 Storage Connector#
Introduction#
Amazon S3 or Amazon Simple Storage Service is a service offered by AWS that provides object storage. That means you can store arbitrary objects associated with a key. These kind of storage systems are often used as Data Lakes with large volumes of unstructured data or file based storage. Popular file formats are CSV or PARQUET.
There are so called Data Lake House technologies such as Delta Lake or Apache Hudi, building an additional layer on top of object based storage with files, to provide database semantics like ACID transactions among others. This has the advantage that cheap storage can be turned into a cloud native data warehouse. These kind of storages are often the source for raw data from which features can be engineered.
In this guide, you will configure a Storage Connector in Hopsworks to save all the authentication information needed in order to set up a connection to your AWS S3 bucket. When you're finished, you'll be able to read files using Spark through HSFS APIs. You can also use the connector to write out training data from the Feature Store, in order to make it accessible by third parties.
Note
Currently, it is only possible to create storage connectors in the Hopsworks UI. You cannot create a storage connector programmatically.
Prerequisites#
Before you begin this guide you'll need to retrieve the following information from your AWS S3 account and bucket:
- Bucket: You will need a S3 bucket that you have access to. The bucket is identified by its name.
- Authentication Method: You can authenticate using Access Key/Secret, or use IAM roles. If you want to use an IAM role it either needs to be attached to the entire Hopsworks cluster or Hopsworks needs to be able to assume the role. See IAM role documentation for more information.
- Server Side Encryption details: If your bucket has server side encryption (SSE) enabled, make sure you know which algorithm it is using (AES256 or SSE-KMS). If you are using SSE-KMS, you need the resource ARN of the managed key.
Creation in the UI#
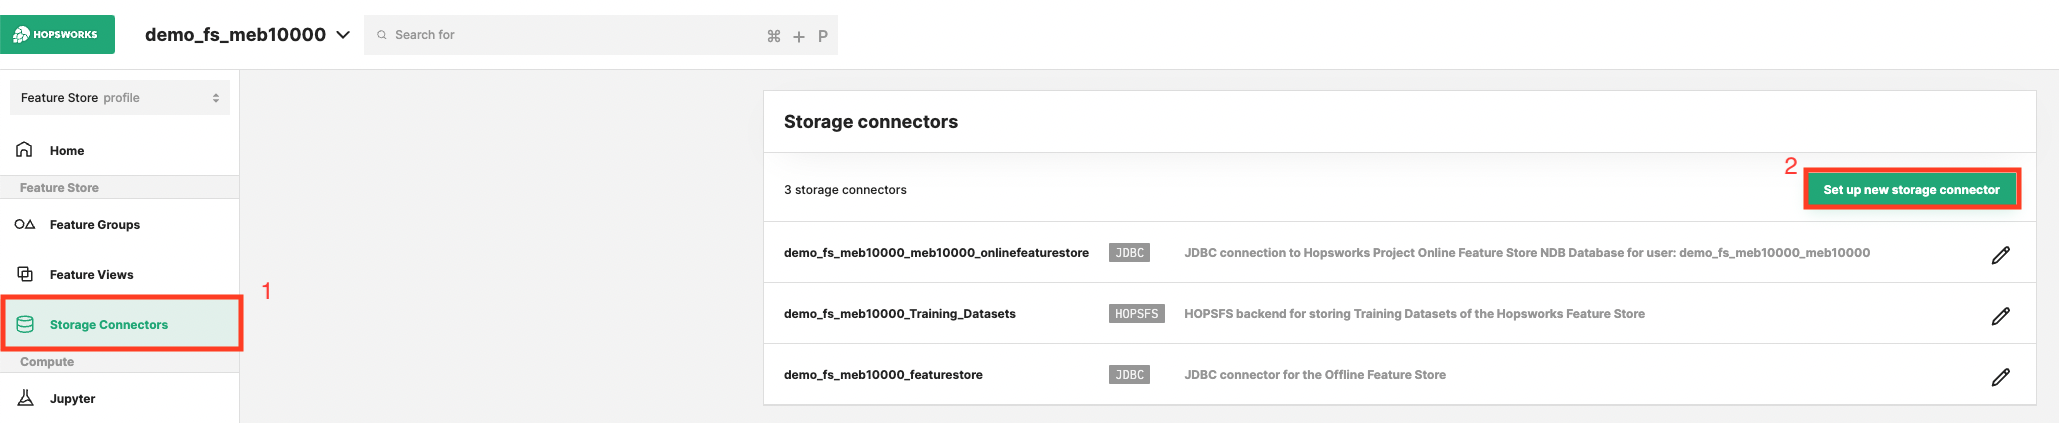
Step 1: Set up new storage connector#
Head to the Storage Connector View on Hopsworks (1) and set up a new storage connector (2).
Step 2: Enter Bucket Information#
Enter the details for your S3 connector. Start by giving it a name and an optional description. And set the name of the S3 Bucket you want to point the connector to.
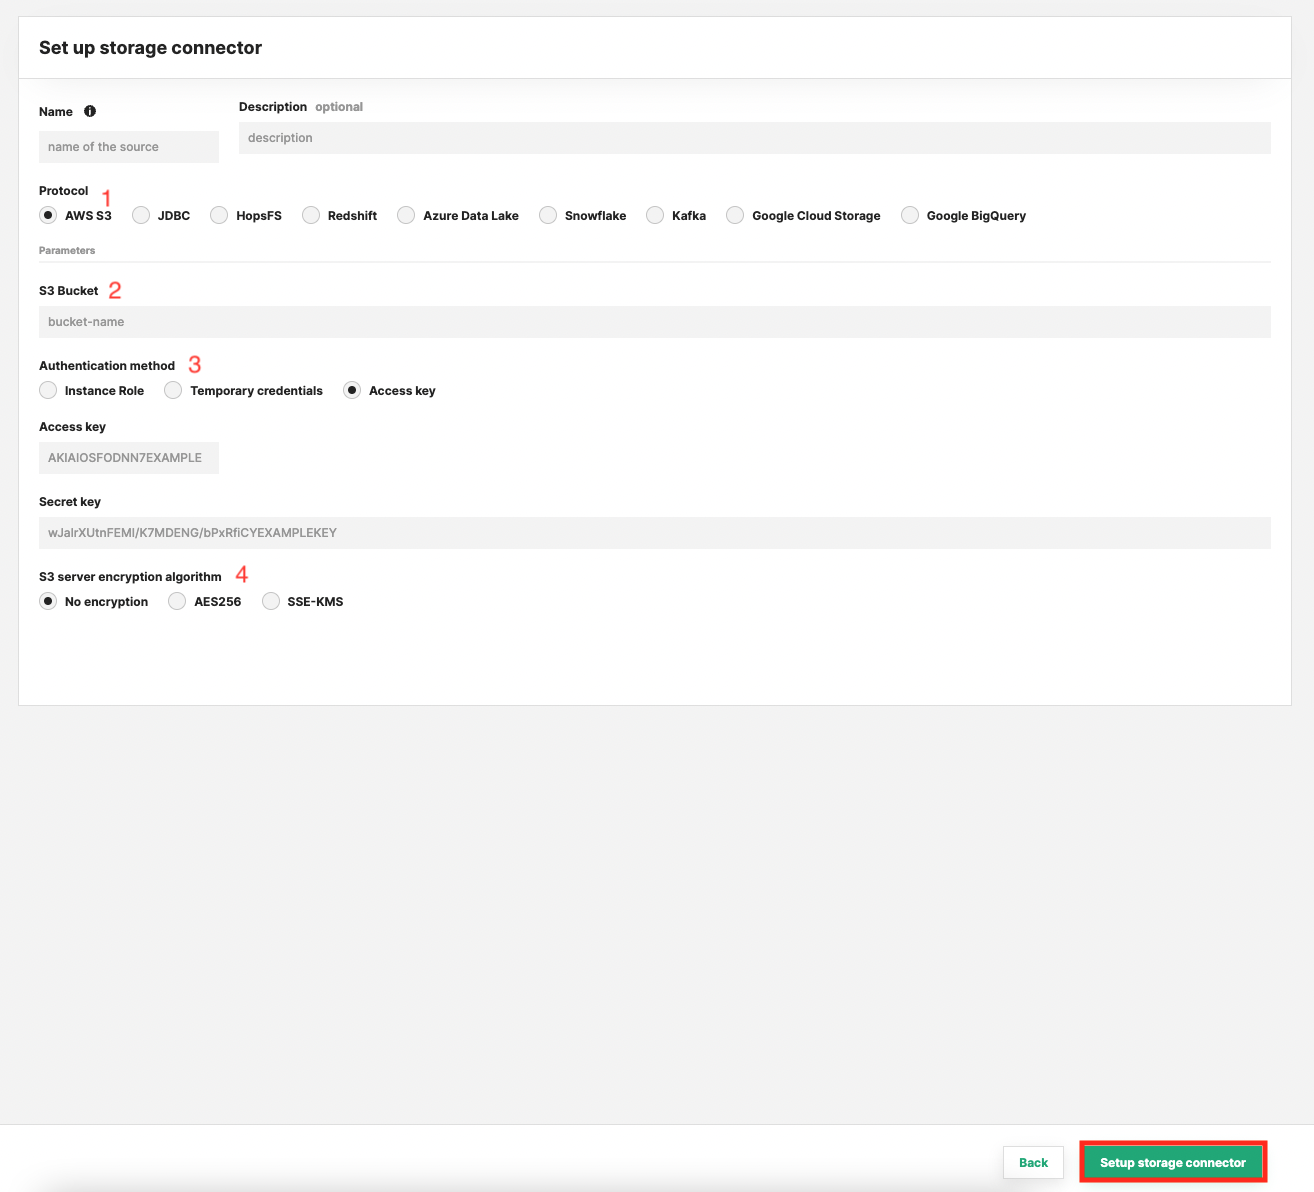
Step 3: Configure Authentication#
Instance Role#
Choose instance role if you have an EC2 instance profile attached to your Hopsworks cluster nodes with a role which grants you access to the specified bucket.
Temporary Credentials#
Choose temporary credentials if you are using AWS Role chaining to control the access permission on a project and user role base. Once you have selected Temporary Credentials select the role that give access to the specified bucket. For this role to appear in the list it needs to have been configured by an administrator, see the AWS Role chaining documentation for more details.
Session Duration
By default, the session duration that the role will be assumed for is 1 hour or 3600 seconds. This means if you want to use the storage connector for example to write training data to S3, the training dataset creation cannot take longer than one hour.
Your administrator can change the default session duration for AWS storage connectors, by first increasing the max session duration of the IAM Role that you are assuming. And then changing the fs_storage_connector_session_duration configuration variable to the appropriate value in seconds.
Access Key/Secret#
The most simple authentication method are Access Key/Secret, choose this option to get started quickly, if you are able to retrieve the keys using the IAM user administration.
Step 4: Configure Server Side Encryption#
Additionally, you can specify if your Bucket has SSE enabled.
AES256#
For AES256, there is nothing to do but enabling the encryption by toggling the AES256 option. This is using S3-Managed Keys, also called SSE-S3.
SSE-KMS#
With this option the encryption key is managed by AWS KMS, with some additional benefits and charges for using this service. The difference is that you need to provide the resource ARN of the key.
If you have SSE-KMS enabled for your bucket, you can find the key ARN in the "Properties" section of the bucket details on AWS.
Next Steps#
Move on to the usage guide for storage connectors to see how you can use your newly created S3 connector.